
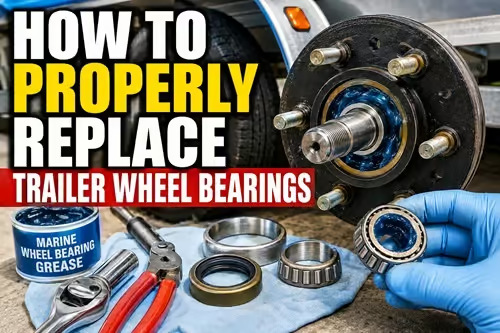
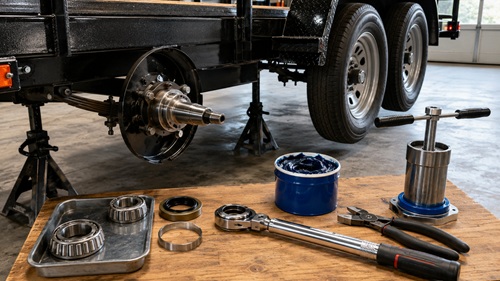
Trailer wheel bearings are one of those components that can work quietly for years and then suddenly leave a trailer stranded on the side of the road. A bearing does not usually fail because it simply became “old.” Failures are more often connected to lost lubrication, water contamination, damaged seals, incorrect bearing adjustment, excessive loads, corrosion, or neglected maintenance. Once a bearing begins overheating or breaking apart, damage can spread from the bearing to the hub and spindle very quickly.
For a prepper, homesteader, camper, or anyone who relies on trailers to move equipment, livestock, boats, generators, water, fuel, building materials, or emergency supplies, understanding trailer bearings is an important practical skill. A trailer may become far more valuable during an emergency than it is during everyday life, but only if it can still roll safely.
Replacing trailer wheel bearings is not especially complicated, but precision matters. Cleanliness matters. Correct bearing adjustment matters. Simply installing new parts is not enough. The goal is to restore the hub so the bearings run smoothly, remain lubricated, stay correctly positioned on the spindle, and remain protected from contamination.
Understand the Hub Before Taking It Apart
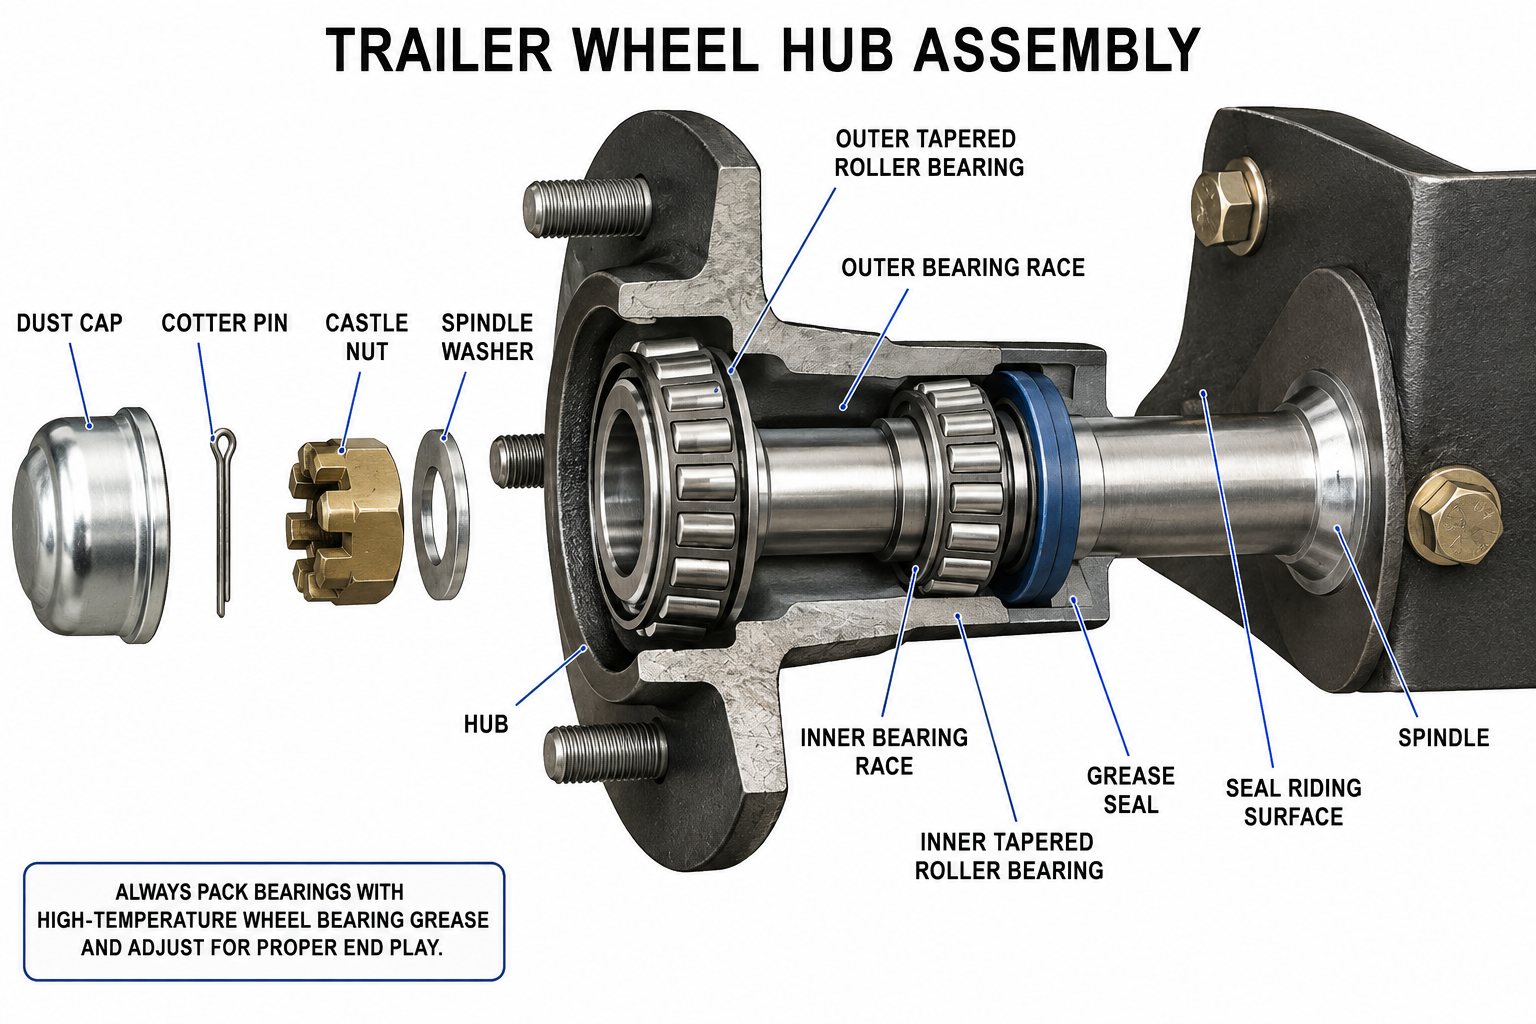
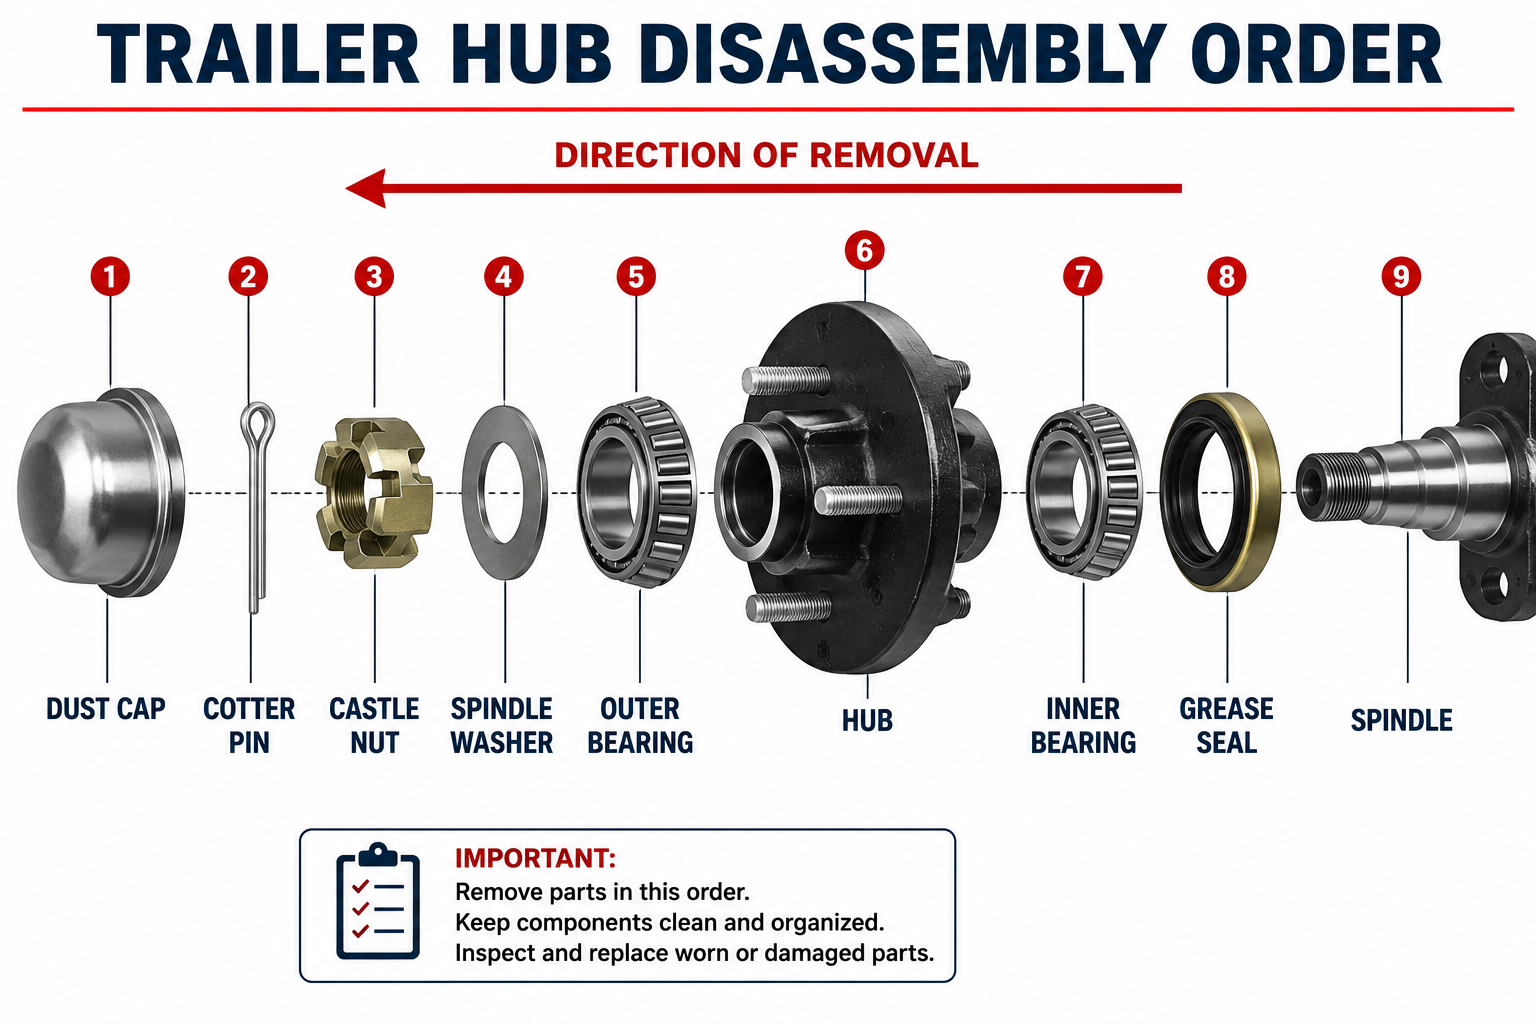
Most serviceable trailer hubs use tapered roller bearings. Inside the hub are two bearings: an inner bearing toward the trailer and an outer bearing closer to the end of the spindle. Each bearing runs against a hardened steel bearing race pressed into the hub.
Behind the inner bearing is a grease seal. Its job is to retain lubricant while helping prevent water and dirt from entering the hub. At the front of the hub, a washer and spindle nut control how tightly the tapered bearings are positioned against their races. The nut is normally secured using a cotter pin, retaining cage, tang washer, or another locking system.
A dust cap closes the front of the hub. Some trailers instead use greaseable bearing protectors or other lubrication systems.
Understanding this arrangement before disassembly makes the repair much easier because every component has a specific purpose and orientation.
Recognizing a Bearing Problem Before Failure
Whenever possible, catch bearing problems before the wheel stops turning.
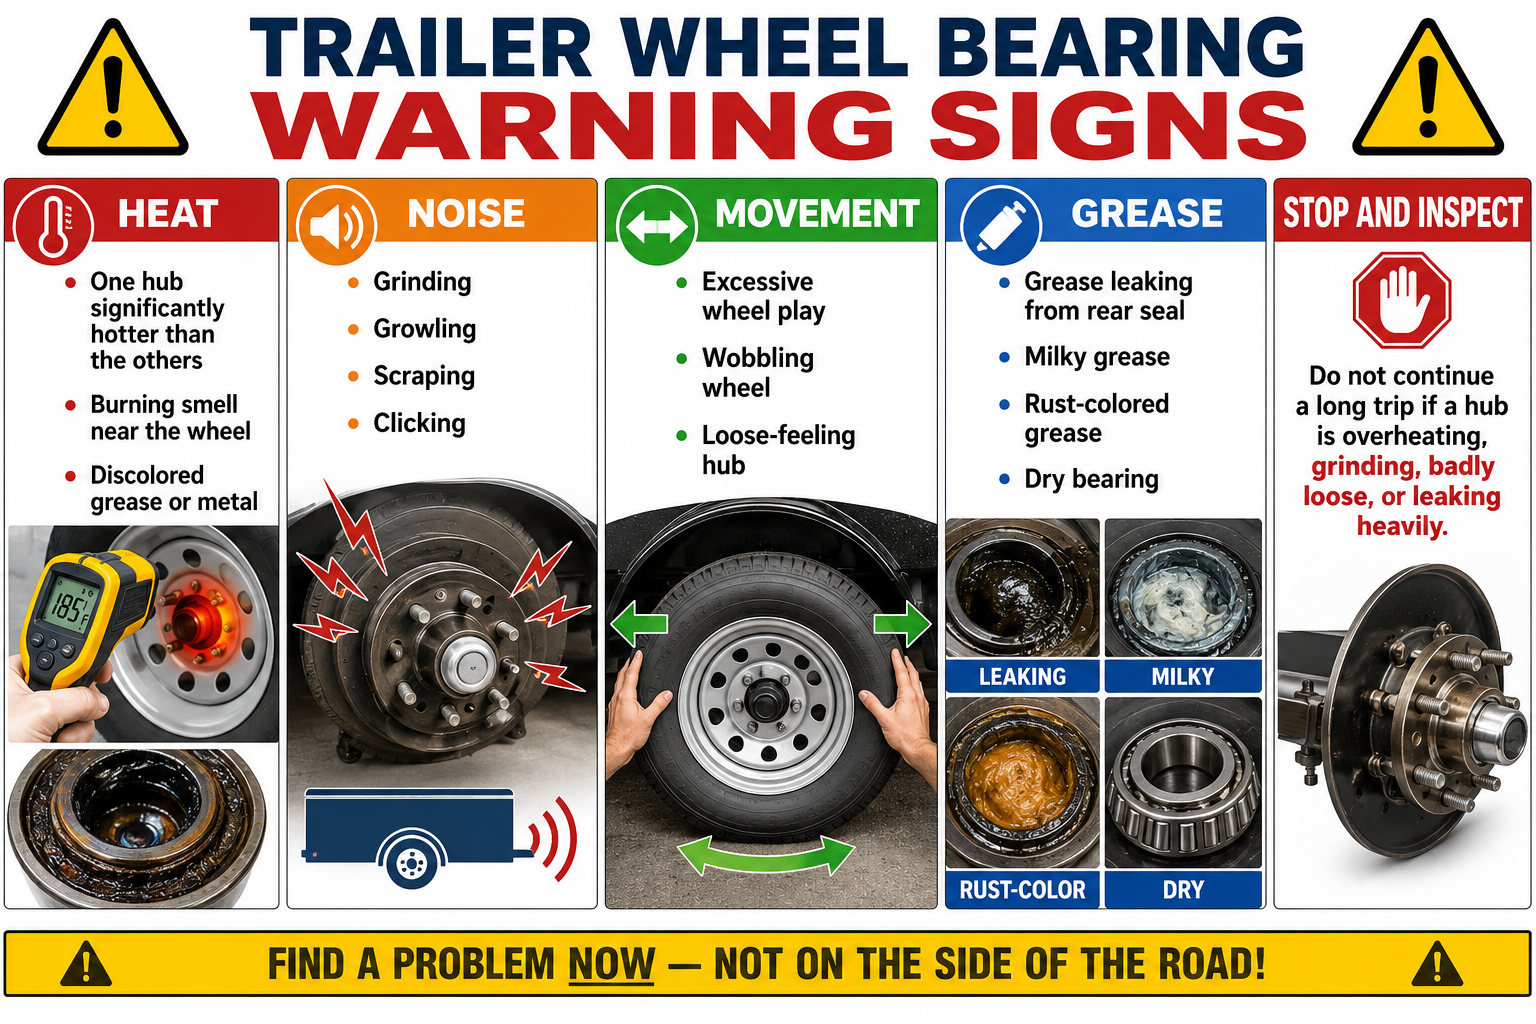
A healthy trailer hub should rotate smoothly without grinding or rumbling. There should not be excessive wheel movement when the tire is rocked from side to side. Grease should remain inside the hub rather than being thrown across the wheel or leaking heavily around the rear seal.
Unusual heat is another warning sign. During a trip, hubs normally become somewhat warm from friction and braking, but one hub running substantially hotter than the others deserves attention.
A growling, scraping, clicking, or grinding sound can indicate damaged bearing surfaces. Excessive looseness may indicate poor adjustment or bearing wear. Grease appearing gray, rusty, watery, or milky suggests contamination.
If any of these conditions appear, investigate before continuing a long trip.
A bearing that completely fails can destroy the spindle, damage the hub, allow the wheel to tilt severely, damage braking components, or in extreme cases contribute to wheel separation.
Prepare the Correct Parts Before Beginning
Trailer bearings cannot always be identified reliably from the trailer’s year and model because different axle and hub combinations may have been installed.
One of the most dependable methods is identifying the numbers stamped into the existing bearings and races. The inner and outer bearings should both be checked because they may use different sizes.
Clean enough grease from the old bearing to locate its identification number. Record it before discarding the component. Do the same with the race.
The grease seal may also have identifying information, although old seals are frequently damaged, rusty, or unreadable by the time they are removed. When necessary, obtain the proper seal from the axle or hub specifications or determine the required dimensions accurately with a caliper.
Do not purchase bearings simply because they look similar. Small dimensional differences can make an apparently correct component unusable or unsafe.
Whenever practical, have the new bearings, races, seals, cotter pins, and correct grease ready before disabling the trailer.
Choose the Right Bearing Grease
Trailer wheel bearings require grease designed for high-load bearing service. Boat trailers introduce another problem because the hubs may repeatedly be submerged in water, making water resistance especially important.
Avoid mixing incompatible grease types simply because both products are labeled as bearing grease. If the existing grease type is unknown and the bearings are being completely serviced, remove the old grease thoroughly and use one suitable grease consistently.
New tapered bearings also need grease forced through the rollers before installation. Coating the outside of a dry bearing is not enough.
Make the Trailer Safe to Work On
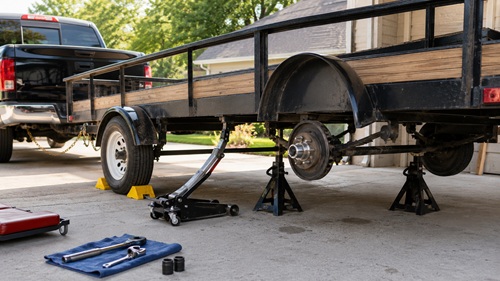
Park the trailer on a firm, level surface whenever conditions permit.
If appropriate for the trailer and tow vehicle, keeping the trailer connected to the vehicle can add stability, but connection to a vehicle is not a substitute for wheel chocks and jack stands.
Chock the wheels remaining on the ground so the trailer cannot roll in either direction.
Before raising the wheel, loosen the lug nuts slightly. Do not remove them yet. Breaking the nuts loose while the tire is still on the ground prevents the wheel from spinning and avoids applying high torque to a suspended trailer.
Locate a structurally appropriate lifting point. Trailer designs vary significantly, so follow the trailer or axle manufacturer’s lifting recommendations rather than assuming any convenient part of the suspension can safely support the trailer.
Raise the trailer only high enough to clear the tire.
Support the Trailer Before Removing the Wheel
A hydraulic jack is a lifting device, not a safe long-term support.
Place properly rated jack stands beneath suitable structural points and carefully lower the trailer onto them. Confirm that the trailer is stable before continuing.
Leaving the jack lightly positioned beneath the trailer can provide additional backup, but the trailer should never depend solely on hydraulic pressure while someone is working around the wheel and hub.
Finish removing the lug nuts and lift the wheel from the hub.
This is also a good opportunity to inspect the tire for cracking, dry rot, tread separation, unusual wear, exposed cords, or sidewall damage.
A freshly serviced hub does little good if the tire attached to it is unsafe.
Remove the Dust Cap
The center of the hub will normally be protected by a dust cap or grease protector.
A standard pressed-in dust cap can often be loosened by gently tapping around its edges with a rubber mallet. Work around the circumference rather than hammering aggressively against one side.
If the cap will be reused, avoid crushing or bending it.
Once removed, wipe away enough grease to expose the spindle nut and retaining hardware.
At this point, take a photograph if you are unfamiliar with the assembly. A quick reference showing the washer, nut, cotter pin, and other hardware can be useful during reassembly.
Remove the Spindle Retainer
If the spindle uses a cotter pin, straighten the bent ends with pliers and pull the pin completely out.
Discard it.
A cotter pin is a small and inexpensive safety component. Reusing a fatigued or badly bent pin is unnecessary.
Other axles may use a retaining cage, locking washer, tab system, or different arrangement. Note exactly how that system is installed before removing it.
Never assume that one axle’s retaining method applies to another.
Remove the Spindle Nut
Remove the spindle nut carefully.
A correctly adjusted tapered-bearing spindle nut may feel surprisingly loose compared with an ordinary structural nut. That is not necessarily a problem. The nut is used to establish bearing position and endplay rather than to clamp the assembly together with maximum force.
Remove the washer behind the nut and place it somewhere clean.
Inspect the washer. Deep grooves, heavy wear, deformation, or damage may justify replacement because the washer bears directly against the outer bearing.
Slide the Hub Off the Spindle
Pull the hub outward slowly.
The outer bearing will become accessible as the hub moves away from the spindle. Be ready to catch it rather than allowing it to drop onto the ground.
Remove the outer bearing and place it on a clean surface if it will be inspected.
Then slide the hub completely off the spindle.
Do not allow the open hub to sit in sand, dirt, gravel, grass, or shop debris. Bearing components are precision parts, and even small abrasive particles trapped in grease can shorten their life considerably.
Remove the Rear Grease Seal
Turn the hub so the rear seal faces upward.
A seal puller makes removal straightforward. Carefully work the tool beneath the seal and pry it upward without gouging the hub.
Once the seal is removed, lift out the inner bearing.
The old seal should normally be replaced rather than reused. Even when a seal appears intact, removal may distort its shell or sealing lip.
A new grease seal costs very little compared with the consequences of contaminating a new bearing.
Read the Old Bearings Before Throwing Them Away
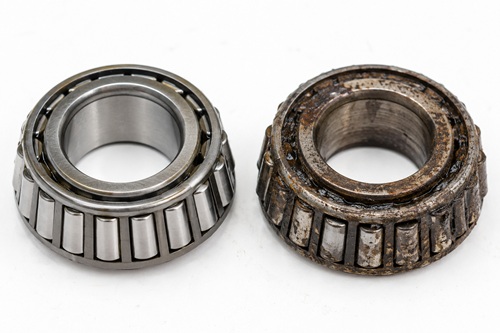
Old bearings can tell the story of what has been happening inside the hub.
Clean them sufficiently to inspect the rollers and races.
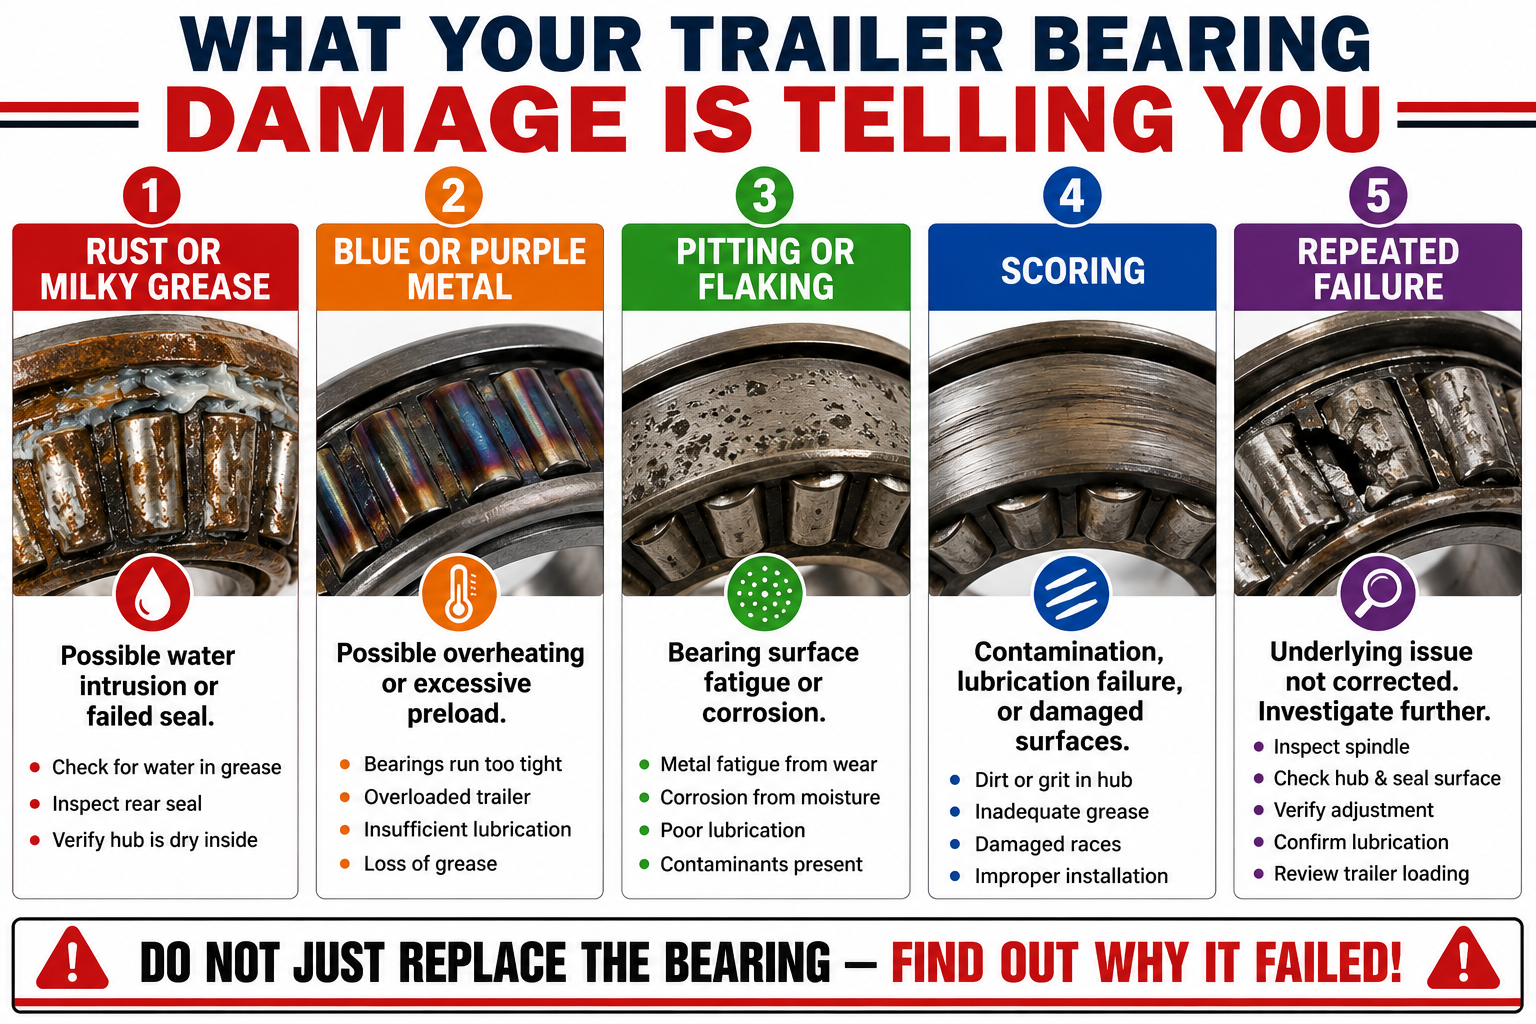
Smooth, polished bearing surfaces are normal. Pitting, flaking, scoring, rust, roughness, cracks, or obvious discoloration are not.
Blue, purple, or dark heat marks can indicate excessive operating temperature. That may have resulted from insufficient lubrication, excessive bearing preload, heavy loading, damaged components, or another source of friction.
Rust indicates that moisture entered the hub.
Pitting may begin as tiny imperfections but eventually creates rough running surfaces capable of damaging the entire bearing.
If one bearing failed badly, do not automatically assume the bearing itself was the original cause. Look for the reason.
Remove the Bearing Races
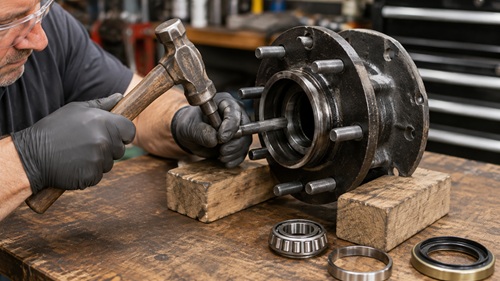
The bearing races are hardened steel cups pressed into the hub.
Whenever the bearings are being replaced because of wear, damage, or contamination, the matching races should generally be replaced as well.
Installing a new bearing against a damaged old race means the new bearing immediately begins running on an already compromised surface.
First remove the old grease from inside the hub so the back edge of each race is visible.
Support the hub securely while leaving enough room beneath the race for it to exit.
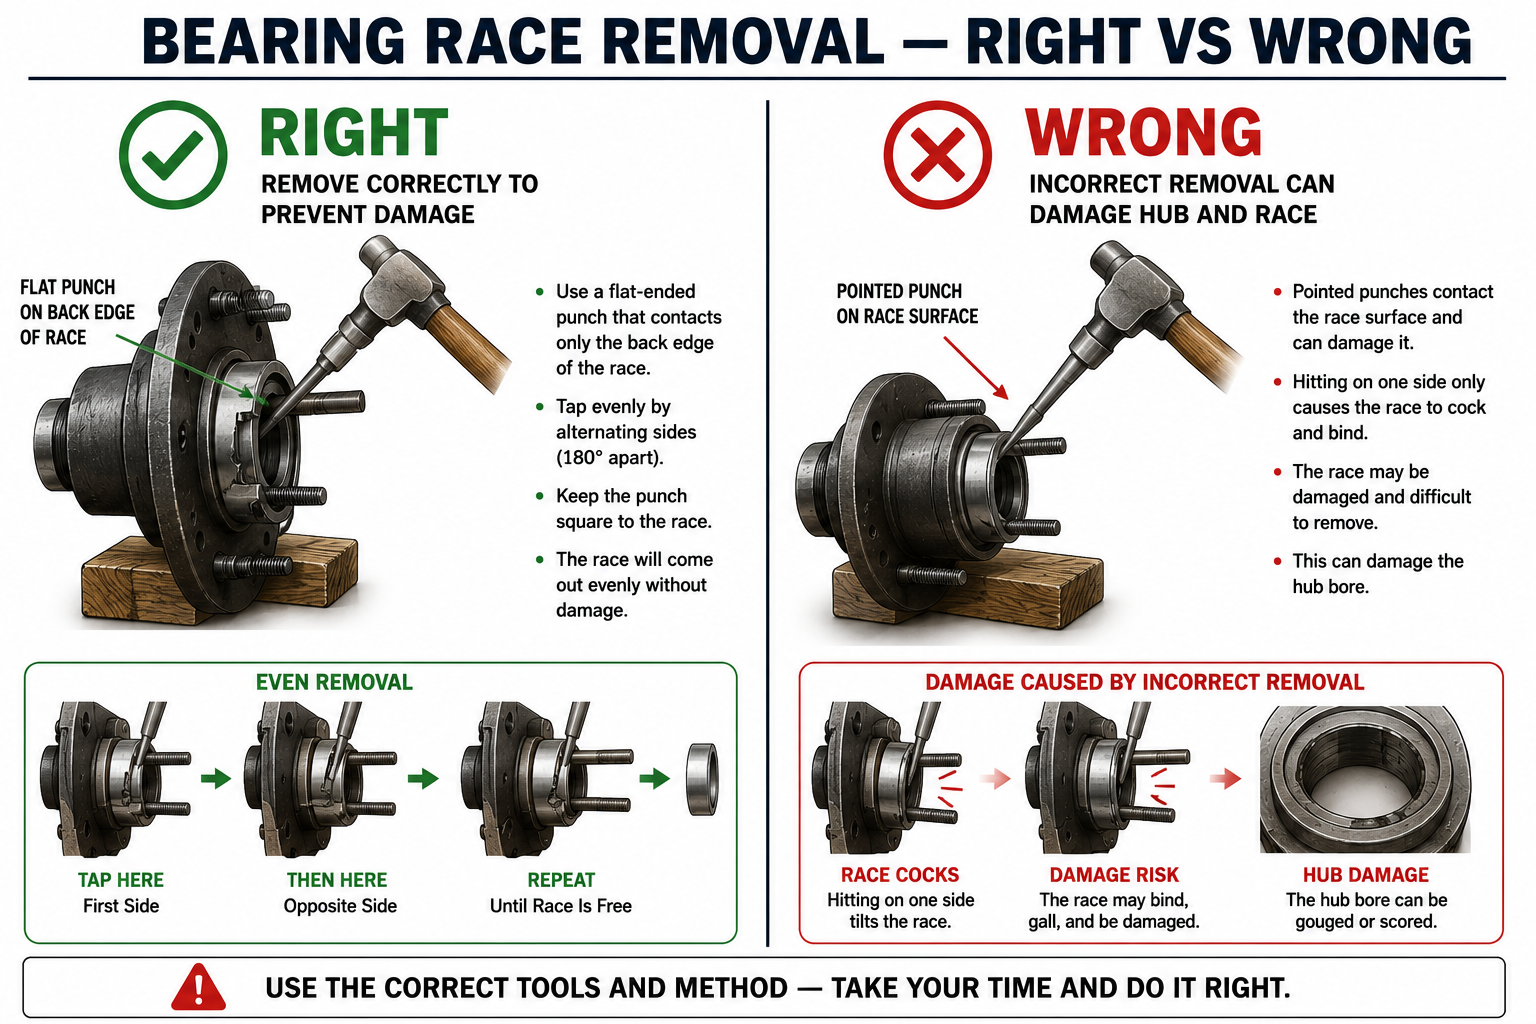
Position a flat-ended punch against the rear edge of the race and strike it firmly with a hammer.
Move the punch to the opposite side and strike again.
Continue moving around the circumference. The race should gradually move outward while remaining reasonably straight.
Do not repeatedly hammer only one point. Doing so can tilt the race in the bore and make removal more difficult.
Repeat the process for the second race.
Clean the Hub Completely
Once everything is removed, thoroughly clean the hub.
Old grease should not remain packed into hidden corners along with dirt, rust particles, metal fragments, or moisture.
Use an appropriate cleaning solvent on compatible bare-metal components and follow the product’s safety instructions. Work in a ventilated area away from flames or ignition sources.
After cleaning, inspect the hub carefully.
Look for cracks, severe corrosion, damaged race seats, distortion, or other structural problems.
Run a finger carefully across the race bores. If removal created a small burr, it may prevent the new race from seating properly.
Minor raised edges can sometimes be lightly smoothed using very fine abrasive material. The objective is only to remove the raised imperfection, not to enlarge or reshape the bore.
A seriously damaged hub should be replaced rather than repaired improvisationally.
Inspect the Spindle Carefully
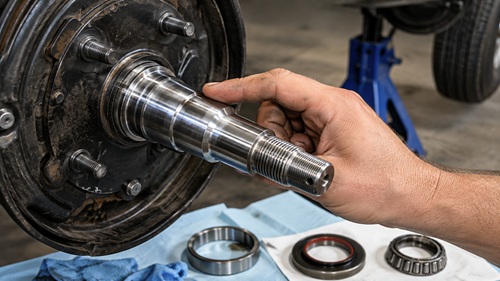
The spindle deserves as much attention as the bearings.
Remove all old grease and inspect the surfaces where the inner and outer bearings ride.
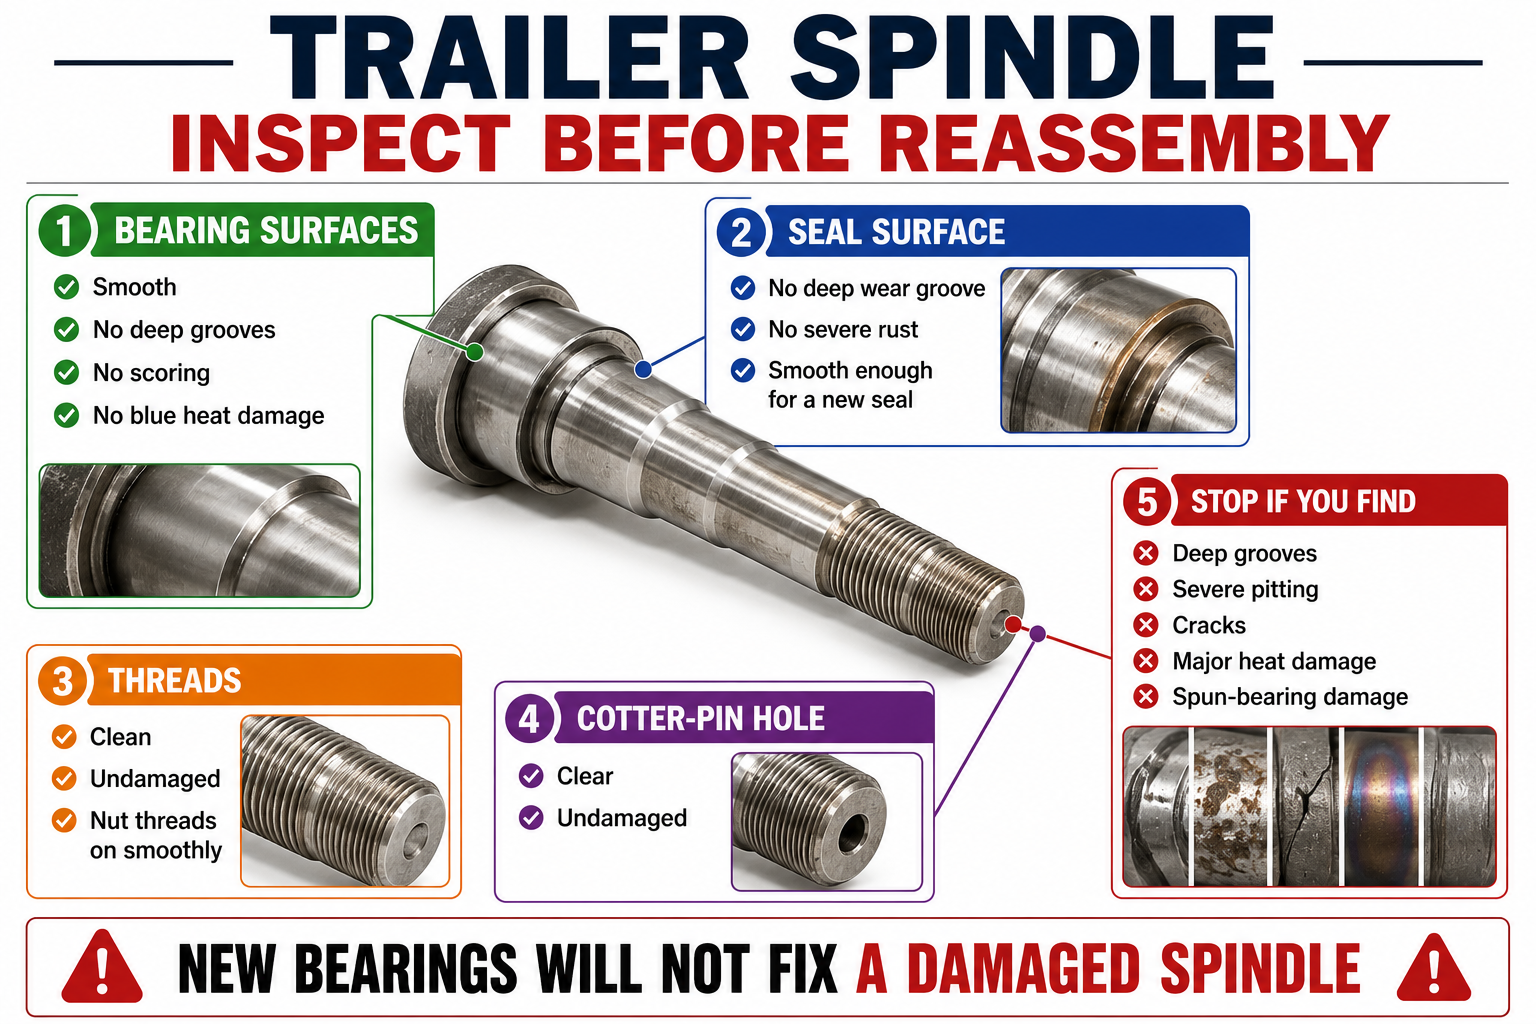
Those surfaces should be smooth and free from substantial grooves, scoring, severe corrosion, or heat damage.
Now examine the area where the grease seal rides.
A worn groove here is particularly important. A new seal cannot reliably hold grease or exclude water if its lip is running against a badly damaged surface.
Carefully drag a fingernail across questionable areas. If a deep groove catches the nail, investigate the appropriate repair rather than assuming new bearings will solve the problem.
Also inspect the spindle threads and the cotter-pin hole or retaining system.
If a previous bearing failed catastrophically and spun against the spindle, the spindle may be damaged enough to require axle or spindle repair.
Install the New Races
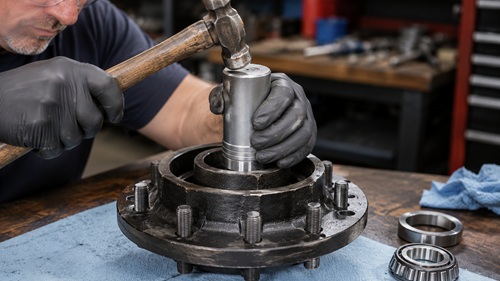
Installing races correctly requires patience.
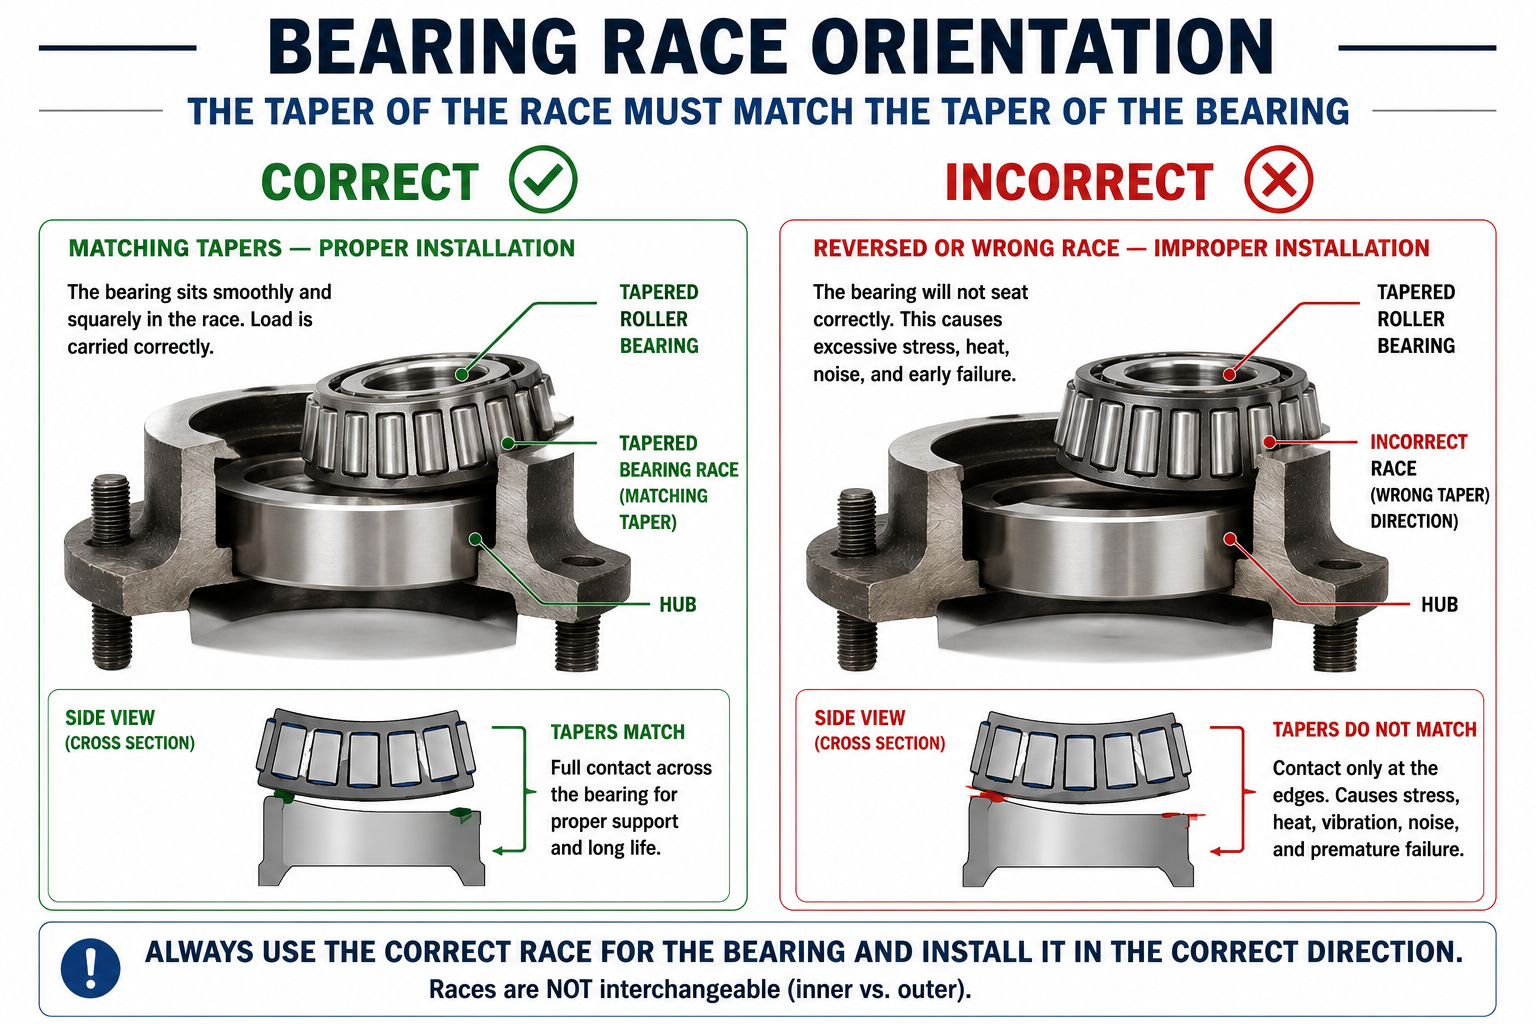
Determine which race belongs to each bearing and verify its orientation.
Position the new race squarely at the entrance to the hub bore.
A bearing race driver is the preferred installation tool because it applies force evenly to the correct edge of the race.
Select a driver that contacts the race securely without contacting the polished running surface used by the bearing rollers.
Begin with light hammer taps.
Watch the race closely.
If one side starts entering farther than the other, stop and straighten it before continuing. Driving a badly tilted race deeper into the hub can damage both the race and hub.
Once it is entering evenly, continue driving the race until it seats firmly against the internal shoulder.
A fully seated race often produces a noticeably different sound when struck, but do not rely only on sound. Visually inspect the race and confirm that it is completely seated.
Repeat the procedure with the second race.
Never use a steel punch against the polished roller-running surface to drive a new race into place. A small nick can create a premature failure point.
Pack the New Bearings Properly
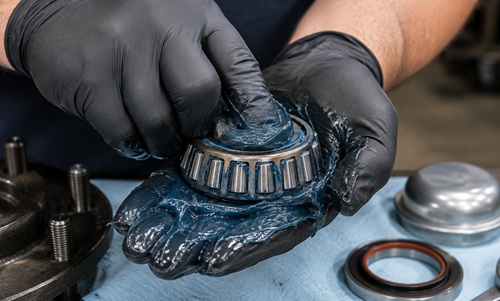
One of the most important stages of the job happens before the bearings enter the hub.
New tapered roller bearings are often supplied without the amount of grease required for service. They must be packed.
Place a quantity of clean wheel-bearing grease into the palm of one hand.
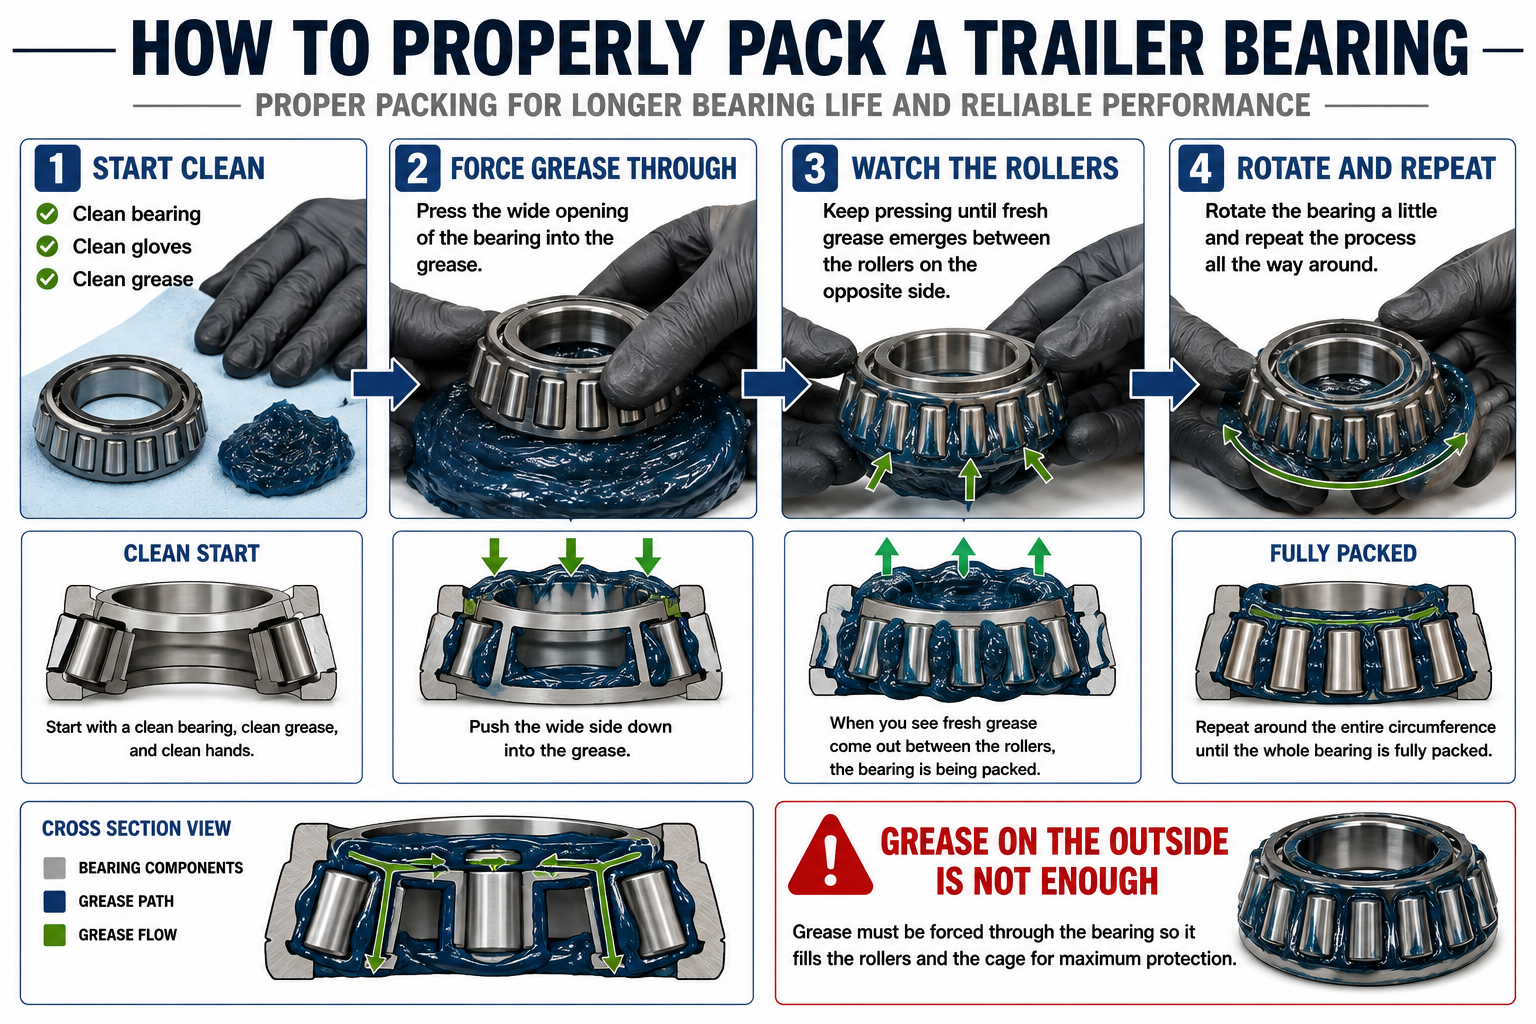
Hold the bearing so the wider spaces between the cage and rollers can be pressed into the edge of the grease.
Press and scrape the bearing against the grease repeatedly.
The goal is to force lubricant completely through the bearing until fresh grease begins emerging between the rollers on the opposite side.
Once grease appears, rotate the bearing slightly and continue.
Work around the entire circumference.
When finished, grease should have passed through every section of the bearing rather than simply coating the outside.
Spread a thin coating over the rollers.
A bearing-packing tool performs the same job by mechanically forcing grease through the bearing and can be especially useful when servicing several hubs.
Regardless of method, cleanliness is critical. If a glove falls onto a dirty floor or picks up grit, change it before continuing.
Install the Inner Bearing
Apply a light film of fresh bearing grease to the inner race.
Place the packed inner bearing into its race.
Confirm that the tapered bearing is correctly positioned and sitting naturally in the matching race.
Do not force it.
At this stage, keep all contaminated tools and old components away from the clean hub.
The new bearing should encounter nothing except clean surfaces and fresh compatible grease.
Install the New Grease Seal
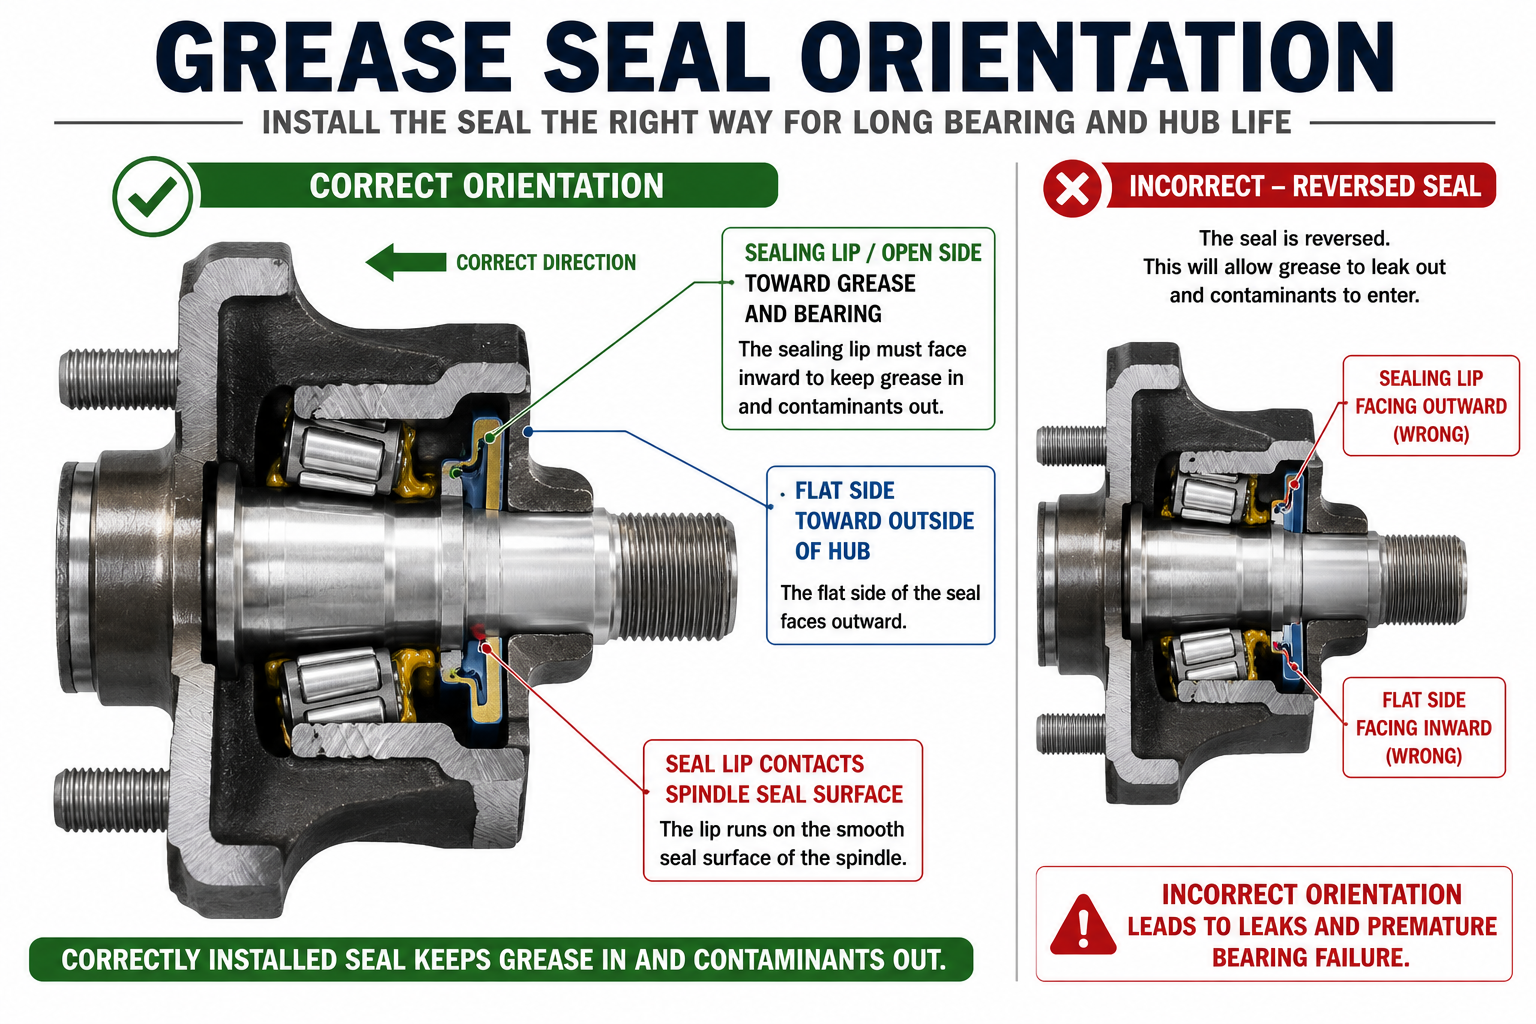
Before installing the seal, determine which direction it faces.
The sealing lip generally faces toward the grease and bearing, while the flatter face points outward, but confirm the specific seal design.
Apply a light film of compatible grease to the seal lip so it does not begin rotating dry against the spindle.
Position the seal squarely over the hub opening.
Using a seal driver or another proper flat driver, tap the seal gradually into place.
Apply force to the rigid outside portion of the seal rather than the flexible lip.
Work evenly.
If the seal begins going in crooked, correct it immediately.
Continue until the seal reaches its specified seated position.
Do not keep hammering after it is fully seated.
A distorted seal may leak grease, admit water, or damage the spindle contact surface.
Prepare the Spindle for Reassembly
Wipe the spindle clean one final time.
Apply a thin film of clean bearing grease across the areas contacted by the bearings and seal.
This provides initial lubrication and some corrosion protection while allowing the new seal to slide into position more easily.
If the trailer has brakes inside the hub, keep grease away from the brake shoes, pads, drums, rotors, and other friction surfaces.
Grease-contaminated brakes can lose a substantial amount of braking ability.
Reinstall the Hub
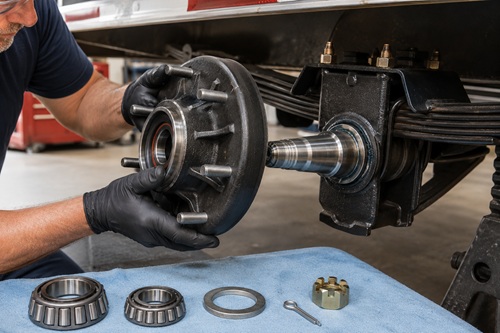
Hold the hub squarely with the spindle and carefully slide it into place.
Take particular care as the rear seal passes over the spindle. Do not force the hub at an angle or drag the sealing lip roughly across threaded surfaces.
Push the hub fully inward.
Install the freshly packed outer bearing into its race.
Follow with the washer.
Then thread the spindle nut onto the axle by hand.
The next stage determines how the bearings will run, so do not rush it.
Correctly Adjust the Spindle Nut
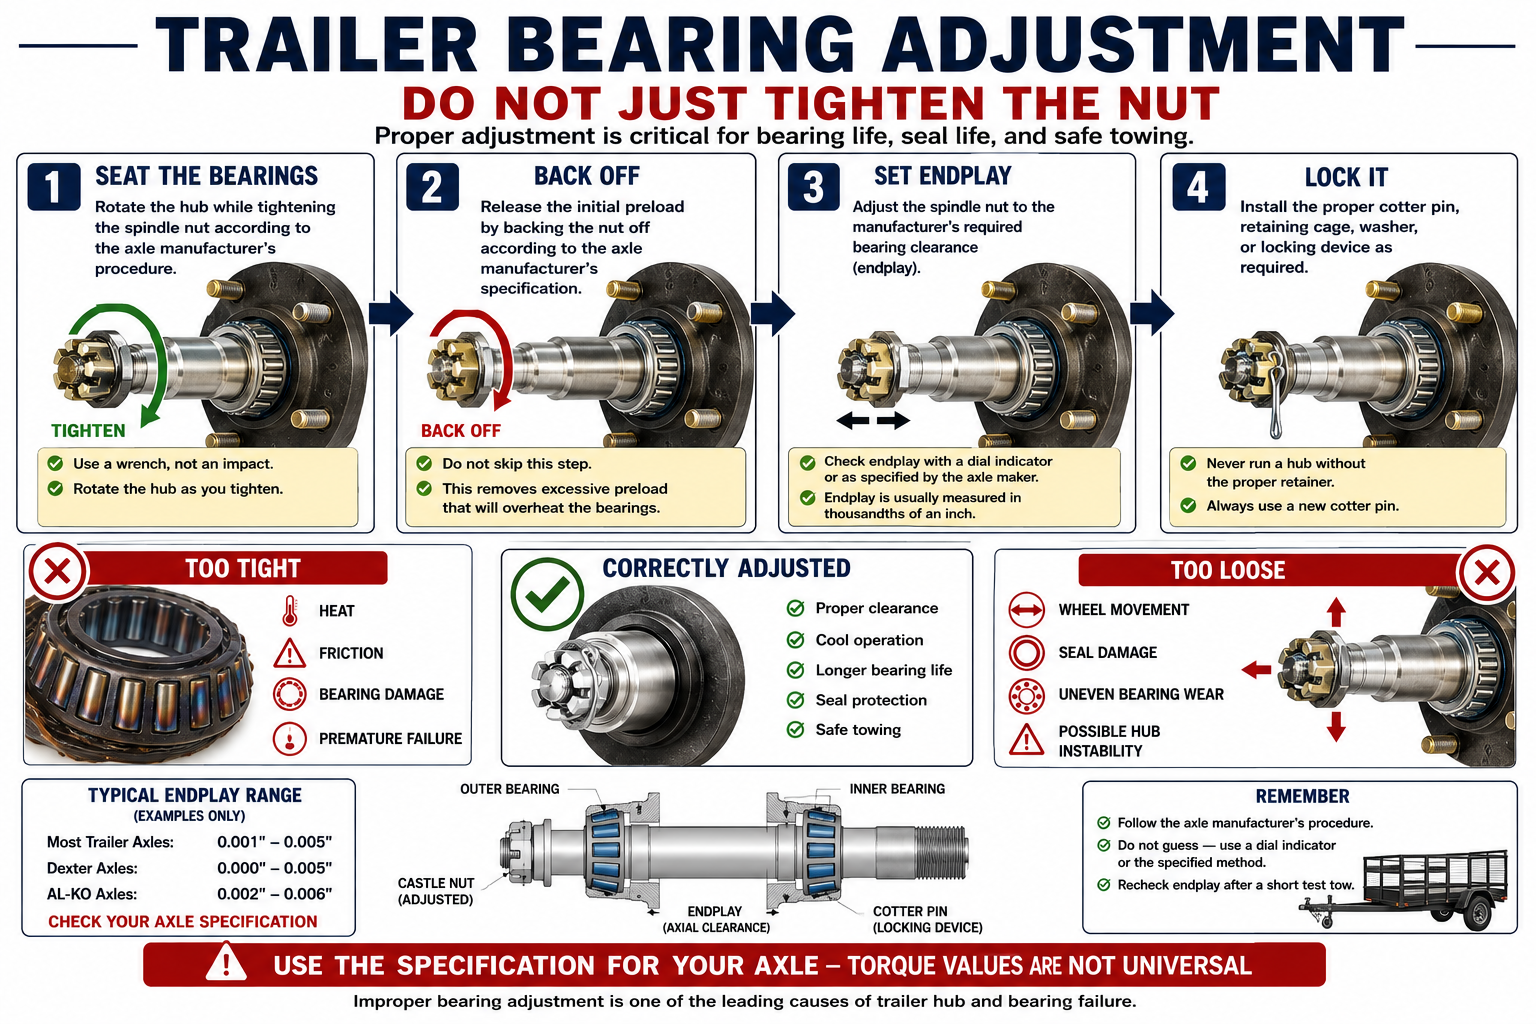
A common misunderstanding is that the spindle nut should simply be tightened very firmly.
That can destroy tapered wheel bearings.
Tapered roller bearings require controlled adjustment. Excessive preload squeezes the rollers against their races, increases friction, produces heat, and accelerates wear. Excessive looseness allows the hub to move too far along the spindle and can damage bearings, seals, tires, and braking components.
The exact adjustment procedure must come from the axle or hub manufacturer.
A common approach involves tightening the nut while rotating the hub so the bearings settle fully into their races. The nut is then loosened and readjusted to establish the manufacturer’s required endplay.
Do not blindly use a torque figure taken from another axle, another trailer, or an online demonstration.
For example, the source used for this lesson demonstrates one particular axle being seated at 25 ft-lb while the hub is rotated, followed by backing the nut off roughly one-eighth of a turn and then aligning the retaining pin. That is useful for understanding the principle, but it is not a universal trailer specification.
Use the procedure specified for the axle you are servicing.
This single step can determine whether a new bearing lasts for years or overheats during the first trip.
Check Bearing Endplay and Rotation
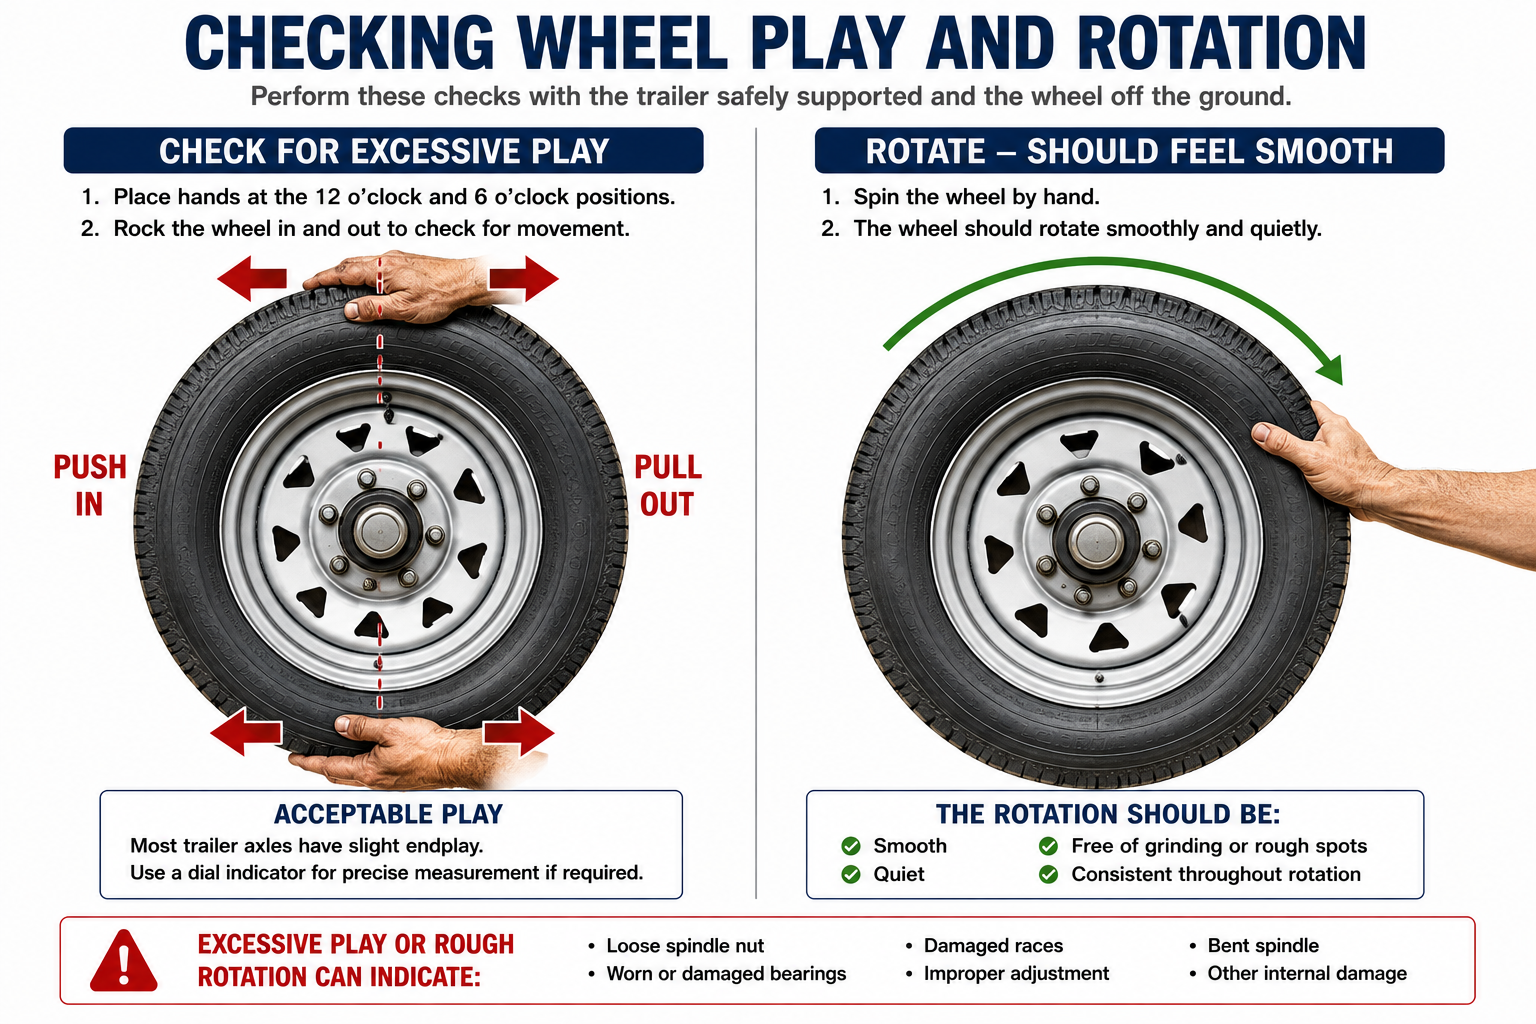
Once the adjustment has been completed, rotate the hub repeatedly by hand.
It should move smoothly.
There should be no grinding, catching, or roughness.
Then grasp opposite sides of the hub and gently push inward and pull outward.
Tapered bearing systems typically require a very small controlled amount of endplay, but the acceptable amount depends on the axle.
Obvious looseness is not normal.
Binding is not normal either.
If anything feels wrong, stop and determine why before installing the wheel.
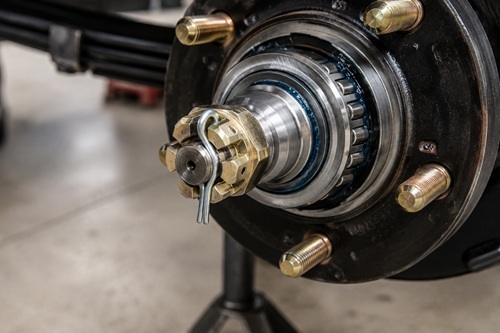
Install the Retainer
Once the spindle nut is correctly positioned, install the locking device.
For a castle nut and cotter-pin arrangement, use a new cotter pin.
Slide it completely through the spindle.
Bend it securely so it cannot work free or interfere with the dust cap.
Do not tighten the spindle nut substantially beyond the proper bearing adjustment merely because the castle-nut slot does not immediately align with the cotter-pin hole. Follow the axle manufacturer’s specified alignment procedure.
Other spindle systems may use locking cages, tang washers, clips, or specialized retaining hardware.
Restore whatever system the axle manufacturer originally designed.
Reinstall the Dust Cap
For a standard hub, position the dust cap squarely against the hub opening.
Tap around its perimeter gradually with a rubber mallet or proper installation tool until it is fully seated.
Avoid hammering heavily on the center of a thin cap.
Once installed, the cap should sit evenly and securely around the hub.
Its job is important. The bearing assembly depends on keeping dirt, water, and other contamination away from the grease.
Using Bearing Protectors
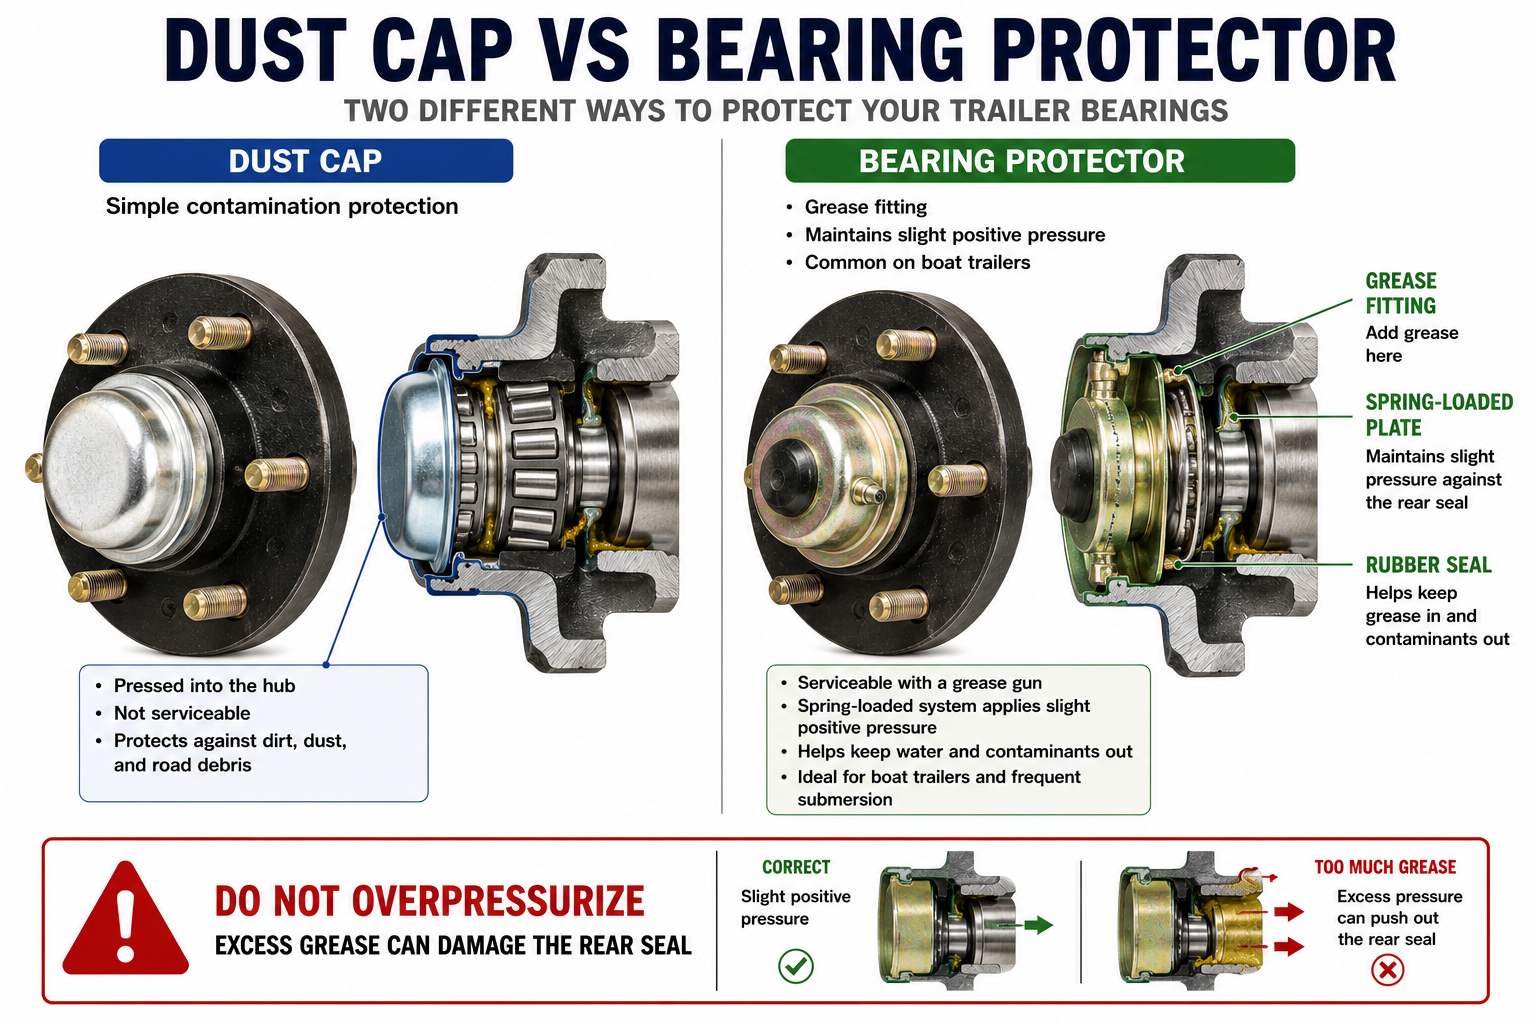
Some trailers, particularly boat trailers, use spring-loaded bearing protectors instead of ordinary dust caps.
These devices allow grease to be added through a fitting and maintain slight positive pressure inside the hub.
That can help reduce water entry when hubs are submerged.
However, a bearing protector is not permission to continually pump grease into the hub.
Excessive grease pressure can push lubricant past the rear seal or damage the seal entirely.
Fill and maintain the device according to its manufacturer’s instructions.
Bearing protectors also do not replace periodic bearing inspection.
A hub filled with grease can still contain a damaged bearing.
Reinstall the Wheel
Place the wheel onto the hub and install all lug nuts by hand first.
This reduces the chance of cross-threading.
Snug the nuts gradually using a crisscross or star pattern.
Raise the trailer enough to remove the jack stands, then lower the trailer until the tire contacts the ground sufficiently to prevent rotation.
Use a calibrated torque wrench and tighten the lug nuts to the specification provided for the trailer, wheel, and wheel studs.
Do not assume that every trailer wheel uses the same torque.
Finish lowering the trailer and remove the lifting equipment.
Inspect the Other Side
Servicing only one hub may leave another equally old bearing assembly untouched.
If one side shows deteriorated grease, worn bearings, failed seals, corrosion, or evidence of long-term neglect, inspect the hub on the opposite side.
Both sides have generally experienced the same mileage, weather, storage conditions, and road contamination.
Discovering a second failing bearing in the workshop is far better than discovering it hundreds of kilometers from home.
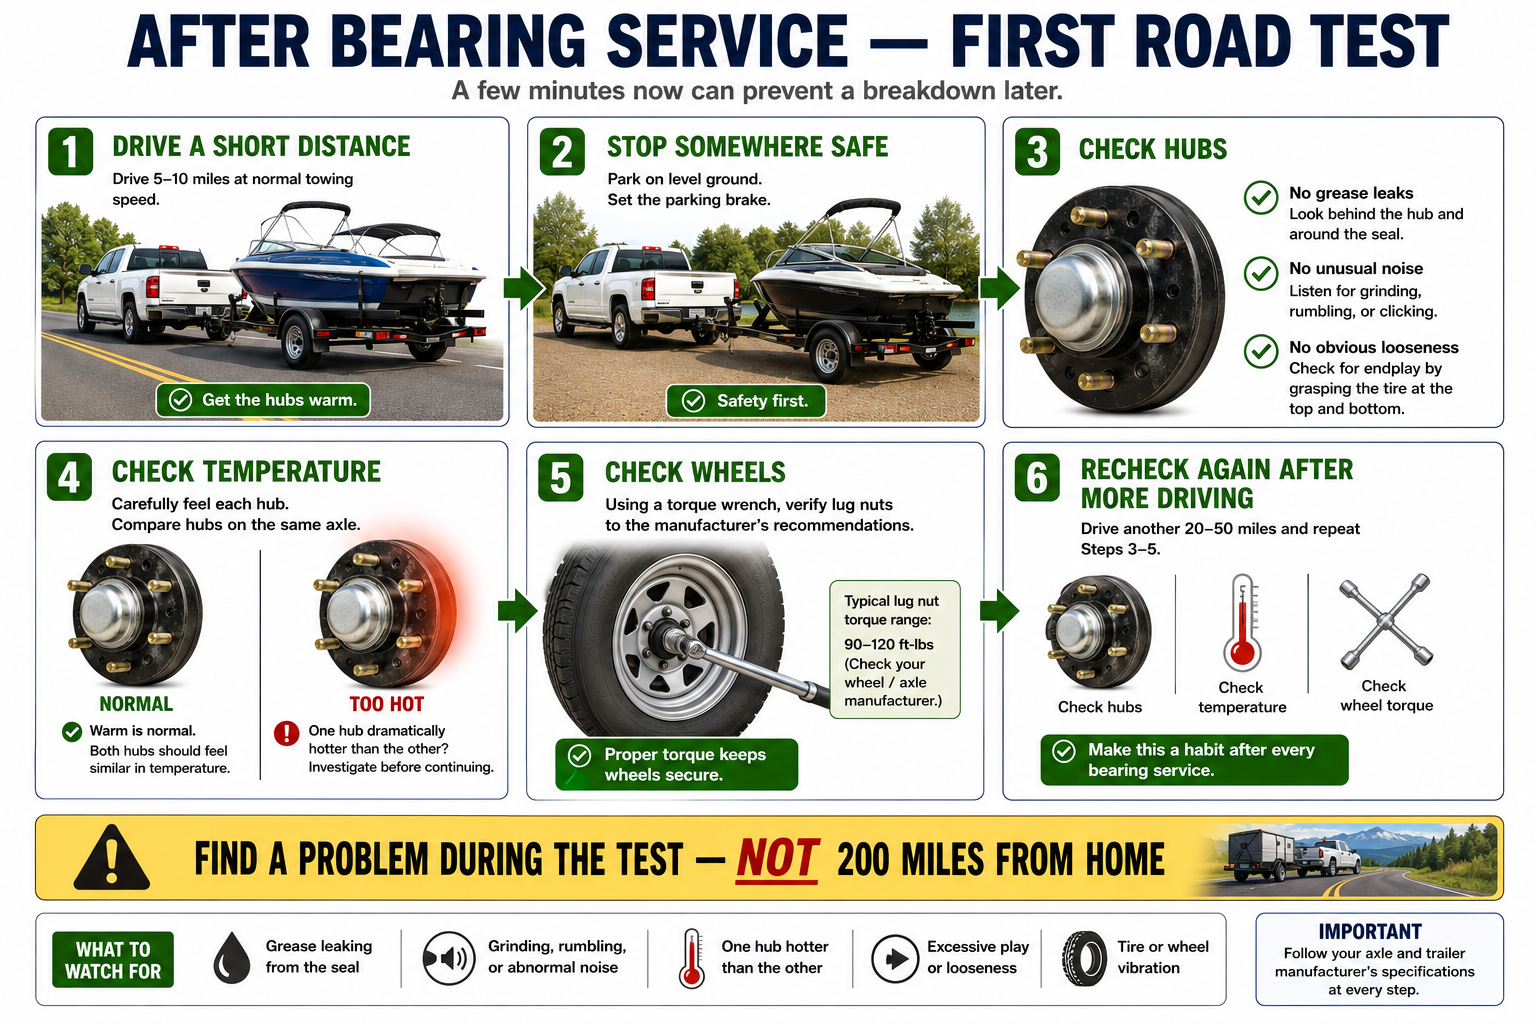
Perform a Short Road Test
A bearing replacement should not immediately be followed by a long highway journey.
Tow the trailer for a short distance.
Stop somewhere safe and inspect the wheels and hubs.
Look for grease escaping around the dust cap or rear seal.
Check that the wheel remains secure.
Carefully evaluate hub temperature without pressing bare skin against a potentially overheated surface.
Compare hubs on the same axle.
They do not need to be exactly the same temperature, especially if brakes are involved, but one hub becoming dramatically hotter than another deserves investigation.
Continue for another short distance and inspect again.
This simple test can reveal an incorrectly adjusted bearing before serious damage develops.
Recheck the Wheel Lug Nuts
Removing and reinstalling a wheel can allow components to settle slightly after driving.
Follow the wheel or trailer manufacturer’s recommendations for lug-nut rechecking after installation.
Do not depend on memory.
Write the torque specification directly into the trailer maintenance record so it is available the next time the wheel is removed.
Boat Trailers Require Extra Attention
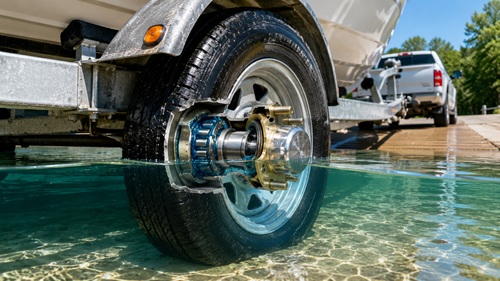
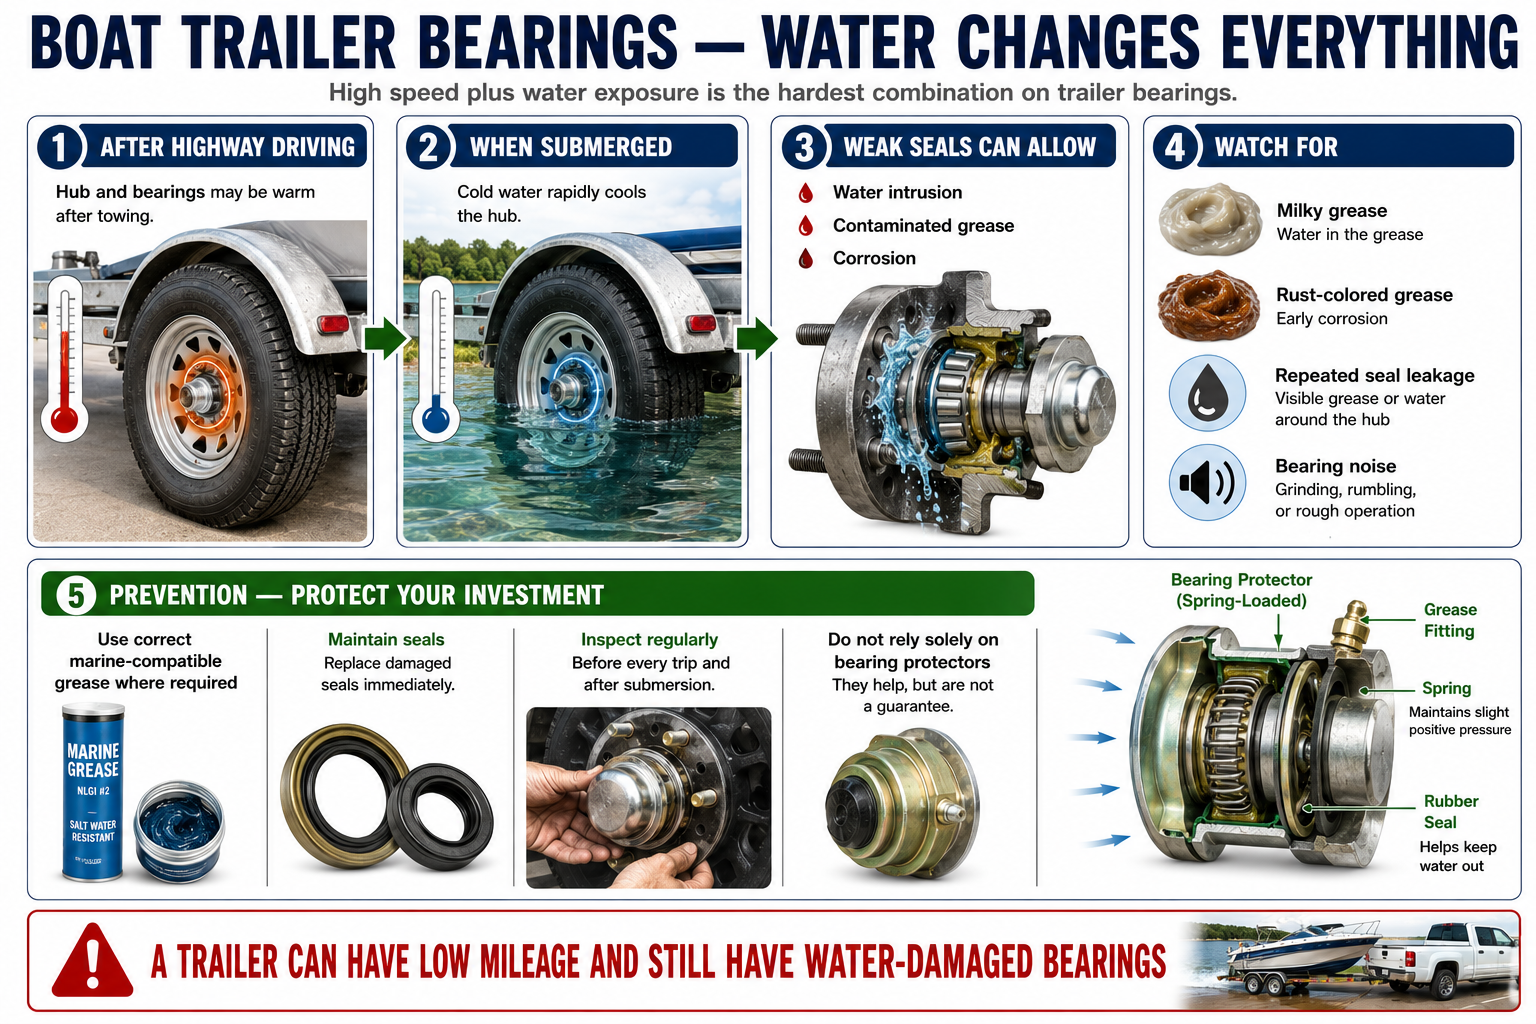
Boat-trailer bearings live in unusually difficult conditions.
After travelling down the highway, the hub and bearings may be warm. Backing the trailer into cold water rapidly cools the hub.
Any weakness in the sealing system can allow water to enter.
Once water contaminates the grease, bearing surfaces can begin rusting even while the trailer sits unused.
Inspect boat-trailer grease periodically.
Milky or cloudy grease usually deserves investigation because it may indicate water contamination.
Maintain seals carefully and use grease appropriate for marine trailer bearing service where required.
A trailer that regularly enters salt water requires even more attention because salt accelerates corrosion.
Do Not Ignore a Trailer That Sits
People often think of bearing maintenance only in terms of mileage.
Storage creates its own problems.
A trailer may sit outside for months or years while condensation forms, seals harden, grease separates, and corrosion slowly attacks bearing surfaces.
A trailer that travelled only a few hundred kilometres last year may still require inspection if it has spent several seasons exposed to weather.
For preparedness equipment, this matters enormously.
Equipment that sits for years waiting for an emergency can appear ready while hidden mechanical components deteriorate.
Inspection should consider both mileage and time.
Build a Trailer Bearing Repair Kit
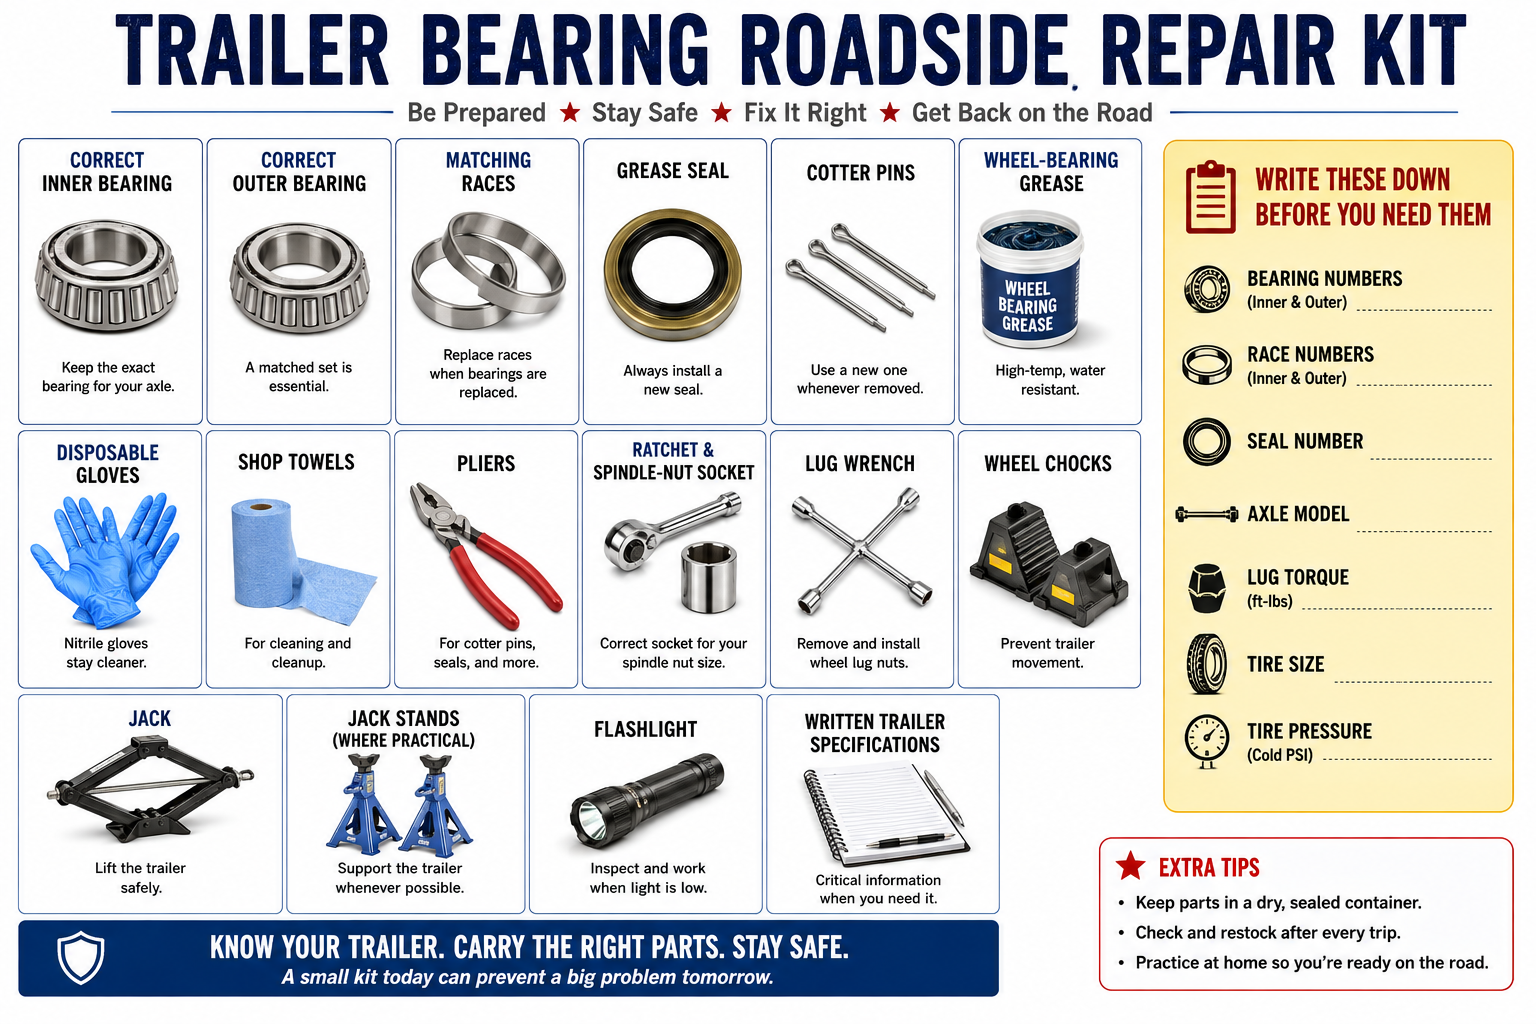
Once the correct bearing sizes are known, record them permanently.
Keep the inner bearing number, outer bearing number, race numbers, grease-seal number or dimensions, spindle-nut procedure, lug-nut torque, tire size, tire pressure, and axle identification with the trailer.
Consider carrying a spare bearing set and grease seal for trailers used on long trips or in remote areas.
Fresh cotter pins, wheel-bearing grease, disposable gloves, shop towels, basic hand tools, wheel chocks, and the correct socket for the spindle nut can turn a serious roadside problem into a repairable one.
The most valuable item in that kit may be the written specifications.
Trying to identify an unknown trailer bearing while stranded far from home is far harder than recording the information when the trailer is already in the workshop.
Learn What the Failure Is Telling You
Replacing the damaged component solves only part of a bearing problem.
Ask why it failed.
A dry bearing suggests lost lubrication or inadequate packing.
Rust points toward water intrusion.
A damaged rear seal may indicate spindle wear, excessive grease pressure, improper installation, or simply age.
Dark heat marks may point toward excessive preload, insufficient lubrication, heavy loading, or bearing damage.
Repeated bearing failures deserve deeper investigation.
A bearing that fails again shortly after replacement may be revealing a damaged spindle, distorted hub, incorrect parts, poor adjustment, axle problem, excessive load, or another unresolved cause.
Successful mechanical repair is not just replacing the failed part. It is understanding why that part failed.
Preparedness Action Plan
Inspect each trailer that might be important during an emergency before it is actually needed. Confirm the condition of the tires, hubs, bearings, seals, suspension, lights, hitch, safety chains, and braking system rather than assuming a trailer is roadworthy simply because it is parked and intact.
During the next bearing service, record every replacement part number and important specification. Store that information both with the trailer and in the workshop.
Build a small bearing-repair kit containing the correct components for that particular axle. A generic collection of bearings is much less useful than one known to fit the trailer.
Practice removing and servicing a hub at home under controlled conditions. Learning the procedure beside a workbench is far easier than learning it beside a highway in rain, darkness, or an emergency.
Finally, locate the axle manufacturer’s bearing-adjustment procedure and keep a copy with the trailer’s maintenance information. Correct adjustment is one of the most important parts of the entire repair.
Key Takeaways
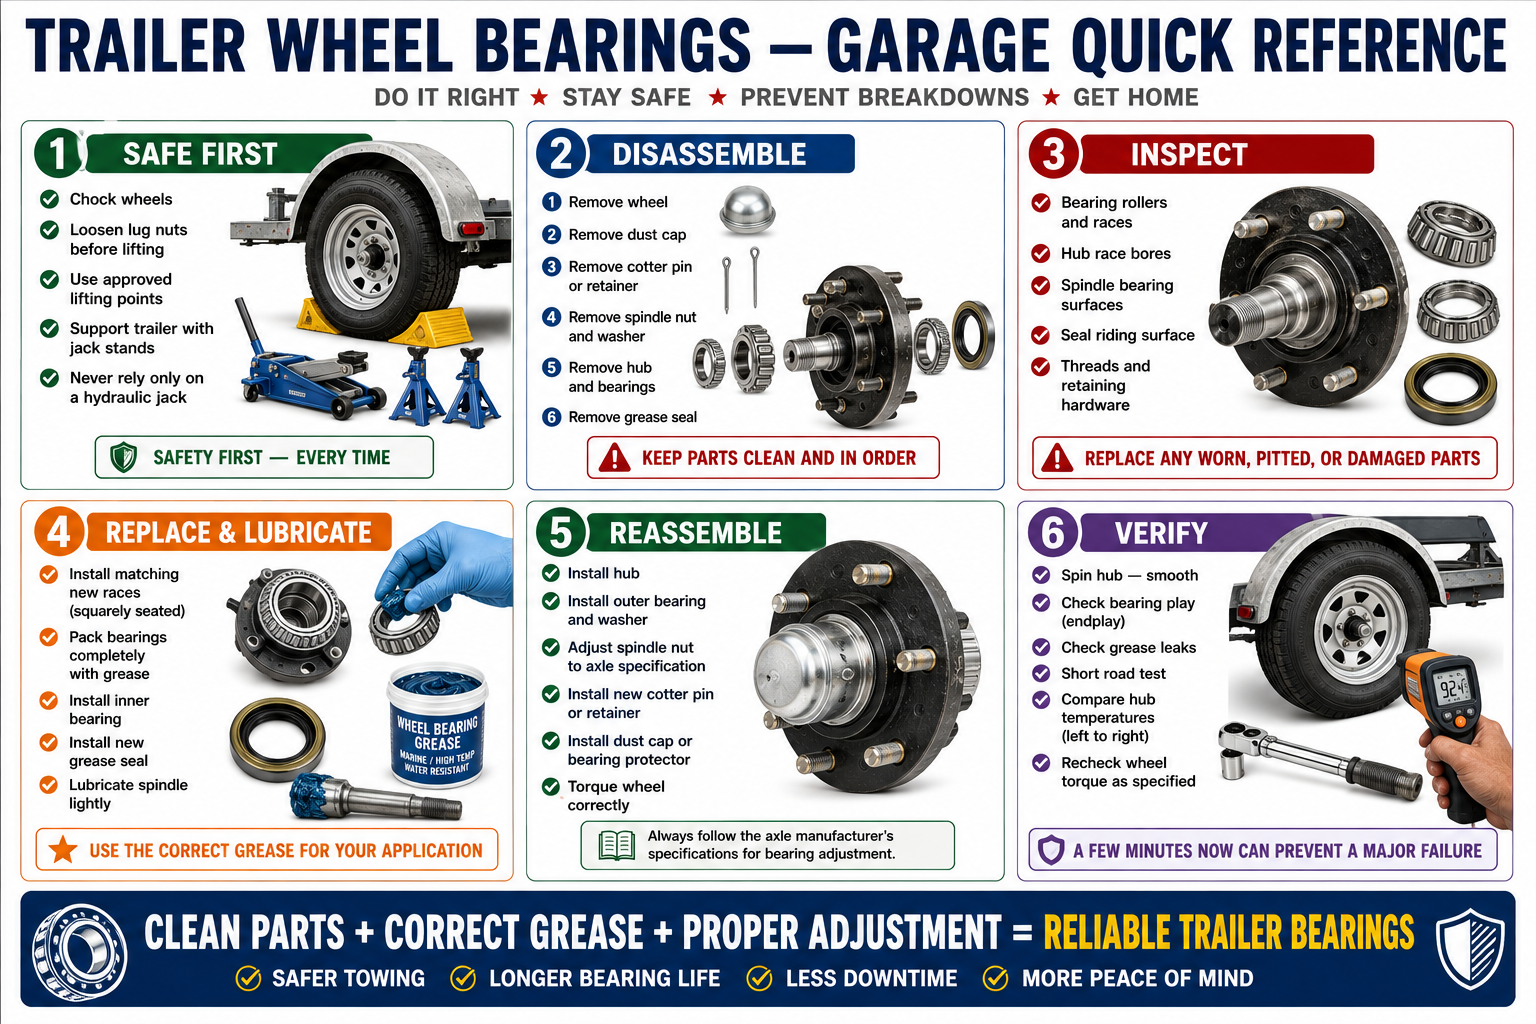
Trailer bearing replacement is not simply a matter of removing an old bearing and installing a new one. A dependable repair requires clean working conditions, correctly identified replacement parts, new or serviceable races, properly packed bearings, an undamaged spindle, a correctly installed grease seal, and precise spindle-nut adjustment.
Never install a dry bearing. Never deliberately reuse a damaged seal or worn cotter pin. Never drive a new bearing against a damaged race. Never assume maximum spindle-nut tightness is safer, and never substitute another trailer’s torque or adjustment specification for the procedure intended for the axle being serviced.
Inspect the old components because they frequently reveal why the failure occurred.
After servicing the hub, conduct a short controlled road test and inspect it again before beginning a long trip.
The real preparedness skill is not simply knowing how to replace a bearing. It is knowing how to recognize a developing problem, determine what caused it, repair it correctly, verify the repair, and keep the trailer operational when outside assistance may not be available.
Disclaimer
This information is provided for general education and preparedness training. Trailer hubs, bearings, axles, brakes, wheels, spindle nuts, lubrication systems, and retaining mechanisms vary by manufacturer and application. Always follow the specifications and service procedures provided by the trailer, axle, hub, bearing, wheel, tire, and brake manufacturers.
Never work on a trailer supported only by a hydraulic jack. Use properly rated lifting equipment, wheel chocks, jack stands, eye protection, and appropriate workshop safety practices.
Incorrect bearing installation, improper spindle-nut adjustment, incorrect wheel torque, damaged components, inadequate lubrication, or improper trailer support can result in bearing failure, wheel separation, loss of trailer control, property damage, serious injury, or death.
If the hub, spindle, axle, brake assembly, wheel, bearing surfaces, or suspension components show significant cracking, severe corrosion, deformation, overheating, or other structural damage, have the trailer inspected by a qualified technician before returning it to service.
© Prepping Communities. This content is for informational purposes only and not professional advice. Use at your own risk.
Terms | Privacy | Guidelines