
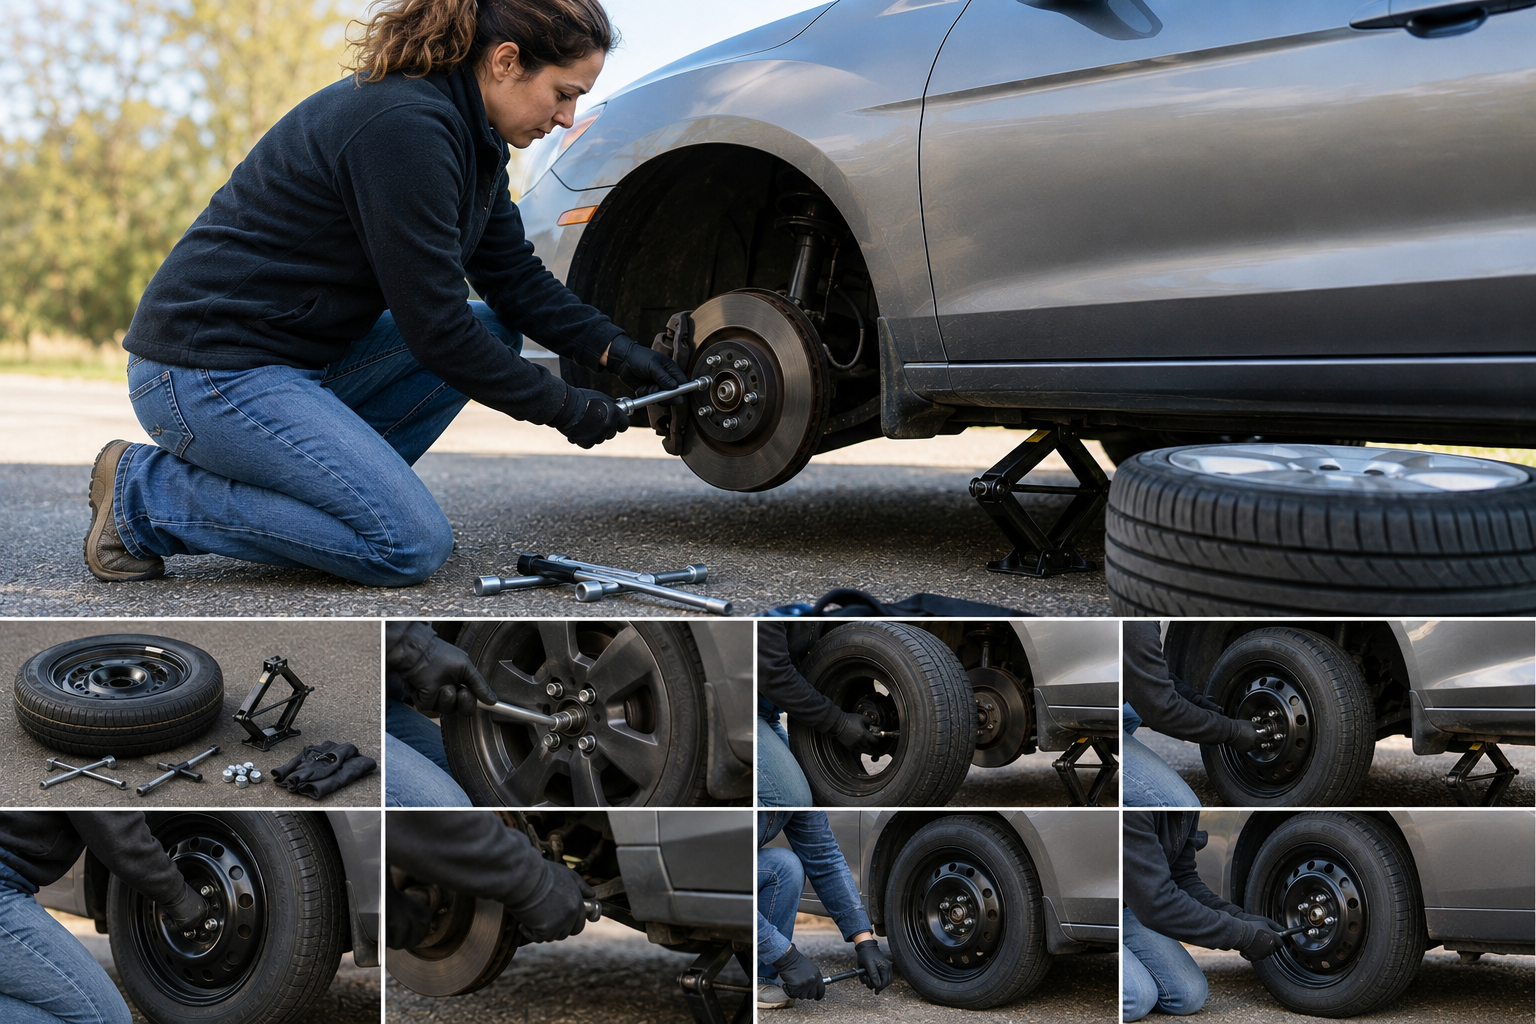
Step-by-Step Instructions
Knowing how to change a flat tire is a basic skill every driver should have. A flat can happen on a highway, back road, during an evacuation, at night, or somewhere without cell service. Roadside assistance may not always be available, so knowing how to safely install your spare can keep you from becoming stranded.
Vehicle designs are different, particularly when it comes to jack locations, spare tires, wheel locks, and recommended lug-nut torque. Always follow your vehicle owner’s manual when its instructions differ from these general steps.
What You Need
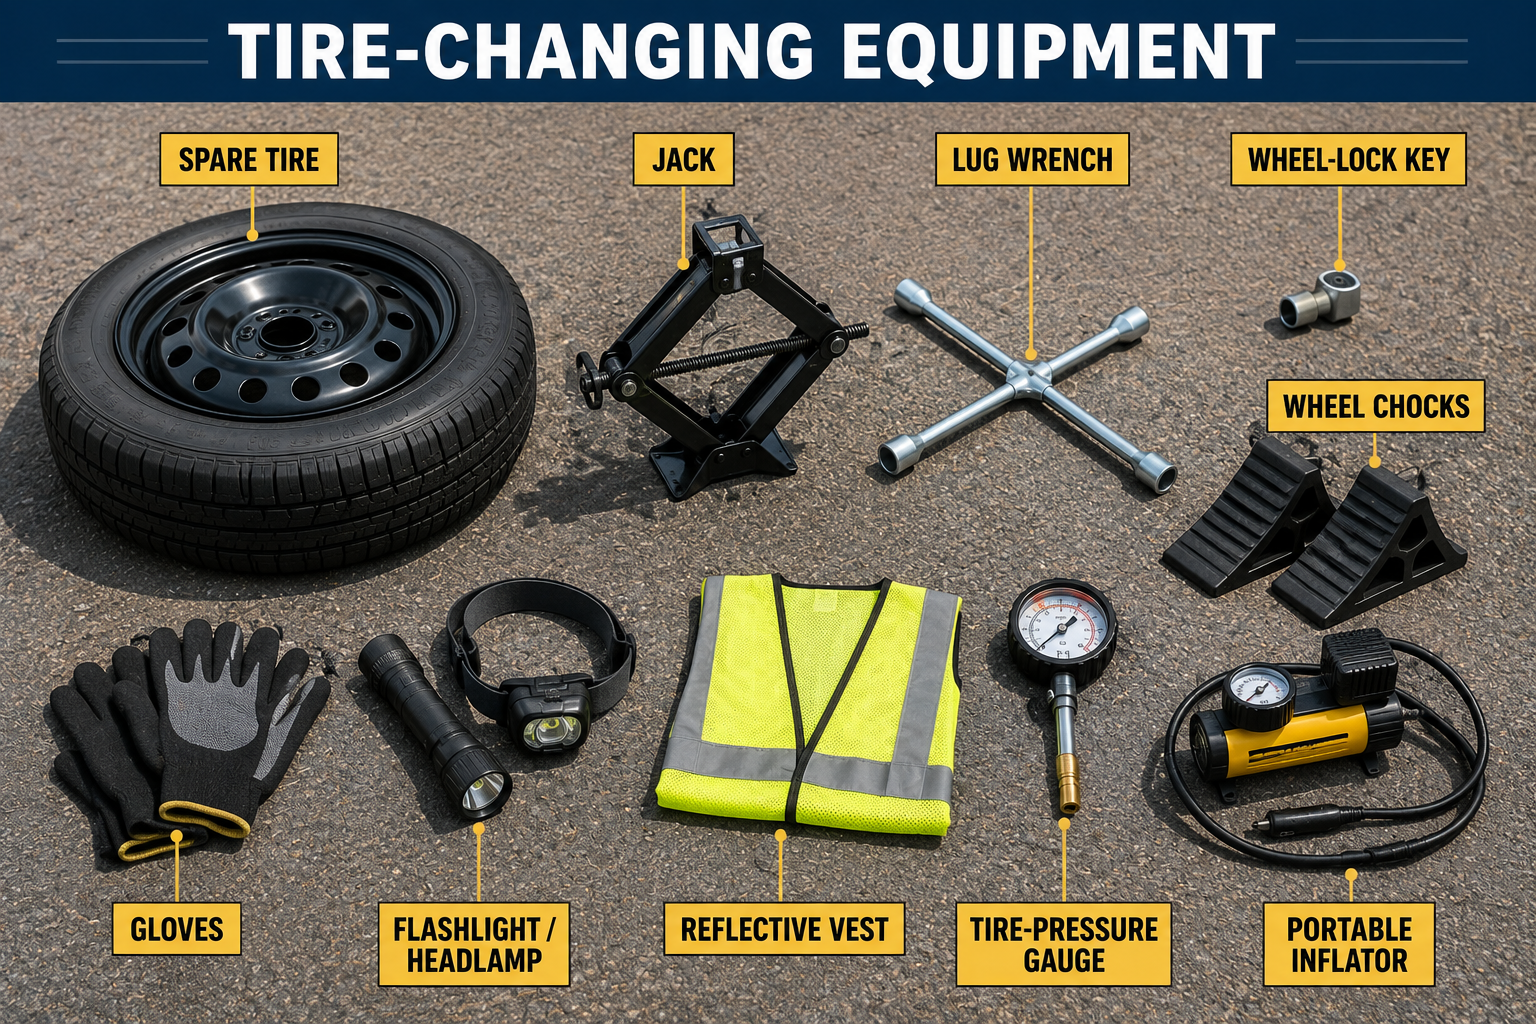
Before starting, locate your spare tire, vehicle jack, and lug wrench. Some vehicles also have a wheel-lock key that is required to remove one or more lug nuts.
Other useful equipment includes wheel chocks, work gloves, a flashlight or headlamp, reflective vest, tire-pressure gauge, portable tire inflator, and warning triangles.
Check that the spare is actually usable before raising the vehicle.
Step 1 – Find a Safe Place to Stop
As soon as you realize you have a flat tire, slow down gradually. Avoid hard braking or sudden steering.
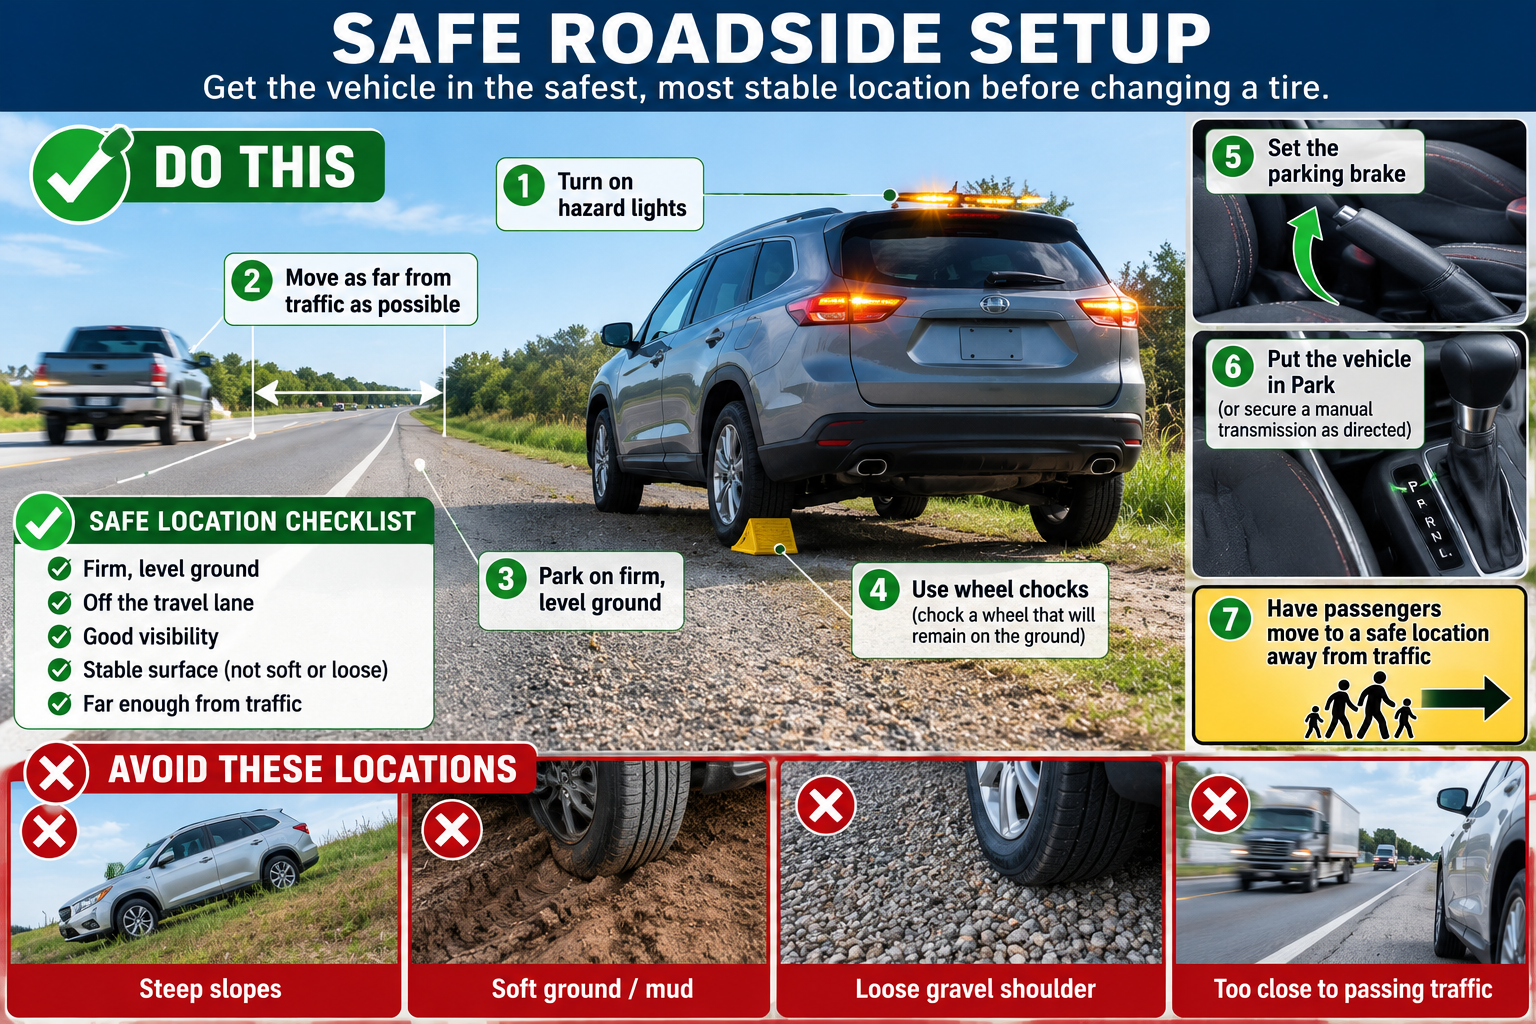
Move away from traffic and find the firmest, flattest location available. Avoid slopes, soft shoulders, mud, loose ground, and locations where passing vehicles could put you in danger.
Turn on your hazard lights.
Put an automatic transmission in Park. Secure a manual transmission according to the manufacturer’s instructions.
Set the parking brake firmly.
If passengers need to leave the vehicle, have them move to a safe location away from traffic.
Step 2 – Prevent the Vehicle From Rolling
Place wheel chocks against a wheel that will remain on the ground. When appropriate for the vehicle and conditions, the wheel diagonally opposite the flat is a useful location.
For example, if the left front tire is flat, the right rear wheel may be chocked.
The purpose is to keep the vehicle from moving while it is being raised.
Never depend on the jack to prevent the vehicle from rolling.
Step 3 – Get Everything Ready
Remove the spare tire, jack, lug wrench, wheel-lock key if required, and owner’s manual from the vehicle.
Keep everything together and within reach.
Do this before raising the vehicle. Once the vehicle is on the jack, you want to disturb it as little as possible.
Take a moment to inspect the spare.
Look for obvious damage and check its pressure if you have a tire-pressure gauge.
Do not assume a spare that has been sitting unused for years still has enough air.
Step 4 – Remove the Wheel Cover if Necessary
If a hubcap or wheel cover prevents access to the lug nuts, remove it.
Different vehicles use different attachment methods. Some wheel covers pull or pry off, while others are secured differently.
If you are uncertain, check the owner’s manual rather than forcing the cover.
You should now have clear access to every lug nut.
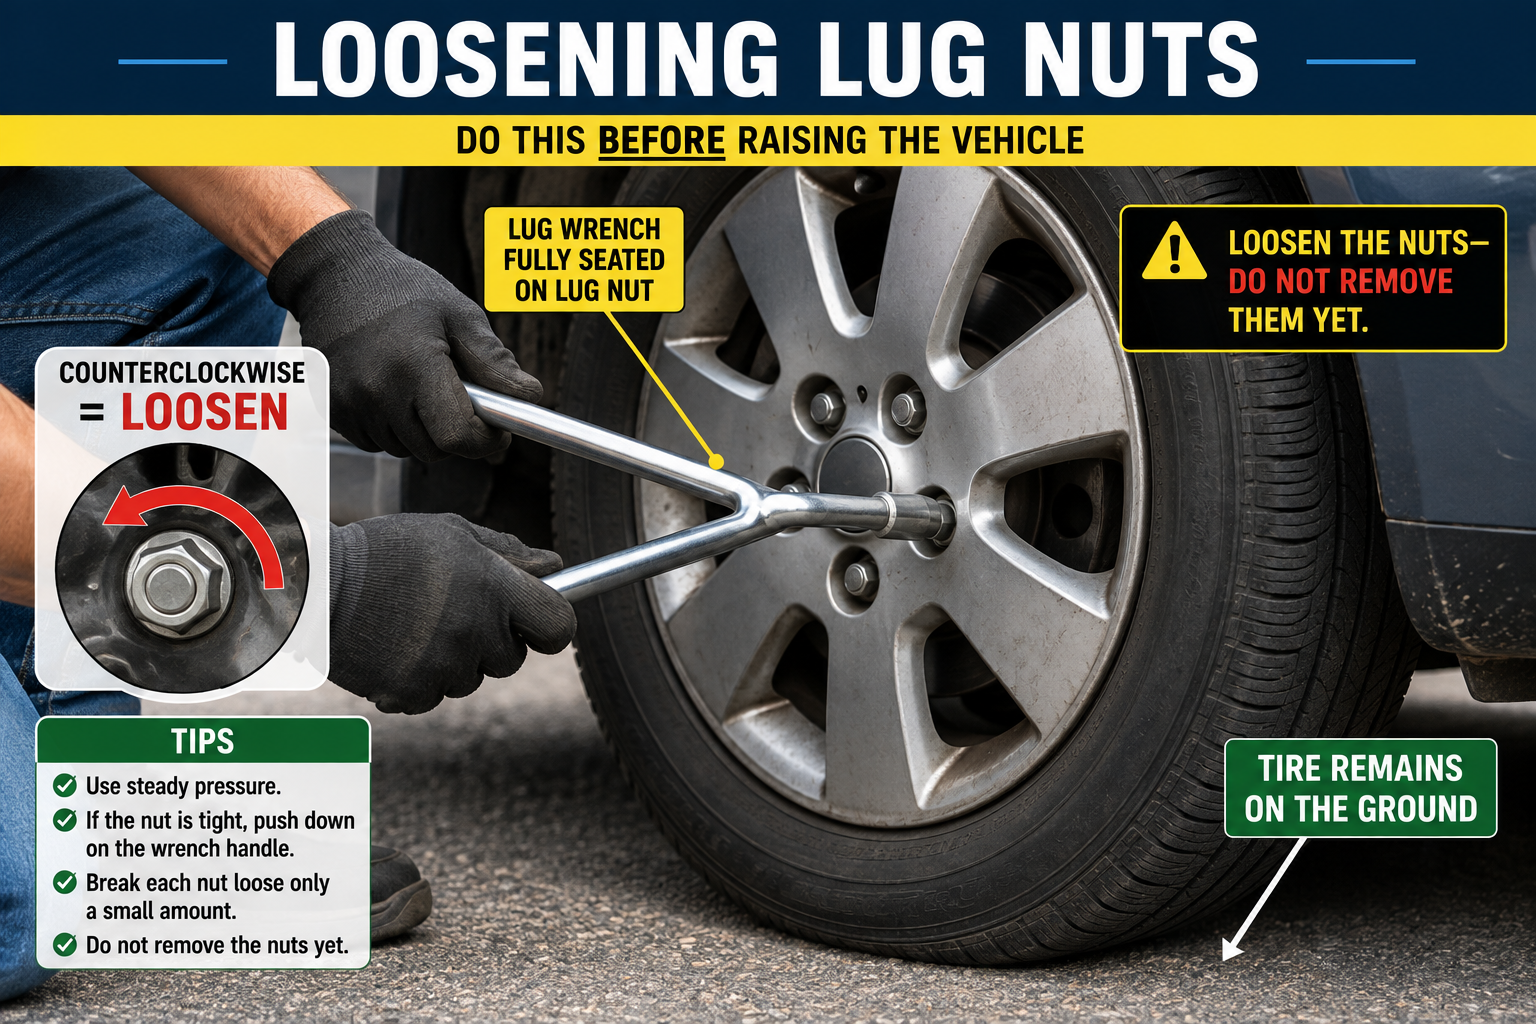
Step 5 – Loosen the Lug Nuts BEFORE Raising the Vehicle
Do this while the flat tire is still firmly on the ground.
Place the lug wrench completely over the first lug nut.
Turn the wrench counterclockwise to loosen it.
Break each lug nut loose, but do not remove it.
You normally only need enough movement to overcome the initial resistance.
Leaving the tire on the ground prevents the wheel from freely turning and provides greater stability while you apply force to the wrench.
Step 6 – Find the Correct Jacking Point
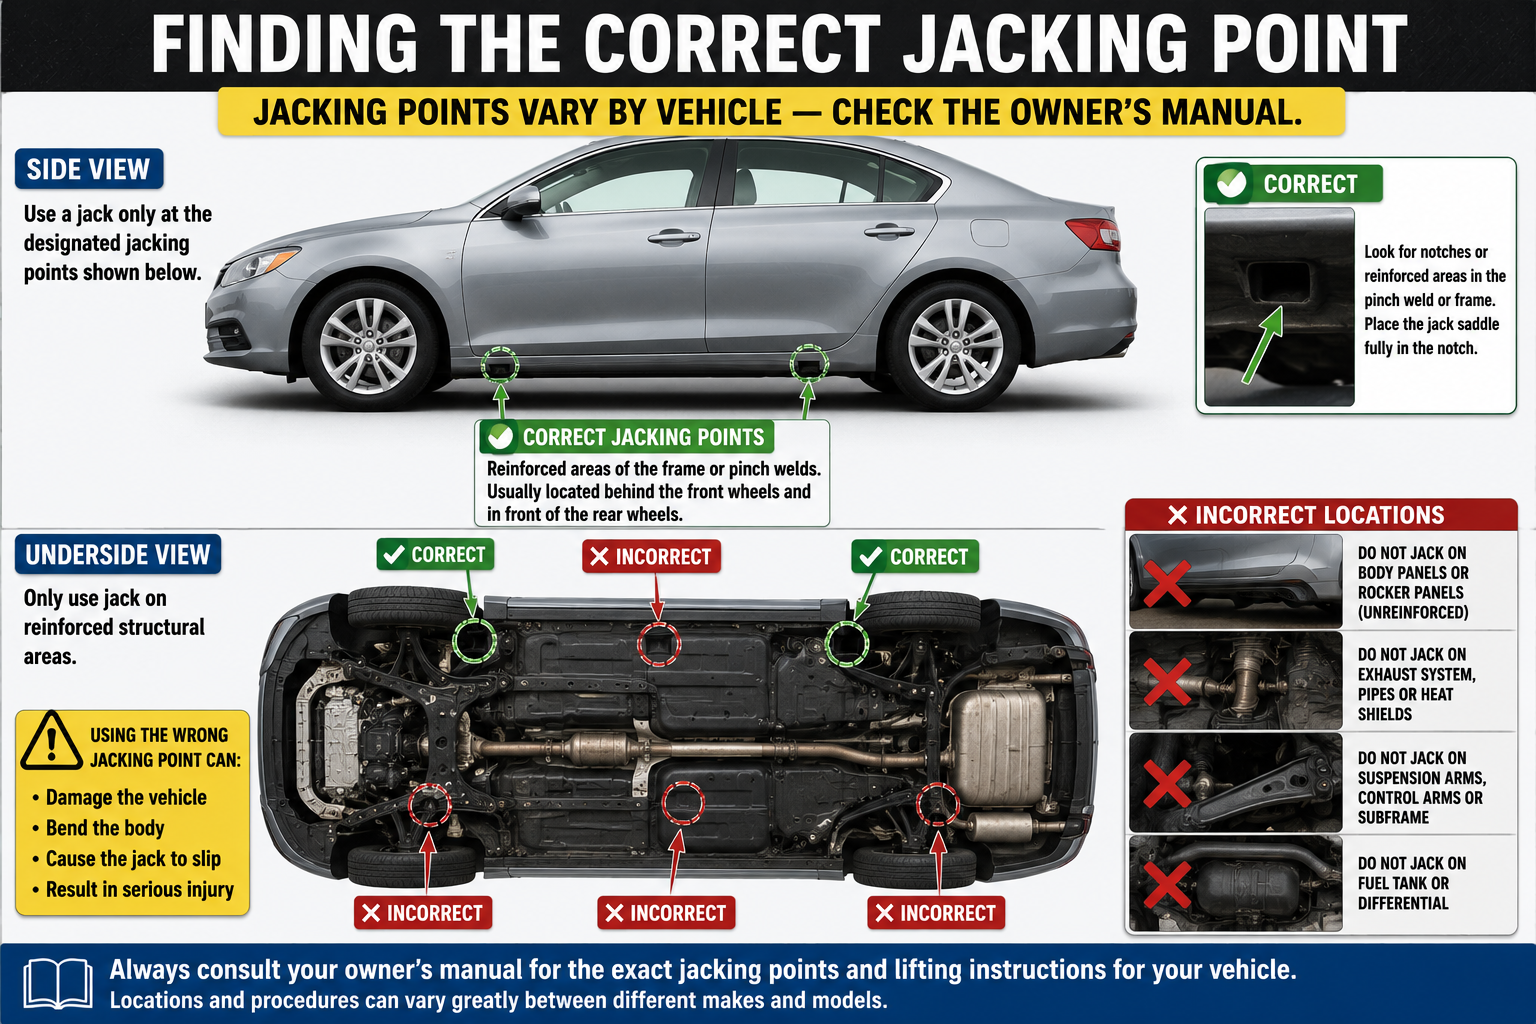
This is one of the most important parts of changing a tire.
Do not guess where the jack belongs.
Your vehicle has designated areas designed to support its weight when using the emergency jack. Their exact locations vary between vehicles.
Check the owner’s manual and identify the correct jacking point nearest the flat tire.
Never place the jack underneath a random section of the vehicle’s body, floor pan, plastic trim, or another component that was not designed as a lifting point.
Using the wrong location can damage the vehicle or cause it to fall.
Step 7 – Position the Jack
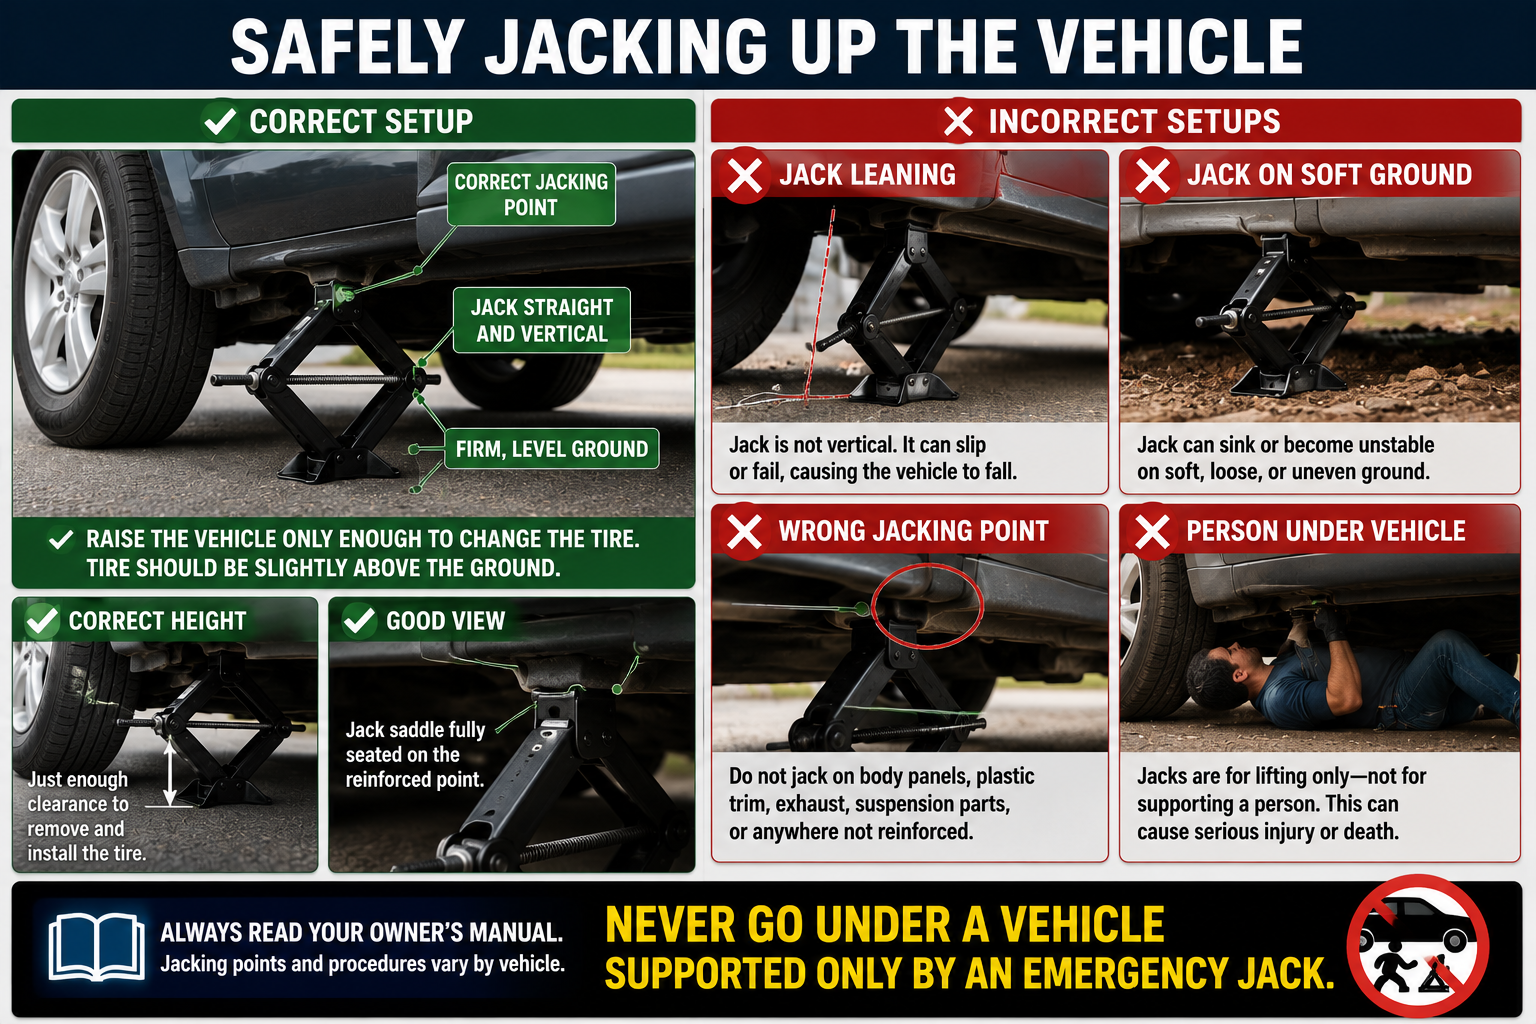
Place the jack directly beneath the correct lifting point.
The base of the jack should sit flat on firm, stable ground.
Look at the jack from more than one angle before raising the vehicle.
Make sure it is properly aligned and is not obviously leaning.
If the ground underneath the jack is soft, unstable, severely uneven, or otherwise unsuitable, find a safer location if possible rather than risking the vehicle falling.
Step 8 – Raise the Vehicle
Begin raising the vehicle slowly.
Watch the jack as it starts carrying the vehicle’s weight.
If the jack begins leaning, shifting, twisting, or sinking, stop immediately.
Lower the vehicle and correct the problem before continuing.
Raise the vehicle only high enough for the flat tire to clear the ground and provide enough room for the inflated spare to be installed.
Do not raise it higher than necessary.
NEVER GET UNDER THE VEHICLE
An emergency tire jack is designed to raise the vehicle for a tire change.
It is not intended to safely support a person working underneath the vehicle.
Never put your head, arms, legs, hands, or any other part of your body underneath a vehicle supported only by an emergency jack.
Step 9 – Remove the Lug Nuts
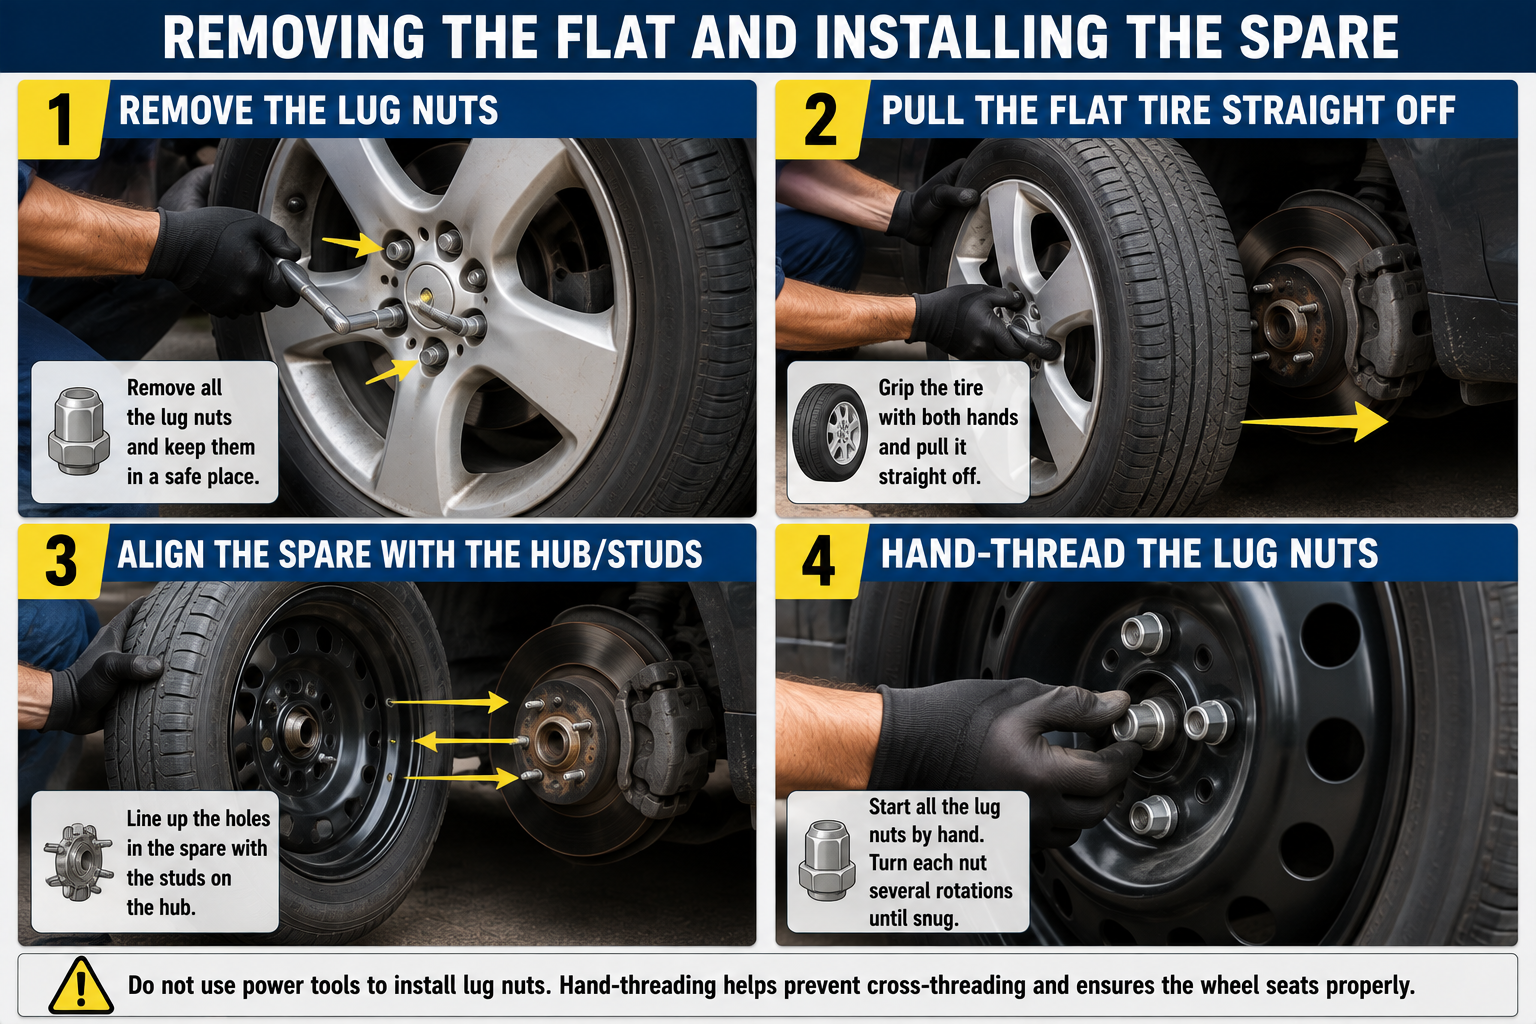
With the tire safely off the ground, finish removing the loosened lug nuts.
Put them somewhere secure.
A small container, hubcap, magnetic tray, or pocket can prevent them from rolling away or disappearing into grass, snow, gravel, or darkness.
Keep every lug nut.
Step 10 – Remove the Flat Tire
Grip the tire securely with both hands.
Pull the wheel straight toward you until it comes off the wheel studs or mounting surface.
Remember that wheels can be heavy.
Place the flat tire on its side somewhere safe where it cannot roll away.
If corrosion has caused the wheel to stick, avoid violently shaking or striking a vehicle that is balanced on an emergency jack. Never crawl underneath it trying to free the wheel.
Step 11 – Install the Spare Tire
Lift the spare into position.
Align the wheel holes with the studs where applicable.
Push the spare straight onto the hub until the wheel is completely seated against its mounting surface.
Install the lug nuts by hand first.
Turn each nut several rotations.
The nuts should thread smoothly. If one immediately becomes difficult to turn, stop. Remove it and start again rather than forcing it.
Forcing a misaligned lug nut can damage the threads.
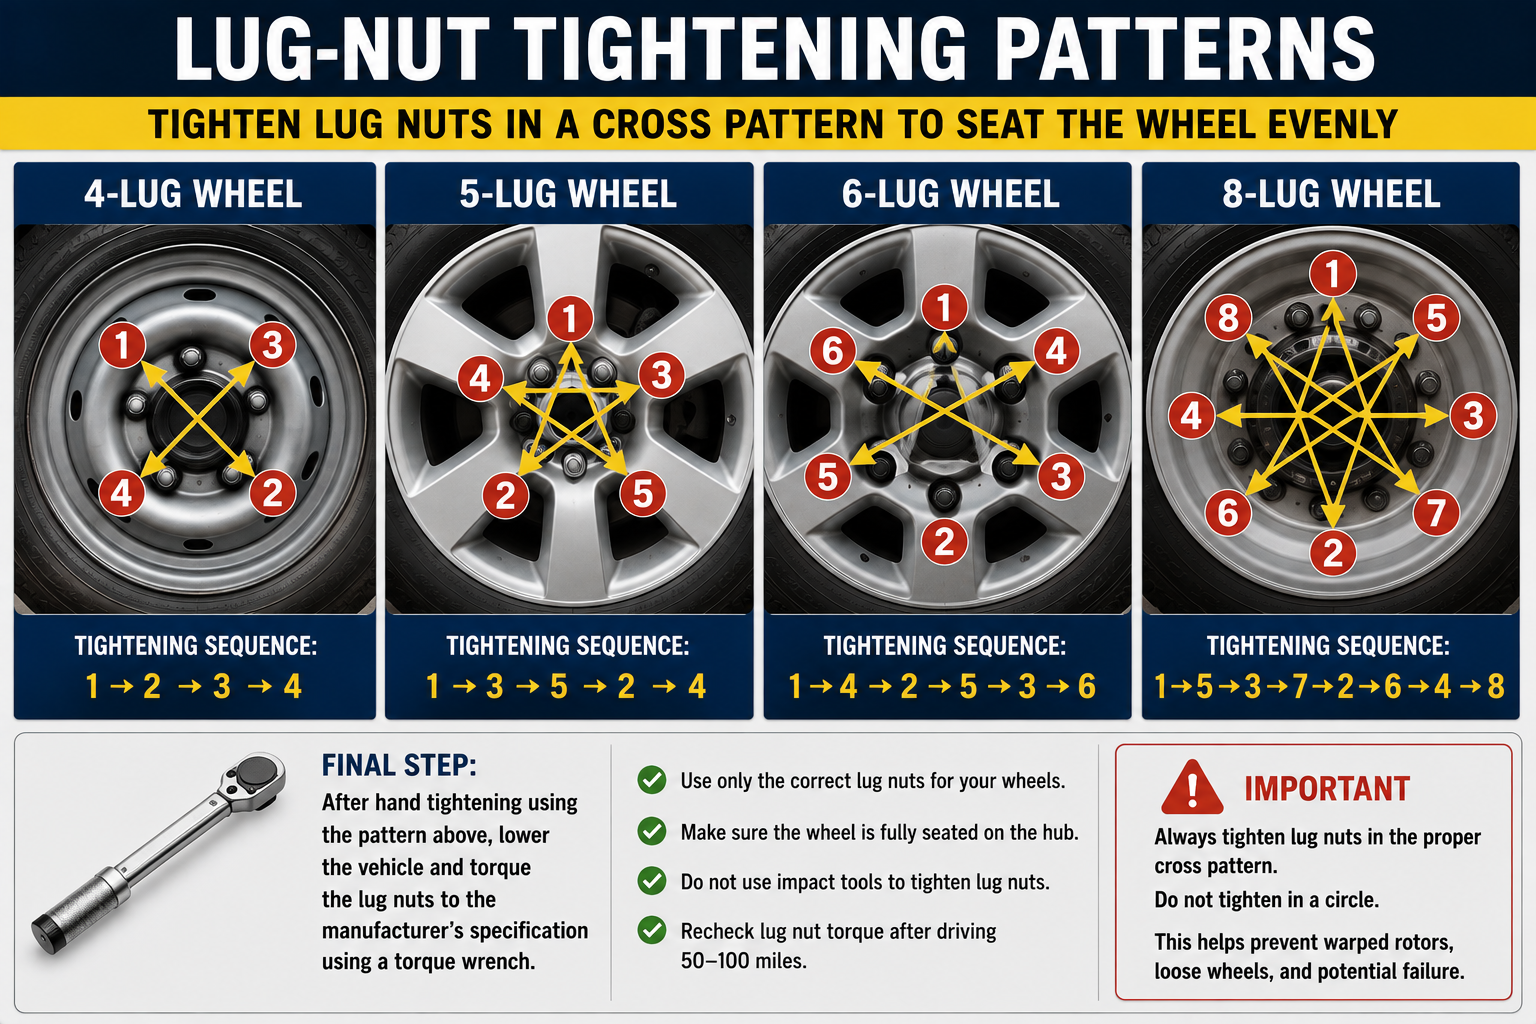
Step 12 – Snug the Lug Nuts in a Cross Pattern
With the vehicle still raised, gently snug the lug nuts.
Do not completely tighten one nut and then simply move around the wheel in a circle.
Instead, work across the wheel using the appropriate opposing or cross pattern.
This helps seat the wheel evenly against the hub.
Do not perform the final tightening while the wheel can freely rotate.
Step 13 – Lower the Vehicle
Slowly lower the vehicle until the tire is firmly on the ground.
Continue lowering and remove the jack according to its instructions.
Watch the vehicle and wheel as the weight transfers back onto the tire.
Do not put your hands or feet underneath the vehicle while lowering it.
Step 14 – Tighten the Lug Nuts
With the vehicle safely on the ground, tighten the lug nuts again using the proper cross pattern.
The correct final procedure is to tighten the lug nuts to the vehicle manufacturer’s specified torque using a torque wrench.
If you are changing the tire on the roadside without a torque wrench, securely tighten the nuts and have their torque checked with the proper equipment as soon as practical.
Do not assume tighter is always better. Excessive force can damage wheel studs or other components.
Step 15 – Check the Spare Tire
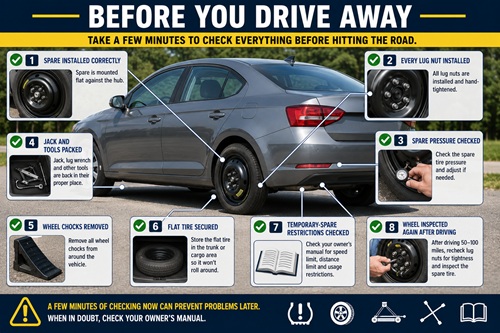
Before driving away, inspect the wheel.
Make sure every lug nut is installed.
Look at the wheel and confirm that it appears fully seated.
Check the spare tire pressure if you have a gauge.
The correct pressure may be printed on the spare or specified by the vehicle manufacturer.
Temporary spare tires can require considerably different pressure from the vehicle’s regular tires.
Step 16 – Pack Everything
Do not drive away and leave your equipment beside the road.
Pack the flat tire.
Pack the jack.
Pack the lug wrench.
Pack the wheel-lock key.
Retrieve the wheel chocks.
Retrieve your flashlight, warning triangles, gloves, and other equipment.
Make sure nothing has been left underneath the vehicle.
Step 17 – Check Whether the Spare Has Driving Restrictions
A full-size spare and a compact temporary spare are not necessarily used the same way.
Compact temporary spares are designed for limited use and commonly have restrictions involving speed, distance, inflation pressure, and vehicle operation.
Read the markings on the tire and follow the vehicle manufacturer’s instructions.
Do not assume that a speed or distance limit you remember from another vehicle applies to your spare.
Step 18 – Drive Carefully
Treat the first part of your drive as a test.
Accelerate gently.
Brake earlier than usual.
Take corners carefully.
Avoid potholes and unnecessary rough roads.
Pay attention to the steering and listen for unusual sounds.
If you notice severe vibration, pulling, wobbling, unusual noise, or another significant change in the way the vehicle handles, find a safe location and stop.
Step 19 – Inspect the Wheel Again
After driving a short distance, stop somewhere safe and inspect the spare again.
Look at the tire.
Check that every lug nut is still present.
Look for obvious pressure loss or anything unusual about how the wheel is sitting.
Have the lug nuts checked with a torque wrench and tightened to the manufacturer’s specification as soon as practical.
The damaged tire should then be repaired or replaced.
Quick Tire-Changing Checklist
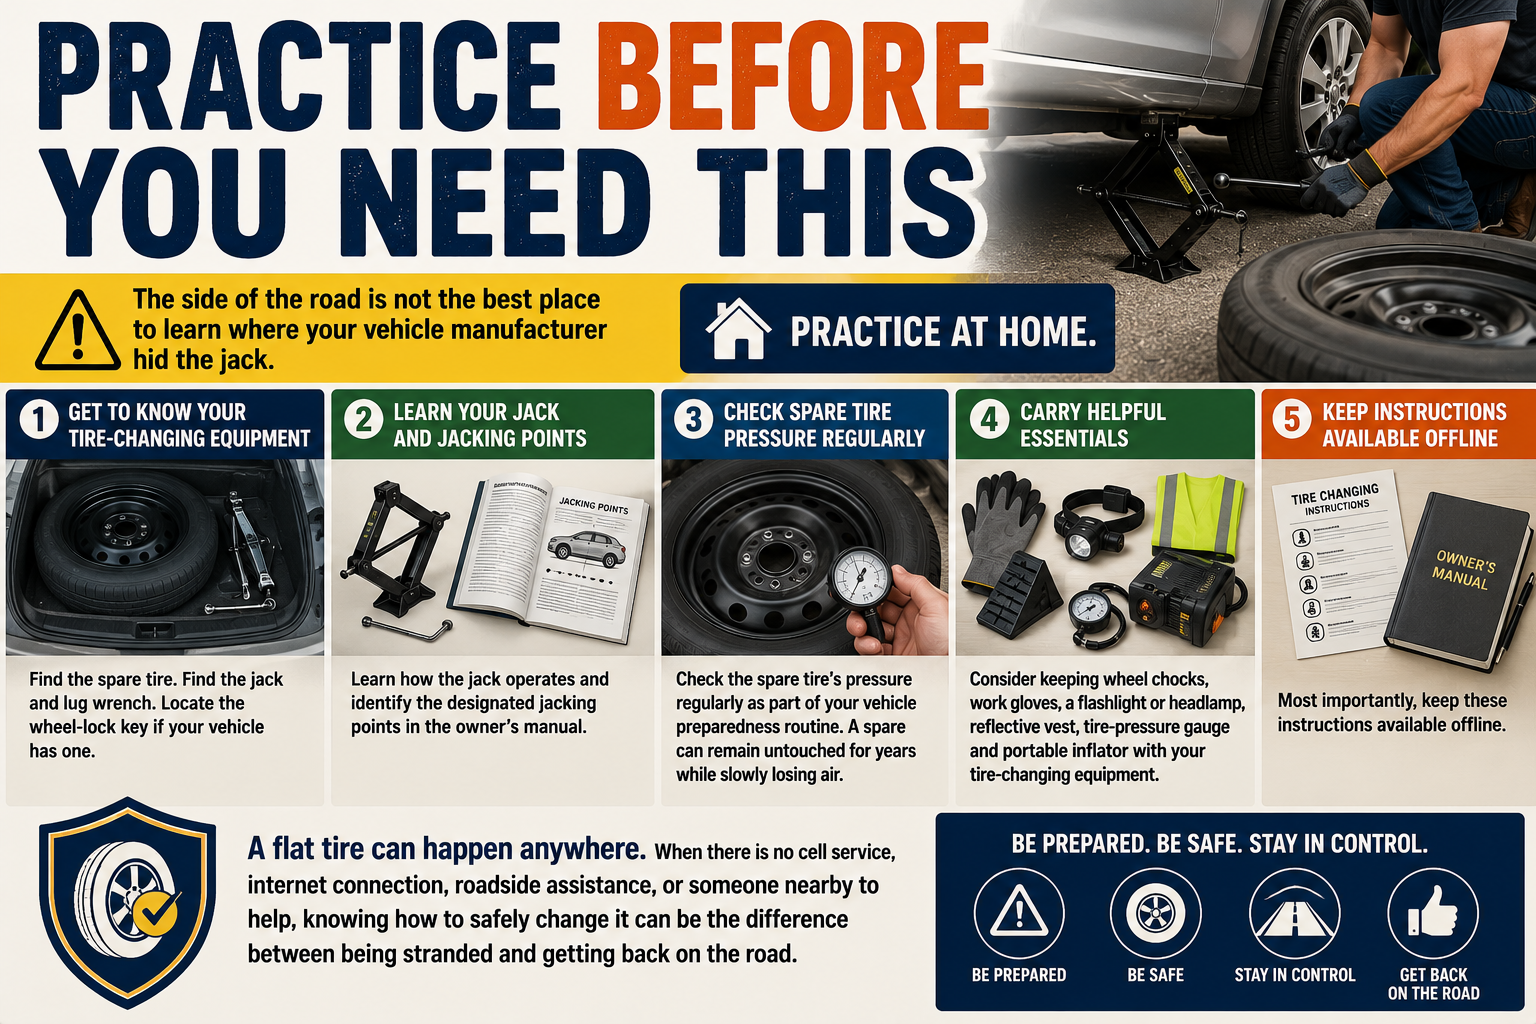
Use this checklist as a quick reference when changing a flat tire. Follow the steps in order and always refer to your vehicle owner’s manual for vehicle-specific instructions.
1. Secure the Vehicle
☐ Move to firm, level ground away from traffic.
☐ Turn on the hazard lights.
☐ Put the vehicle in Park or secure a manual transmission as recommended.
☐ Set the parking brake firmly.
☐ Place a wheel chock against a wheel that will remain on the ground.
2. Prepare the Equipment
☐ Get the spare tire, jack, lug wrench, and wheel-lock key if required.
☐ Check that the spare tire is usable and properly inflated.
☐ Remove the wheel cover or hubcap if it blocks access to the lug nuts.
3. Prepare the Wheel
☐ With the tire still on the ground, loosen each lug nut slightly.
☐ Do not remove the lug nuts yet.
☐ Locate the manufacturer’s designated jacking point.
4. Raise the Vehicle Safely
☐ Position the jack securely on firm, level ground.
☐ Make sure the jack is correctly aligned with the designated jacking point.
☐ Raise the vehicle only high enough to change the tire.
☐ NEVER get underneath a vehicle supported only by an emergency jack.
5. Remove the Flat Tire
☐ Completely remove the loosened lug nuts and keep them together.
☐ Pull the flat tire straight off the hub or wheel studs.
☐ Place the flat tire somewhere it cannot roll away.
6. Install the Spare
☐ Align the spare with the hub and wheel studs.
☐ Push the wheel fully into position.
☐ Install and thread every lug nut by hand first.
☐ Snug the lug nuts using the appropriate cross or star pattern.
7. Lower and Tighten
☐ Carefully lower the vehicle until the tire is firmly on the ground.
☐ Remove the jack.
☐ Tighten the lug nuts evenly using the proper cross pattern.
☐ Have the lug nuts tightened to the manufacturer’s specified torque with a torque wrench as soon as practical.
8. Before Driving Away
☐ Check that the spare is properly installed and adequately inflated.
☐ Make sure every lug nut is installed.
☐ Pack the jack, lug wrench, wheel-lock key, and other equipment.
☐ Remove the wheel chocks.
☐ Secure the flat tire inside the vehicle.
☐ Check the temporary spare for speed, distance, pressure, and other restrictions.
9. Once You’re Moving
☐ Drive cautiously and pay attention to vibration, pulling, or unusual noises.
☐ Stop somewhere safe after a short distance and inspect the wheel again.
☐ Have the lug-nut torque verified to the manufacturer’s specification.
☐ Repair or replace the damaged tire as soon as possible.
Practice Before You Need This
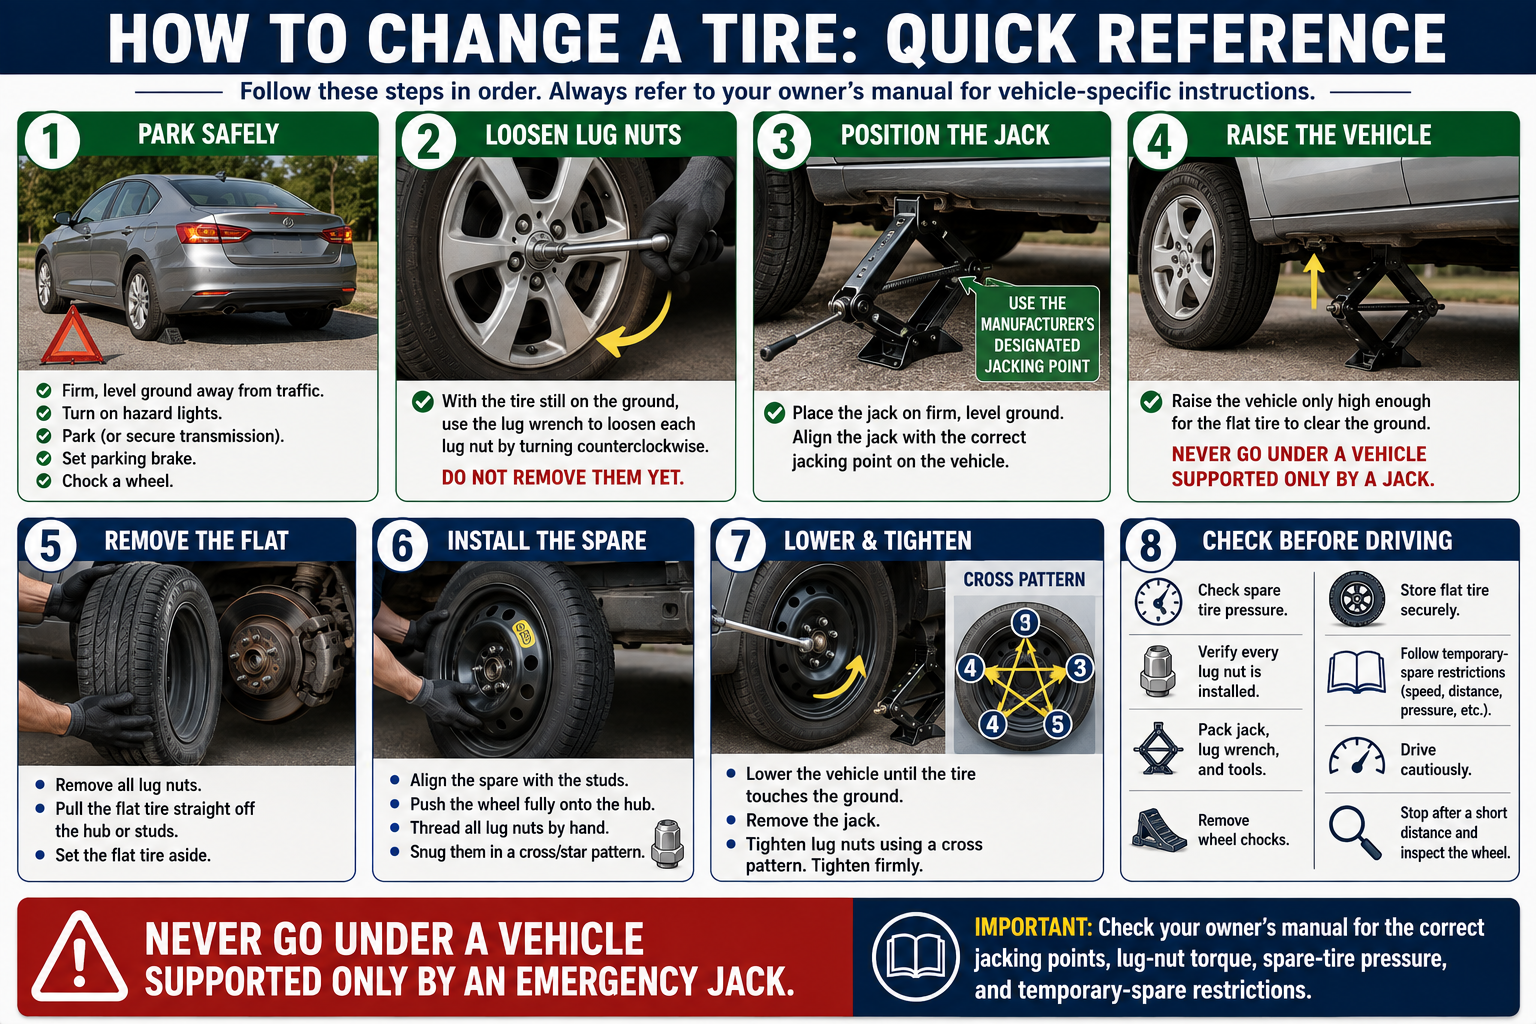
The side of the road is not the best place to learn where your vehicle manufacturer hid the jack.
Practice at home.
Find the spare tire. Find the jack and lug wrench. Locate the wheel-lock key if your vehicle has one. Learn how the jack operates and identify the designated jacking points in the owner’s manual.
Check the spare tire’s pressure regularly as part of your vehicle preparedness routine. A spare can remain untouched for years while slowly losing air.
Consider keeping wheel chocks, work gloves, a flashlight or headlamp, reflective vest, tire-pressure gauge and portable inflator with your tire-changing equipment.
Most importantly, keep these instructions available offline.
A flat tire can happen anywhere. When there is no cell service, internet connection, roadside assistance, or someone nearby to help, knowing how to safely change it can be the difference between being stranded and getting back on the road.
© Prepping Communities. This content is for informational purposes only and not professional advice. Use at your own risk.
Terms | Privacy | Guidelines