
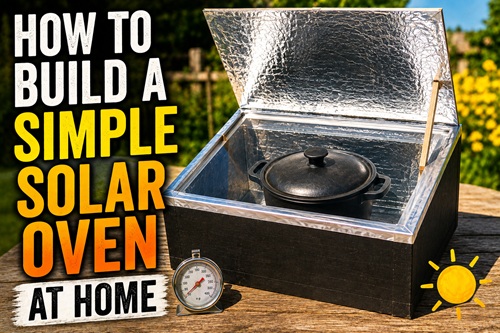
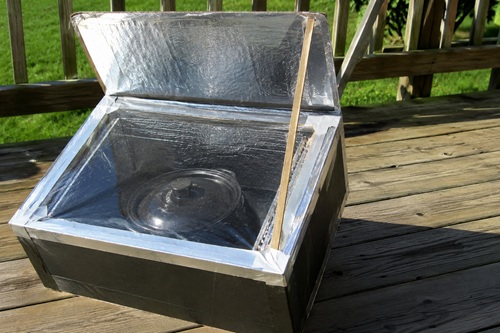
A solar oven is one of the simplest ways to cook food without electricity, propane, natural gas, or firewood. Instead of producing heat by burning fuel, it captures energy from the sun and holds that heat around your food.
You can build a basic solar oven from two cardboard boxes, aluminum foil, insulation, a clear cover, and a dark cooking surface. It won’t replace a regular stove, and it won’t work well every day, but when strong sunlight is available it gives you another way to cook without using any of your stored fuel.
That’s what makes a solar oven particularly useful for preparedness. During a long power outage, propane, butane, firewood, charcoal, and generator fuel are limited resources. Sunlight isn’t something you have to stockpile.
The basic cardboard version is also inexpensive enough that you can build one, experiment with it, and learn how solar cooking works before deciding whether you want to build a more permanent version.
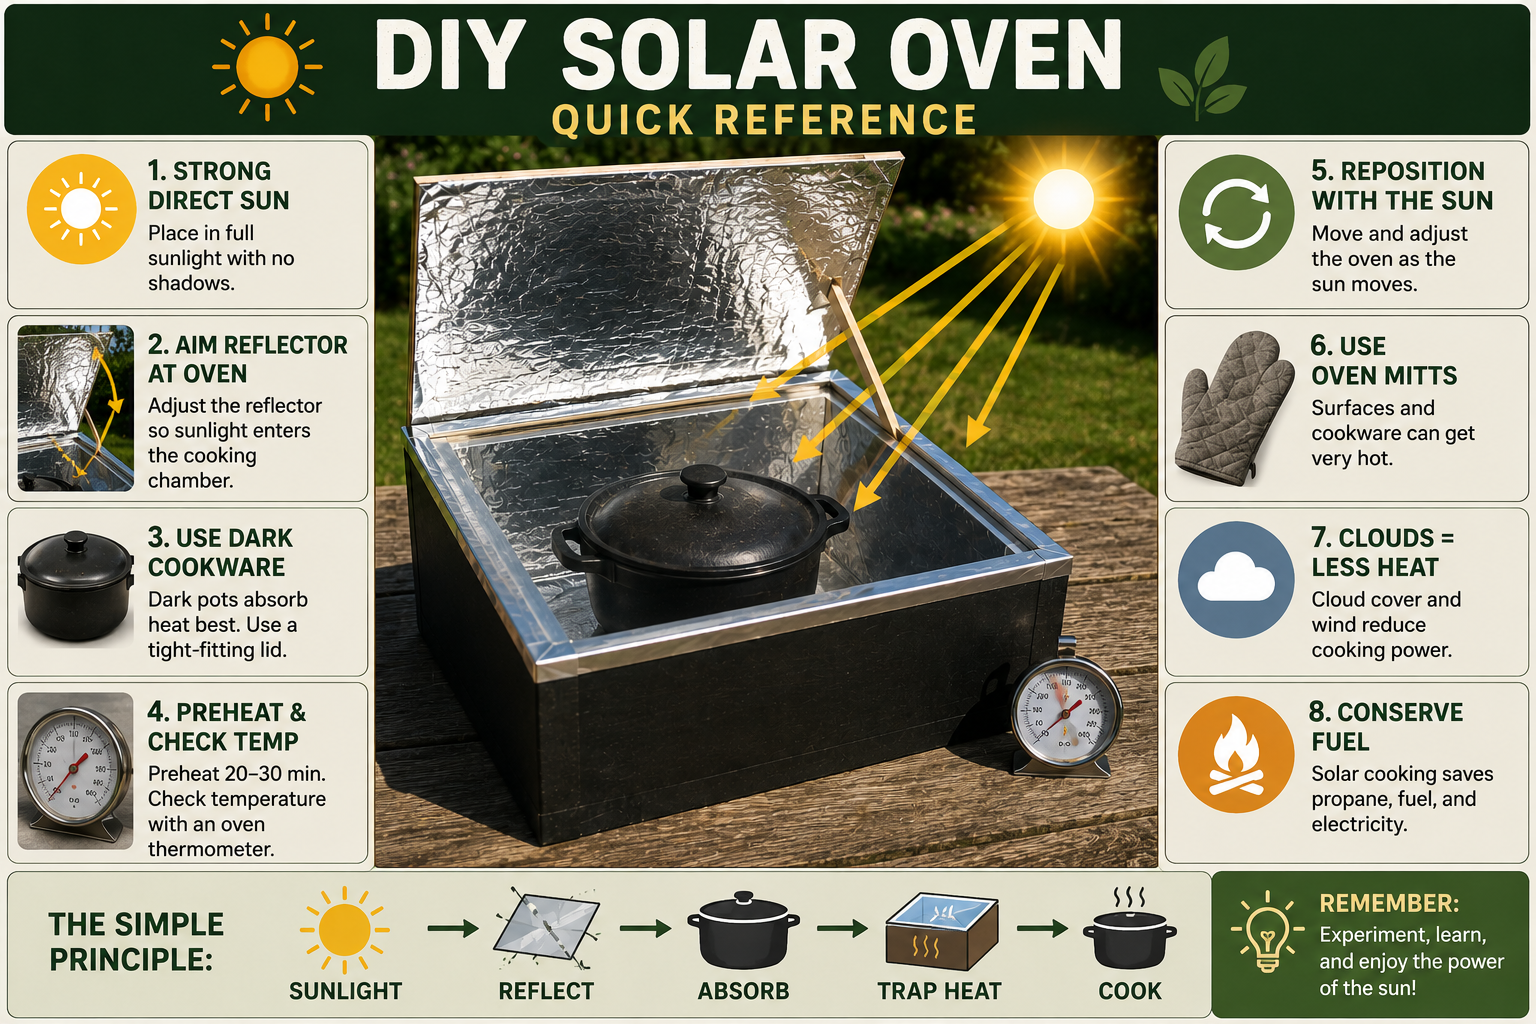
How a Solar Oven Works
A solar oven doesn’t create energy. It collects sunlight and converts that energy into heat.
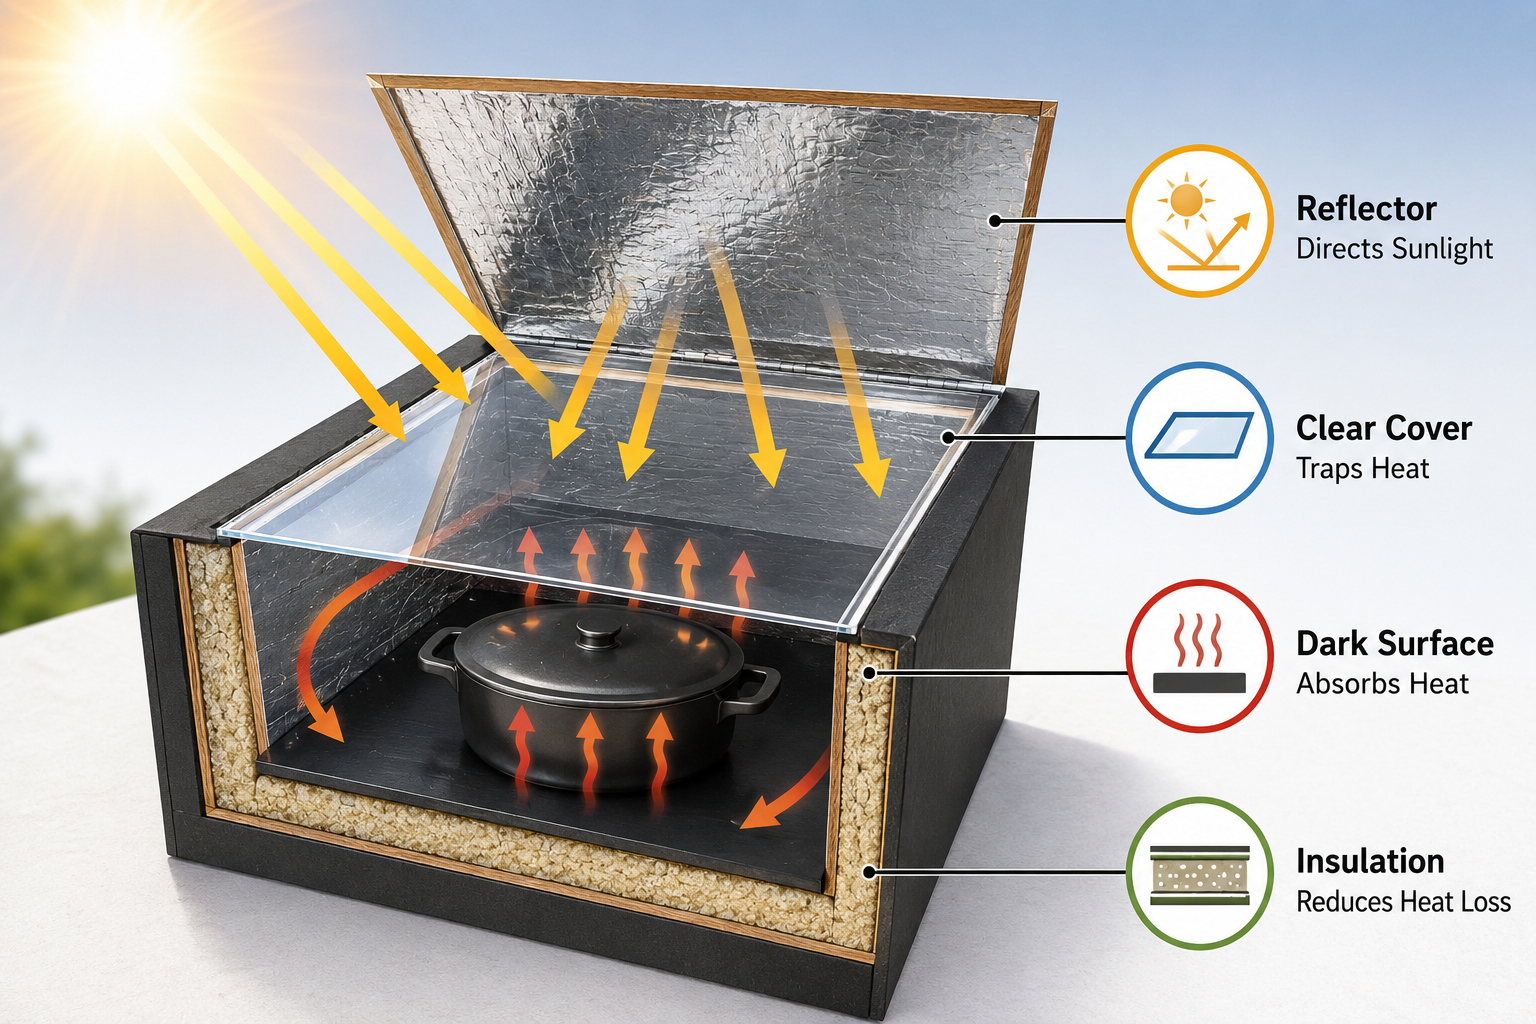
Several parts of the oven work together to make this happen.
A reflective surface directs additional sunlight into the cooking chamber.
A dark surface absorbs that sunlight and converts it into heat.
A clear cover allows sunlight to enter while slowing the escape of warm air.
Insulation around the cooking chamber reduces heat loss through the sides and bottom.
Put those four things together and the temperature inside the box can become considerably hotter than the surrounding air.
It’s similar to what happens inside a vehicle sitting in direct sunlight. Sunlight passes through the windows, the interior absorbs that energy, and heat builds up inside.
A solar oven uses the same basic principle but puts that trapped heat to work cooking food.
What You’ll Need
You don’t need specialized equipment to build a basic box-style solar oven.
Gather:
- One large cardboard box
- One smaller cardboard box that fits inside it
- Aluminum foil
- A flat black metal tray or other dark, heat-safe cooking surface
- Crumpled newspaper, corrugated cardboard, wool, or another dry insulating material
- A suitable clear cover, such as a properly fitted piece of glass
- Tape
- Glue
- Scissors
- Utility knife
- A stick, wire, or scrap piece of wood for supporting the reflector
- A dark-colored cooking pot with a lid
- Oven thermometer if available
- Food thermometer for checking cooked food
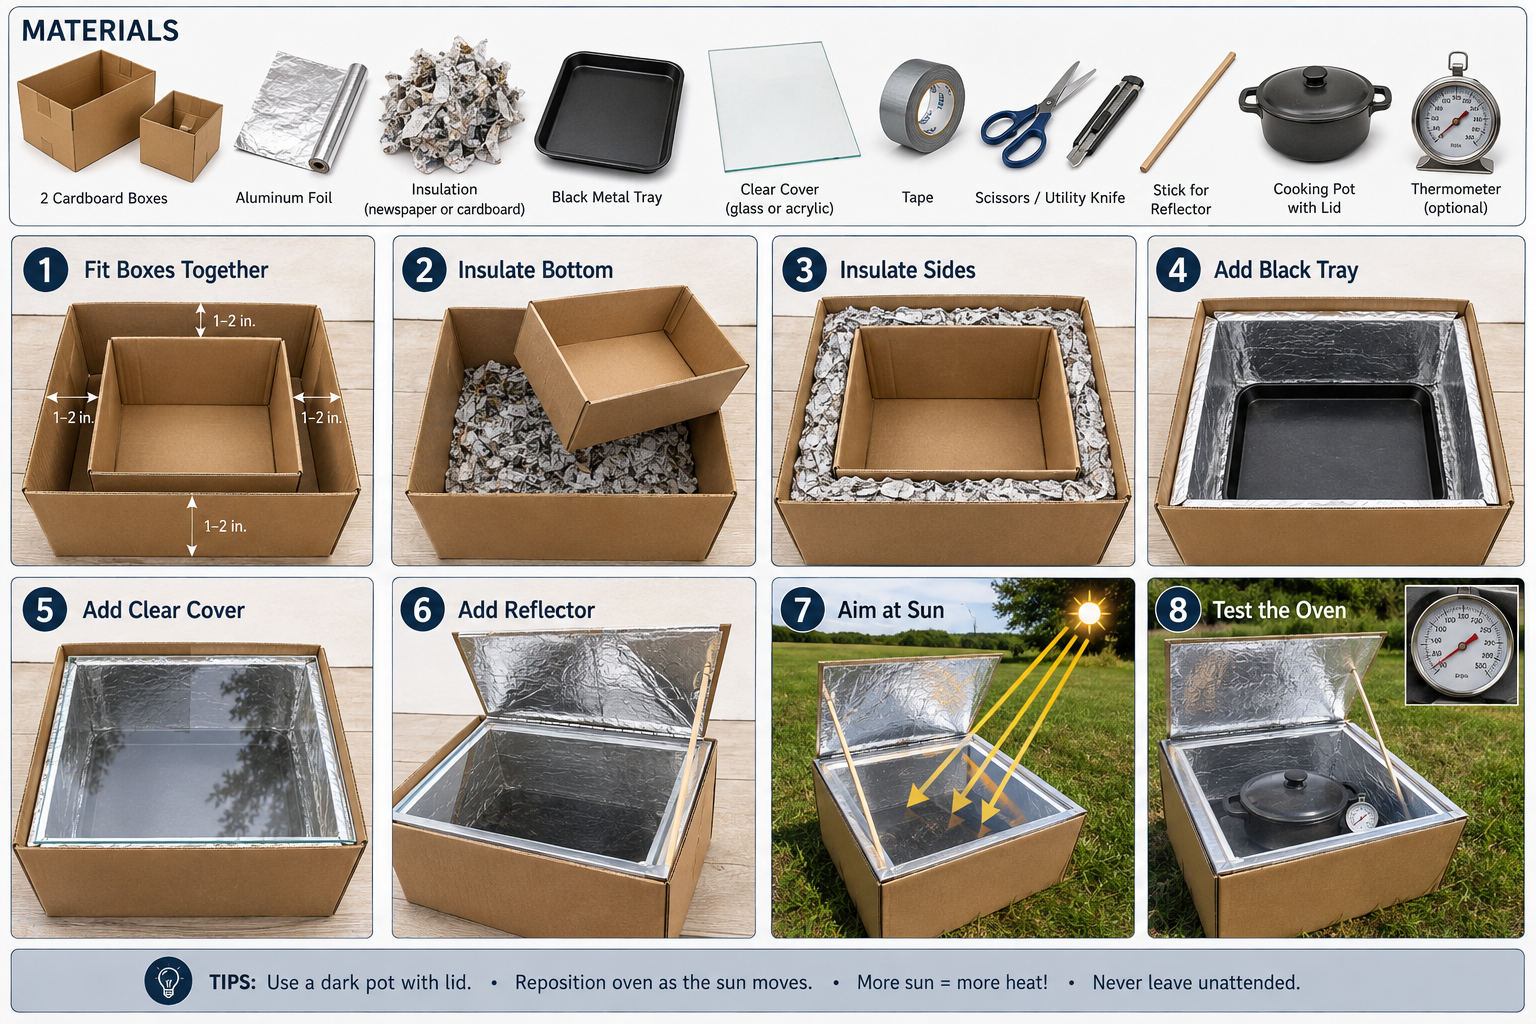
Ideally, the smaller box should leave approximately 1–2 inches of space between it and the larger box. That space will become the insulated wall surrounding your cooking chamber.
A wide, relatively shallow box usually works better than a very deep one because sunlight can reach the cooking area more easily.
Step 1: Fit the Boxes Together
Place the smaller box inside the larger box and center it.
Check that you have space around all four sides as well as underneath the smaller box. You don’t need perfectly equal spacing, but you want enough room to add insulation.
If the inner box sits too low, add additional cardboard or insulation underneath it until the top edges of the two boxes are reasonably close.
Don’t permanently attach anything yet. Make sure everything fits before moving on.
Step 2: Insulate the Bottom
Remove the smaller box.
Place a layer of dry insulation in the bottom of the larger box. Crumpled newspaper works well for a simple experimental oven, while layers of corrugated cardboard are another inexpensive option.
The purpose of this layer is to slow the movement of heat from the cooking chamber into the ground and surrounding air.
Place the smaller box back inside and make sure it sits level.
Avoid using insulation that could melt, produce harmful fumes, or become dangerous when heated.
Step 3: Insulate Around the Sides
Fill the space between the two boxes with additional insulation.
Work your way around all four sides so the smaller box is surrounded evenly.
Pack the material firmly enough to hold the inner box in position, but don’t compress everything as tightly as possible. Trapped air contributes to the insulating ability of materials such as crumpled paper and cardboard.
When you’re finished, the inner box should sit securely inside the larger box without moving around easily.
You now have an insulated cooking chamber.
Step 4: Add the Heat-Absorbing Surface
Place a flat black metal tray in the bottom of the inner box.
This is an important part of the design.
Shiny materials reflect much of the sunlight that hits them. Dark surfaces absorb much more of that energy and convert it into heat.
A black baking tray works well. Another piece of dark, heat-safe metal can also be used.
Your cooking pot will eventually sit on this surface.
Step 5: Make the Clear Cover
The top of the cooking chamber needs a transparent cover that allows sunlight to enter while reducing the escape of heated air.
A properly fitted piece of glass is a good option for a reusable oven. Whatever material you choose should be suitable for the temperatures it may encounter and should not melt or release harmful substances when heated.
Position the cover over the inner box.
Try to eliminate large gaps around the edges. The oven doesn’t need to be perfectly airtight, but every large opening allows heated air to escape.
The better you retain that heat, the hotter the oven can become.
Step 6: Build the Reflector
Cut a piece of sturdy cardboard roughly the width of the oven opening.
Cover one side with aluminum foil, with the shiny side facing outward. Glue or tape the foil securely to the cardboard.
Try to keep the foil reasonably smooth. Large wrinkles can scatter sunlight in different directions rather than directing it toward the oven.
Attach the reflector to the back of the oven so it can be raised and lowered.
Use a stick, piece of wire, scrap wood, or another simple support to hold the reflector at different angles.
You don’t need a complicated adjustment system. You simply need to be able to change the angle as the sun moves.
Step 7: Aim the Oven at the Sun
Take the finished oven outside and place it somewhere with unobstructed direct sunlight.
Avoid trees, buildings, fences, or anything else that may cast a shadow over the oven as the sun moves.
Turn the oven toward the sun and adjust the reflector.
Watch where the reflected sunlight lands. You want as much of that reflected light as possible entering through the transparent cover and reaching the dark cooking area.
You’ll usually know when the reflector is positioned correctly because the cooking chamber becomes noticeably brighter.
The oven will not remain perfectly aligned all day. As the sun moves across the sky, you’ll need to reposition the oven periodically.
Step 8: Test It Before Cooking
Before putting food inside, test your oven.
Place an oven thermometer inside the cooking chamber if you have one. Close the transparent cover and position the oven in strong direct sunlight.
Leave it for approximately 20–30 minutes and check the temperature.
Continue checking it over the next hour.
This simple test tells you much more about your particular oven than an estimated temperature from someone else’s design.
Your results will depend on the size of the oven, quality of the insulation, reflector size, outside temperature, wind, cloud cover, season, sun angle, and your geographic location.
If the temperature continues climbing, your oven is successfully capturing and retaining solar heat.
Cooking With Your Solar Oven
Once you’ve tested the oven, start with something simple.
Use a dark-colored cooking pot with a tight-fitting lid whenever possible. Dark cookware absorbs solar energy efficiently, while the lid helps retain heat and moisture.
Smaller quantities of food generally heat faster than large, heavy meals, so don’t start by filling your biggest pot.
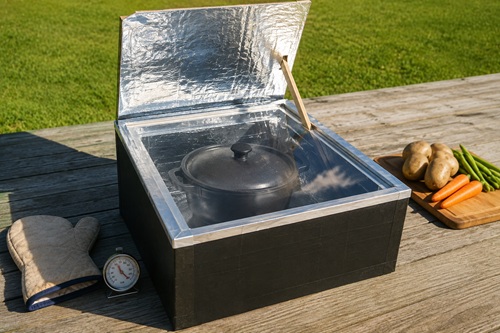
Place the pot on the black tray and close the transparent cover.
Keep an eye on the position of the sun. If the cooking chamber is no longer receiving strong direct sunlight, turn the oven and readjust the reflector.
Solar cooking is generally slower than cooking on a conventional stove. There isn’t one reliable rule such as simply doubling the normal cooking time because conditions can change considerably from one day to another.
Sunlight and temperature are what matter.
A clear summer afternoon may provide excellent cooking conditions, while passing clouds can quickly reduce the amount of heat entering the oven.
What Can You Cook?
Solar ovens are particularly well suited to foods that tolerate slower cooking.
Good foods to experiment with include:
- Potatoes
- Rice
- Beans
- Soups
- Stews
- Oatmeal
- Vegetables
- Casseroles
- Simple breads and baked dishes
Once you understand how hot your oven gets and how well it maintains that temperature, you can experiment with more foods.
Start simple and learn how your particular oven behaves.
Food Safety Still Matters
One of the biggest mistakes with solar cooking is assuming that food must be safe because it has been sitting in a hot box for several hours.
That’s not necessarily true.
A solar oven can heat slowly, and its temperature can fall when clouds block the sun. Certain foods can therefore spend too much time at temperatures where bacteria can grow.
Meat, poultry, eggs, leftovers, and other potentially hazardous foods should reach the appropriate safe internal temperature.
Use a food thermometer.
Don’t rely only on cooking time, appearance, or the temperature of the oven itself.
If changing weather prevents the oven from maintaining adequate cooking temperatures, move the food to another cooking method rather than continuing to wait for the sun.
Getting More Heat From Your Oven
If your solar oven isn’t getting hot enough, there are several things to check before rebuilding it.
First, check the reflector. Make sure the reflected sunlight is actually entering the cooking chamber rather than shining onto the ground or the outside of the box.
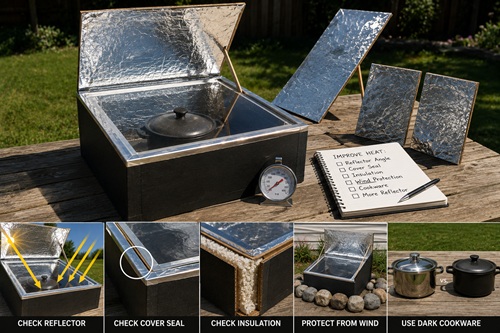
Next, inspect the clear cover. Large gaps around the edges allow heated air to escape.
Check your insulation as well. The inner cooking chamber should be surrounded by insulation on the bottom and sides.
Wind can also remove heat surprisingly quickly. If possible, place the oven somewhere protected from strong wind without blocking the sunlight.
Your cookware matters too. A shiny stainless-steel pot reflects solar energy. A dark pot absorbs much more of it.
You can also experiment with a larger reflector or additional reflector panels to direct more sunlight into the oven.
Change one thing at a time and watch what happens to the temperature. That’s the easiest way to determine which improvements actually work.
Preheat Before Adding Food
Just as you would preheat a conventional oven, it can help to preheat your solar oven before adding food.
Set it up in direct sunlight and let the temperature climb for 20–30 minutes.
Then carefully open the cover, place the food inside, and close it again.
Try not to repeatedly open the oven just to check the food. Every time you remove the cover, much of the accumulated heat escapes.
A thermometer allows you to monitor what’s happening without constantly opening the cooking chamber.
Keep Following the Sun
A solar oven only works while it receives useful sunlight.
If you’re cooking something for several hours, check the oven periodically and turn it toward the sun as necessary.
You may also need to change the reflector angle.
You don’t have to adjust it every few minutes. The goal is simply to keep strong sunlight entering the cooking chamber throughout the cooking period.
After using the oven several times, you’ll get a feel for how often it needs to be moved.
What About Cloudy Days?
Solar ovens perform best under strong, direct sunlight.
Thin clouds may only reduce performance, while heavy cloud cover can make useful cooking temperatures difficult or impossible to maintain.
That’s why a solar oven shouldn’t be your only emergency cooking method.
Think of it as one tool among several.
When the weather is sunny, use solar energy and conserve your stored fuel. When conditions aren’t suitable, switch to propane, wood, charcoal, a camp stove, or another backup cooking method available to you.
That combination gives you far more flexibility than depending entirely on one source of cooking heat.
Can a Solar Oven Make Water Safe?
Solar heat can potentially be used as part of a water-treatment process, but don’t assume that water is safe simply because it became hot.
Warm water and properly treated water are two different things.
If you’re using heat to make questionable water safer, you need to know that the water itself reached the necessary treatment conditions. Cloudy or chemically contaminated water may also require additional treatment.
For emergency water treatment, use established methods you can verify rather than guessing based on how hot the container feels.
Make a Better Version Later
Your first solar oven doesn’t need to last for years.
In fact, there is an advantage to building the inexpensive cardboard version first.
Use it to learn.
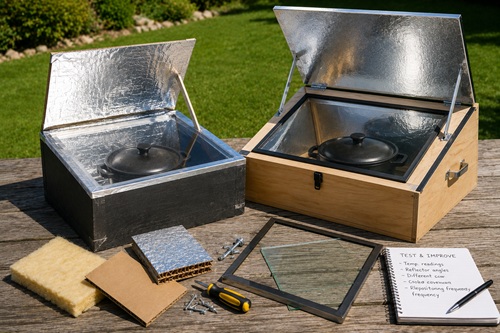
Measure how hot it gets. Experiment with different reflector angles. Try different cookware. See how quickly the temperature drops when clouds pass overhead. Find out how often you need to reposition it.
Once you’ve proven the concept where you live, you can build a more permanent version.
A reusable solar oven could be built with plywood, better insulation, a fitted glass cover, stronger adjustable reflectors, and a more durable cooking chamber.
The materials may change, but the principles remain exactly the same: reflect sunlight, absorb the energy, trap the heat, and reduce heat loss.
Solar Oven Safety
A solar oven doesn’t have an open flame, but it can still become hot enough to cause burns.
Treat the cookware, dark metal tray, glass, and interior surfaces as you would equipment from a regular oven.
Use oven mitts or heat-resistant gloves when removing cookware.
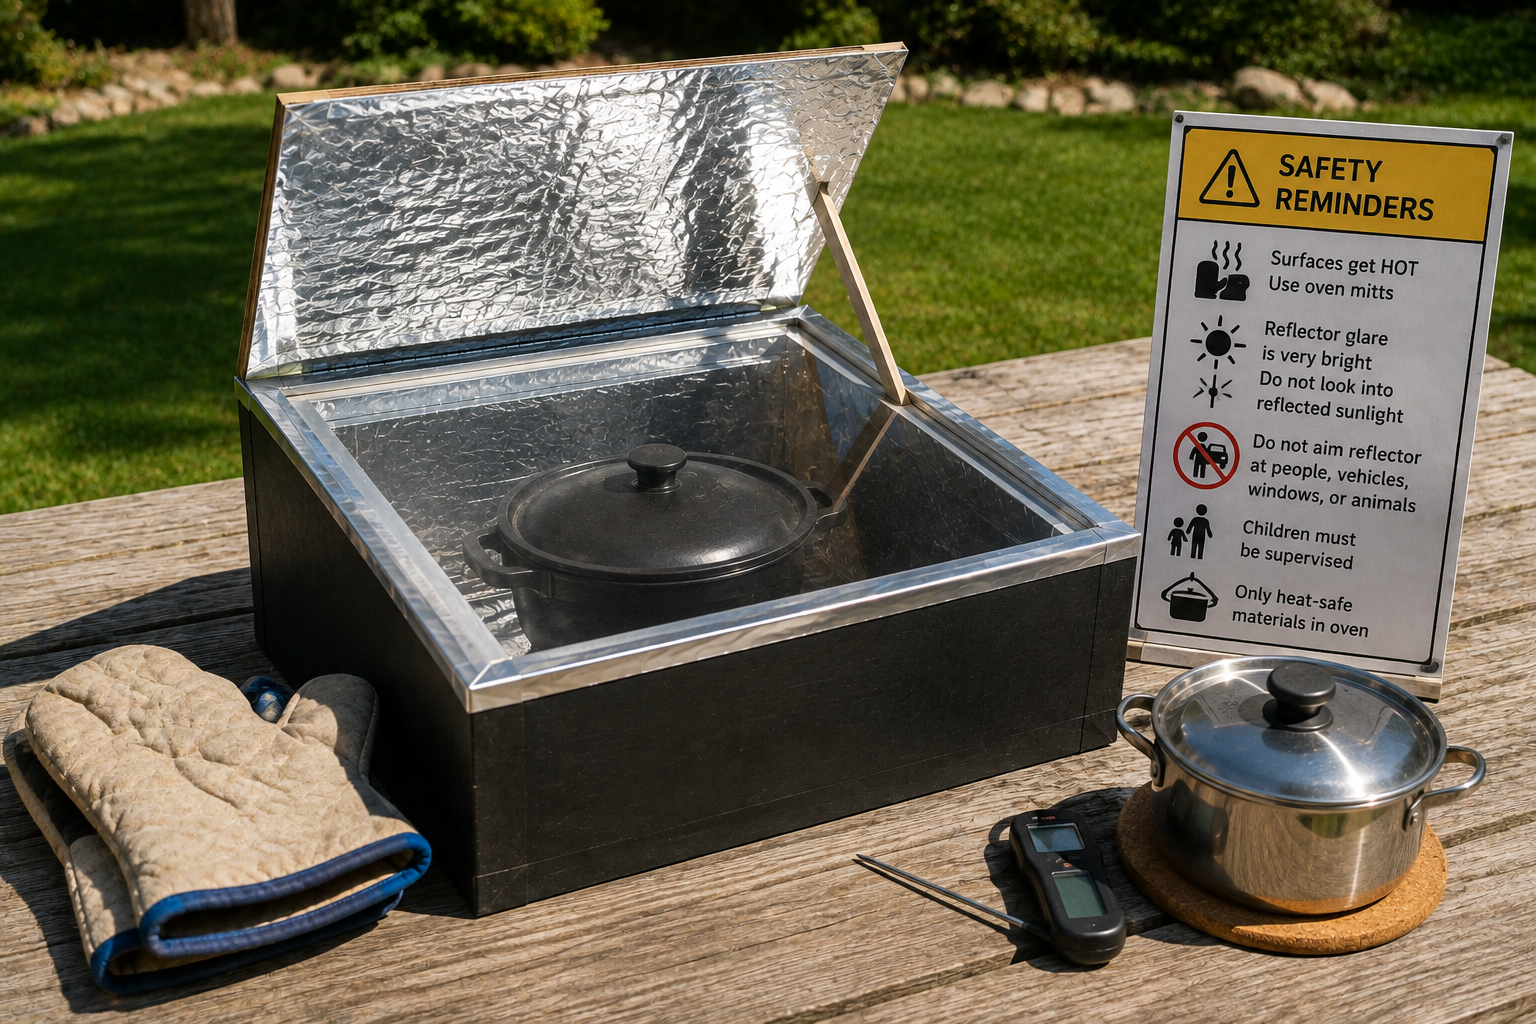
Be careful with reflected sunlight as well. A reflector can produce extremely bright glare. Don’t intentionally look into concentrated reflected sunlight or aim the reflector toward people, vehicles, windows, animals, or anything that could be affected by concentrated heat or glare.
Children should be supervised while the oven is being used.
Also avoid placing materials inside the heated cooking chamber unless you’re confident they are appropriate for elevated temperatures.
Why a Solar Oven Is Useful for Preparedness
A solar oven isn’t going to solve every cooking problem during an emergency.
That’s not really the point.
Its value comes from giving you another option.
Imagine an extended power outage where you have propane for your camp stove, firewood for outdoor cooking, and a solar oven.
Every sunny day you use the solar oven is a day when some of that propane or firewood stays in reserve.
Instead of depending entirely on one cooking method, you’re spreading the demand across several.
That’s useful during a short outage, but it becomes much more important if a disruption lasts for weeks.
Fuel that doesn’t need to be burned today is fuel you still have tomorrow.
Preparedness Action Plan
Build the inexpensive cardboard version before spending money on a permanent solar oven.
Choose a clear sunny day and place an oven thermometer inside. Record the temperature after approximately 30, 60, and 90 minutes. This will give you a realistic idea of what your homemade oven can achieve under local conditions.
Once you’ve tested the empty oven, try cooking something simple and forgiving such as potatoes. Pay attention to the reflector position, how often you need to turn the oven, how quickly the temperature changes, and what happens when a cloud temporarily blocks the sun.
Then try it again on another day.
The important part isn’t building the perfect solar oven on your first attempt. It’s learning how to capture and use solar heat with materials you can easily obtain.
If you can build one, test it, improve it, and successfully cook with it now, you’ll already understand the process if you ever need to rely on solar cooking during an extended power outage or other situation where conventional cooking fuel is limited.
© Prepping Communities. This content is for informational purposes only and not professional advice. Use at your own risk.
Terms | Privacy | Guidelines