
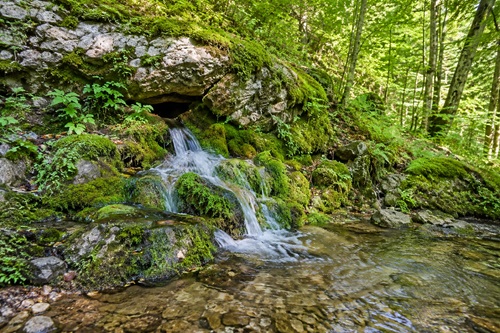
For anyone interested in greater self-reliance, a dependable water supply is one of the most valuable resources a property can have. While wells, rainwater collection systems, and stored water all have an important place in emergency preparedness, some properties have another resource that has quietly supplied clean water for generations – a natural spring. If properly located, protected, and maintained, a spring can provide a continuous source of water without depending on municipal infrastructure, electrical power, or regular fuel supplies.
Finding a natural spring, however, is not as simple as locating a wet patch of ground and digging a hole. Water moves through the landscape in many different ways. Rainwater runs across the surface, groundwater travels through layers of soil and rock, seasonal seeps appear after storms, and underground aquifers may release water at specific locations where geological conditions allow it to reach the surface. Understanding the difference between these water sources is the foundation of successful spring development.
A common mistake is assuming that clear water is automatically safe to drink. Another is believing that every spring produces enough water to justify development. In reality, every potential spring should be carefully evaluated for consistency, flow rate, water quality, legal considerations, and long-term reliability before investing significant time or money. A spring that flows steadily throughout the year may become an excellent addition to your household water system, while another may only provide water for a few weeks after heavy rainfall.
This lesson explains how to locate potential springs, determine whether they are suitable for development, evaluate their reliability, protect them from contamination, and incorporate them into a broader household water strategy. Even if your property does not contain a natural spring, understanding how groundwater behaves will improve your ability to locate dependable water sources in both everyday life and emergency situations.
Step 1 – Understand How Natural Springs Form
Before searching for a spring, it helps to understand why springs exist in the first place. Every rainfall begins a slow journey through the landscape. Some water evaporates back into the atmosphere, some flows across the surface into streams and rivers, and some gradually soaks into the ground. As water moves downward through layers of soil, sand, gravel, and fractured rock, it eventually reaches underground formations capable of storing large amounts of groundwater. These formations, known as aquifers, act as natural underground reservoirs that slowly collect and store water over long periods of time.
Groundwater rarely remains motionless. Gravity continues pulling it downhill beneath the surface until it encounters an obstacle. Dense clay layers, solid bedrock, or other impermeable formations can prevent the water from moving deeper underground. When that happens, the water begins moving sideways along the top of the barrier until it eventually finds an opening where it can naturally emerge at the surface. That location becomes a natural spring.
Because spring water travels underground, its temperature is usually much more stable than lakes, ponds, or streams. It often feels refreshingly cool during the summer and noticeably warmer than surface water during the winter. This relatively constant temperature is one reason springs have historically been valued for drinking water, food storage, irrigation, and livestock watering.
Not all springs are alike. Some produce only a slow trickle that may barely fill a bucket during an entire day. Others discharge thousands of gallons every hour. The amount of water available depends on several factors, including the size of the aquifer, recent precipitation, local geology, seasonal groundwater levels, and how much water is being withdrawn elsewhere within the same watershed. Understanding these natural processes helps explain why some springs continue flowing during extended droughts while others disappear entirely after only a few weeks without rain.
The important lesson is that a spring represents much more than visible water. It is the surface expression of an underground water system. Everything that happens uphill from the spring – including rainfall, land use, agriculture, construction, wildlife activity, and contamination – can eventually influence both the quantity and quality of the water emerging from the ground. For that reason, evaluating a spring always begins by understanding the landscape that feeds it rather than focusing only on the point where the water becomes visible.
Step 2 – Learn Where Natural Springs Are Most Likely to Occur
Once you understand how springs form, the next step is learning where they are most likely to appear. Although a spring can emerge almost anywhere that groundwater reaches the surface, certain landscape features greatly increase your chances of finding one. Rather than wandering randomly across your property, begin by studying how the land is shaped and how water naturally moves through it. A few minutes spent reading the terrain can save hours of unnecessary searching.
Hillsides are among the best places to begin looking because groundwater naturally travels downhill beneath the surface. As it moves through soil, gravel, and fractured rock, it eventually encounters layers that slow or completely block its downward movement. Unable to continue deeper, the water begins moving sideways until it reaches an opening where it can escape. This is why springs are commonly found along the sides of hills, near the base of rocky slopes, or where different soil and rock layers meet.
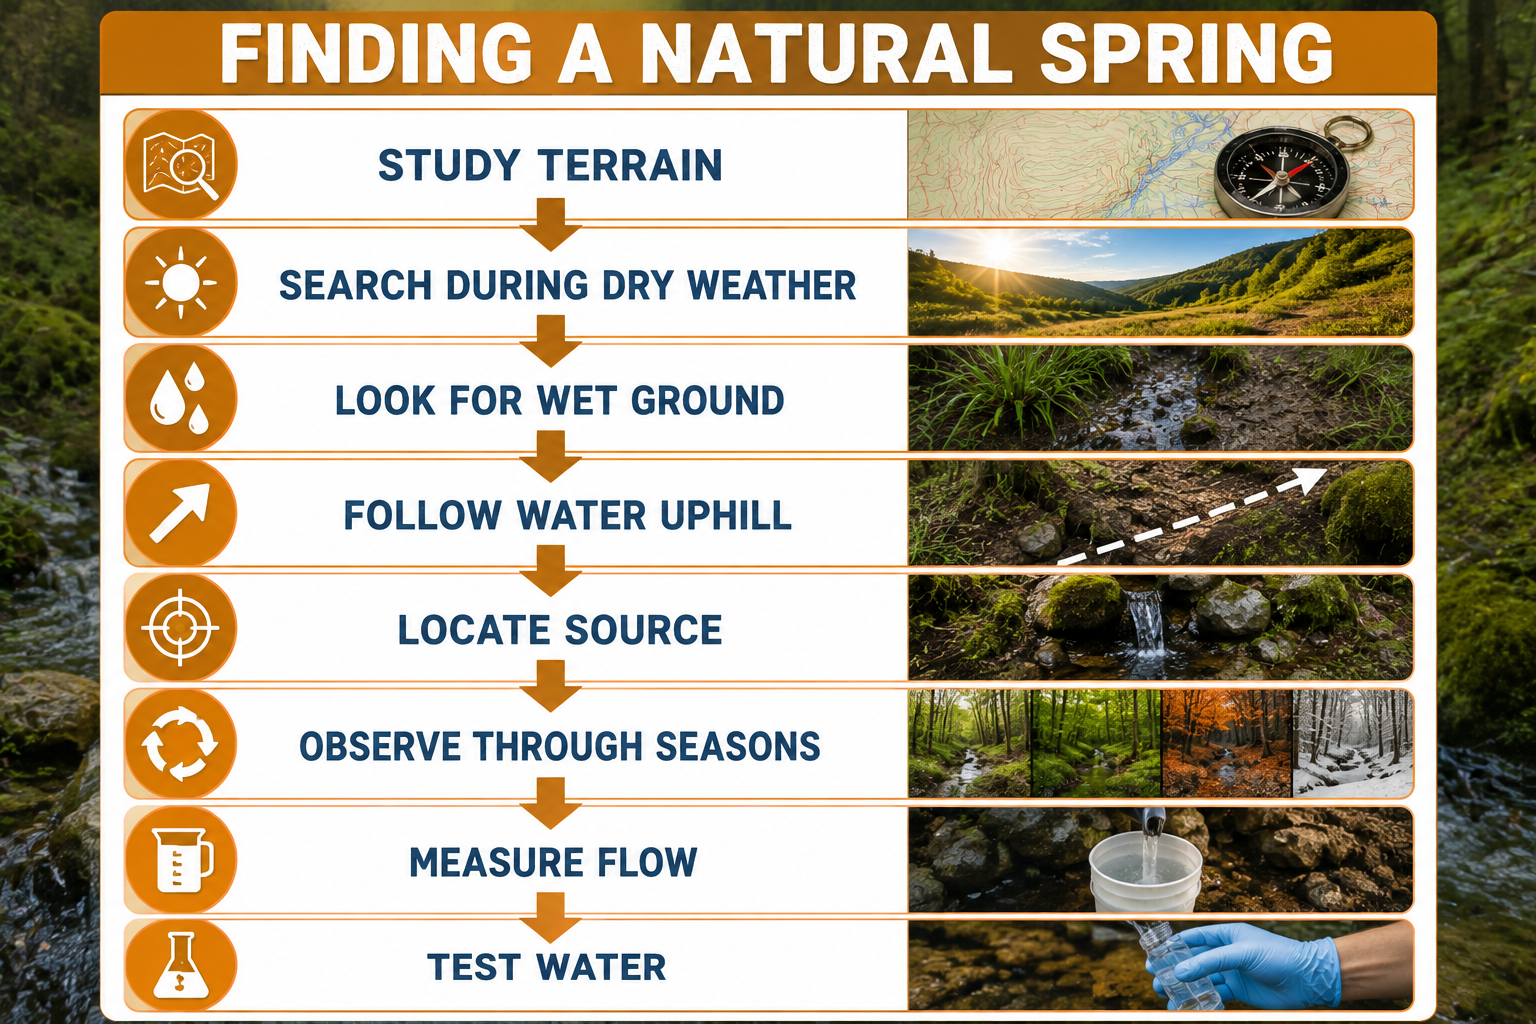
Topographic maps and aerial photographs can be valuable tools before you ever set foot on the property. Contour lines reveal valleys, ridges, benches, and drainage patterns that are often difficult to recognize while standing on the ground. Satellite imagery may also reveal unusually green vegetation, damp areas, or narrow drainage channels that remain visible even during dry weather. By identifying several promising locations before beginning your search, you can concentrate your efforts where groundwater is most likely to emerge.
Timing is equally important. The best time to search for a spring is usually after the surrounding ground has had an opportunity to dry. Immediately following heavy rain, runoff can create wet areas almost everywhere, making it difficult to distinguish temporary surface water from groundwater that is flowing continuously. Waiting for several dry days – or even longer during wetter seasons – allows temporary puddles to disappear while genuine groundwater sources continue producing moisture. Persistent wet areas during otherwise dry conditions are often the best places to investigate further.
As you walk your property, pay attention to subtle clues rather than expecting to find a large stream flowing from the hillside. Many natural springs begin as nothing more than a slow trickle emerging from beneath rocks or dense vegetation. Ground that remains damp while surrounding soil is dry deserves careful inspection. Moss growing on otherwise dry rock faces, unusually green patches of grass, clusters of moisture-loving plants, small channels carved through the soil, or gravel that appears constantly washed clean can all indicate that groundwater is present below the surface.
Wildlife can also provide useful clues. Birds, deer, and other animals often establish well-used trails leading to dependable water sources. While animal activity alone does not confirm the presence of a spring, repeated use of the same location may suggest that water is available throughout much of the year. Likewise, insects such as dragonflies and certain amphibians may be more common around areas where groundwater consistently reaches the surface.
It is important to remember that one visit rarely tells the whole story. Return to promising locations during different seasons and after different weather conditions. A spring that flows steadily during the hottest weeks of summer is far more valuable than one that appears only after prolonged rainfall. Taking photographs, recording GPS coordinates, and keeping notes about water flow and surrounding conditions will help you compare observations over time and identify the most dependable sources on your property.
The goal during this stage is not to begin digging or installing pipes. Instead, your objective is to locate several potential groundwater sources and gather enough information to determine which ones deserve closer evaluation. Careful observation at the beginning of the process often prevents unnecessary work later and significantly increases the chances of developing a reliable long-term water source.
Step 3 – Distinguish a Natural Spring from a Seep
One of the most common mistakes people make while searching for groundwater is confusing a natural spring with a seep. Although both create wet ground, they form differently and have very different potential as long-term water sources. Learning to recognize the difference can save considerable time and effort before any excavation begins.
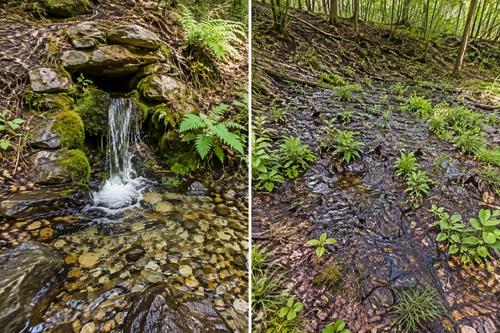
A true natural spring usually has a clearly defined point where water emerges from the ground. If you carefully follow the visible flow uphill, you should eventually reach a location where the water appears to originate from beneath the soil, gravel, or exposed rock. Even if the flow is small, the source is generally concentrated enough that it can be identified with careful observation.
A seep behaves quite differently. Instead of flowing from one specific point, groundwater slowly oozes through a broad area of soil. The ground may remain constantly wet over several square meters, but there is no obvious outlet where the water can easily be collected. Vegetation growing in these locations is often dense because the soil remains saturated for long periods. While a seep may provide moisture for wildlife or contribute water to nearby streams, it is generally much more difficult to develop into a dependable household water supply.
One simple method of distinguishing the two is to observe how the water behaves after several weeks of dry weather. A concentrated spring will often continue flowing from the same outlet, although the amount of water may decrease. A seep, however, may simply leave damp soil with little or no visible movement of water. Following prolonged dry conditions, the differences usually become much easier to recognize.
Water clarity can also provide useful information. Fresh groundwater emerging directly from a spring is often remarkably clear because it has been naturally filtered while moving through layers of soil and rock. However, clear water should never be assumed to be safe for drinking. Bacteria, parasites, dissolved chemicals, and other contaminants cannot be detected simply by looking at the water. Laboratory testing is always required before using any untreated spring as a drinking water source.
Do not become discouraged if your first discovery turns out to be a seep instead of a spring. Properties often contain several groundwater features, and the knowledge gained while investigating one location frequently helps identify better opportunities elsewhere. Every observation improves your understanding of how water moves across your land and brings you closer to locating a dependable source.
Step 4 – Measure the Spring’s Flow Rate
Finding a natural spring is only the beginning. Before investing time and money into developing it, you need to determine whether it produces enough water to meet your intended needs. Some springs flow continuously throughout the year but produce only a few gallons each day. Others discharge enough water to support an entire household, livestock, irrigation, and long-term storage. Measuring the flow rate allows you to estimate how useful the spring may become and helps determine whether additional storage or supplemental water sources will be necessary.
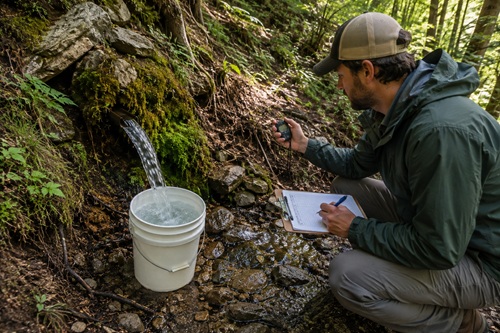
Fortunately, measuring a spring does not require specialized equipment. One of the simplest methods uses a clean container with a known capacity, such as a five-gallon bucket, along with a stopwatch or the timer on a mobile phone. If the spring already flows through a small channel, temporarily direct the water into the container. Record exactly how long it takes to fill, then divide the volume of the container by the number of minutes required. For example, if a five-gallon bucket fills in two minutes, the spring is producing approximately two and a half gallons per minute.
One measurement, however, is rarely enough. Flow rates change throughout the year as groundwater levels rise and fall. A spring that appears abundant during spring snowmelt may slow considerably during late summer when rainfall has been limited for weeks. For that reason, measure the spring several times throughout the year and keep a written record of the results. Recording measurements after extended dry periods provides a much better indication of the spring’s dependable output than measurements taken immediately after heavy rain.
It is also important to think beyond today’s conditions. Consider how much water your household actually uses during an average day. Drinking water represents only a small portion of total consumption. Cooking, washing, food preparation, gardening, livestock, and sanitation all increase demand considerably. Even a spring with a relatively modest flow may become highly useful if water is collected continuously in a properly sized storage tank. Water that slowly accumulates throughout the day can provide a substantial reserve when larger amounts are needed all at once.
Pay attention to how the spring responds after storms. If the water suddenly becomes muddy or cloudy following rainfall, surface water may be entering the system. A brief period of discoloration is not uncommon, but water that remains cloudy for an extended time may indicate erosion, poor natural filtration, or contamination entering the recharge area. Any significant change in flow, color, odor, or clarity should be investigated before the water is used.
As you evaluate the spring, document everything you observe. Record the date, recent weather conditions, estimated flow rate, water appearance, and any noticeable changes. Taking photographs from the same location each time you visit provides an excellent visual record that can reveal gradual changes over months or years. These records become valuable if you later decide to improve the spring or compare seasonal performance.
The objective during this stage is not simply to determine how much water the spring produces today. Instead, you are trying to understand how reliable the source will be throughout the entire year. Consistent production over many months is usually far more valuable than impressive flow immediately after heavy rainfall.
Step 5 – Evaluate the Surrounding Area for Contamination Risks
Even the strongest natural spring can become unsafe if contaminants enter the groundwater before it reaches the surface. Because groundwater travels beneath the landscape, activities occurring hundreds of meters – or sometimes even farther – uphill from the spring may eventually influence water quality. Understanding what surrounds the spring is therefore just as important as evaluating the spring itself.
Begin by examining the land above the spring rather than focusing only on the outlet where the water emerges. Look for anything that could introduce bacteria, chemicals, or other contaminants into the groundwater. Septic systems, livestock pens, manure storage, fertilized fields, pesticide applications, fuel storage, abandoned equipment, old dumps, mining activity, roads, and construction projects can all affect groundwater quality under certain conditions. The closer these activities are to the recharge area, the greater the potential risk.
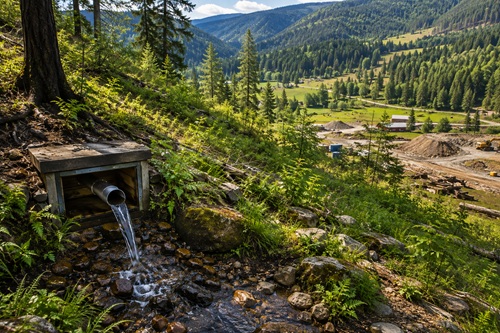
Natural contamination sources should also be considered. Wildlife regularly visit water sources, and their waste can introduce harmful microorganisms into groundwater. Beavers, deer, rodents, birds, and other animals may all contribute bacteria or parasites, particularly where water collects near the surface before entering the spring. Fallen leaves, decaying vegetation, and accumulated organic debris can also influence water quality over time if they are allowed to collect around the outlet.
Pay close attention to erosion. Heavy rainfall may wash sediment into the spring, especially if vegetation has been removed or the surrounding soil has been disturbed. Excessive erosion not only affects water clarity but can also damage collection systems and increase maintenance requirements. Areas showing signs of recent landslides, bank failure, or exposed roots deserve careful monitoring before any development begins.
The recharge area itself deserves protection whenever possible. Avoid storing chemicals, fuel, paint, fertilizers, or pesticides uphill from the spring. If livestock are present, prevent them from walking directly through the spring or grazing immediately around the outlet. Animals can quickly damage vegetation, increase erosion, and introduce contamination that affects water quality long after they have moved elsewhere.
One of the most important lessons for anyone developing a spring is recognizing that appearance alone means very little. Crystal-clear water can still contain harmful bacteria, parasites, dissolved chemicals, or heavy metals that cannot be seen, smelled, or tasted. For that reason, visual inspection should always be viewed as only the first stage of evaluating water quality. Laboratory testing remains the only reliable way to determine whether the water is safe for drinking and food preparation.
By thoroughly evaluating the surrounding landscape before development begins, you reduce the likelihood of expensive problems later. Protecting the area that supplies the spring is often far easier – and much less costly – than trying to correct contamination after it has already entered the water source.
Step 6 – Test the Water Before You Drink It
Finding a clear, cold spring is exciting, but this is also where many people make their biggest mistake. Clear water is not necessarily safe water. Harmful bacteria, parasites, agricultural chemicals, and dissolved minerals cannot be detected simply by looking at the water. A spring may appear perfectly clean while still containing contaminants capable of causing serious illness. Before using any natural spring as a drinking water source, it should be professionally tested.
Start by collecting a water sample according to the instructions provided by the testing laboratory. Improper sample collection can introduce contamination that produces misleading results, so avoid touching the inside of the sample container or allowing dirt, leaves, or debris to enter the bottle. Many certified laboratories provide detailed instructions and sterile containers specifically designed for water testing.
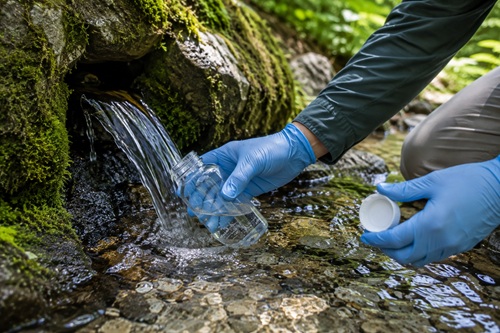
A complete water analysis should include testing for bacteria, particularly total coliform bacteria and Escherichia coli (E. coli), which are common indicators of contamination from human or animal waste. Depending on your location, the laboratory may also recommend testing for nitrates, heavy metals, pH, turbidity, hardness, dissolved minerals, or agricultural chemicals. Properties located near farmland, mining operations, industrial sites, or areas with extensive septic systems may require additional testing based on local conditions.
Testing should never be viewed as a one-time event. Water quality can change over time as weather patterns, groundwater levels, and surrounding land use change. Even a spring that has produced excellent water for years should be retested regularly. Annual testing is a good practice for most private water sources, but additional testing should be performed after flooding, major storms, nearby excavation, wildfires, earthquakes, or any noticeable change in the water’s appearance, taste, or odor.
Do not rely solely on inexpensive home water test kits when evaluating a primary drinking water source. While they can provide useful screening information, they often do not detect the full range of biological and chemical contaminants that may be present. Professional laboratory testing provides a much more complete assessment and establishes a baseline that future tests can be compared against.
If laboratory results identify contamination, do not assume the spring must be abandoned. Many water quality problems can be addressed through improved source protection, better collection methods, or properly designed treatment systems. The important point is to understand exactly what contaminants are present before selecting a filtration or purification method. Different contaminants require different treatment approaches, and no single filter removes every possible hazard.
Testing is one of the most important investments you can make during spring development. It protects not only your own health but also everyone who may depend upon the water in the future.
Step 7 – Understand Water Rights Before Beginning Development
Many property owners are surprised to learn that finding a spring on their land does not automatically give them unrestricted authority to develop or divert the water. Water laws vary considerably between countries, provinces, states, and even local jurisdictions. In some areas, groundwater and surface water are regulated differently, while other regions apply additional environmental protections that affect what work can be performed around natural water sources.
Before digging, installing pipes, building a spring box, or altering the natural flow, contact the government agency responsible for water resources in your area. They can explain whether permits are required, whether the spring is subject to environmental regulations, and whether development could affect downstream water users or protected habitats. Understanding these requirements before construction begins is usually much easier than correcting problems after work has already been completed.
You should also determine whether utility easements, conservation areas, wetlands, or protected waterways exist on or near your property. Activities that appear minor, such as redirecting water or installing a storage tank, may require approvals depending on local regulations. While these requirements vary widely, learning them early prevents unnecessary delays and helps ensure that any improvements comply with applicable laws.
If the spring will become your household’s primary water source, consider consulting professionals who regularly work with private water systems. Depending on your circumstances, this may include a hydrogeologist, licensed well contractor, environmental consultant, surveyor, or attorney familiar with local water law. Their advice can prevent costly mistakes and help ensure that the system is designed appropriately from the beginning.
Water rights should never discourage someone from investigating a spring, but they should always be understood before major investments are made. Responsible development protects both your property and the long-term health of the groundwater system itself.
Step 8 – Plan the Spring Development Carefully
Once you have confirmed that the spring produces enough water, laboratory testing has been completed, and legal requirements have been addressed, you can begin planning how the spring will be developed. Planning before digging often results in a cleaner, safer, and more reliable system while reducing unnecessary excavation and future maintenance.
The primary objective is to collect groundwater as close to its natural point of emergence as practical while protecting it from contamination. Water that flows across the ground quickly becomes exposed to soil, leaves, insects, wildlife, and surface runoff. Capturing the water before extensive surface exposure generally produces the highest-quality source and reduces the amount of treatment required later.
Think about how the finished system will be used. Will the spring supply drinking water, irrigation, livestock, emergency storage, or several different purposes? Will gravity provide enough pressure, or will a pump eventually be required? Is there enough space for a storage tank, and can maintenance be performed safely throughout the year? Answering these questions before construction begins helps avoid expensive modifications later.
Accessibility is another important consideration. A spring hidden deep within thick vegetation may seem ideal because it is protected from disturbance, but routine inspections, maintenance, repairs, and water sampling become much more difficult if access is poor. Plan safe access routes that allow the spring to be inspected during all seasons without damaging the surrounding environment.
Finally, remember that every spring is unique. Differences in geology, flow rate, climate, elevation, soil type, and intended use mean there is rarely a single design that works everywhere. Taking the time to understand the characteristics of your specific spring will always produce better long-term results than trying to copy another installation exactly.
Step 9 – Develop the Spring Collection System
After confirming that the spring produces a dependable supply of water and laboratory testing has been completed, the next step is protecting the source while collecting the water efficiently. The objective is not to increase the amount of water the spring produces but to capture the water before it becomes exposed to surface contamination. Every disturbance to the area should be kept to a minimum because unnecessary excavation can permanently alter the natural flow of groundwater.
Begin by carefully exposing the point where the water naturally emerges from the ground. Remove loose soil, leaves, roots, and organic debris by hand whenever possible. Avoid using heavy equipment unless absolutely necessary, as excessive digging can collapse underground flow paths or redirect water away from its original outlet. Work slowly and disturb only the area required to reach stable, flowing water.
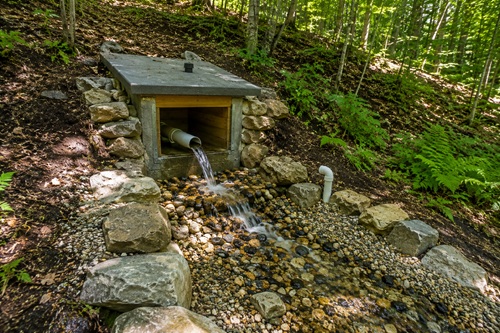
Once the source has been exposed, the collection area should be stabilized. Washed gravel is commonly used around the outlet because it helps support the surrounding soil while allowing groundwater to continue flowing freely. The gravel also helps reduce sediment entering the collection system. Dirt, clay, construction debris, or untreated organic material should never be placed directly around the spring because these materials can restrict water flow or introduce contamination.
Many developed springs use a collection pipe that intercepts the water close to its source. The pipe should be manufactured from materials approved for potable water and positioned so groundwater enters naturally without requiring pumps or excessive excavation. The goal is to collect the water while allowing the spring to continue functioning much as it did naturally. Trying to force additional water from the ground by enlarging the excavation often creates more problems than benefits.
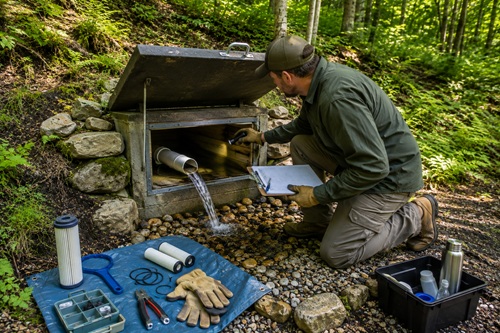
The collection point should then be protected with a spring box or similar enclosure. A spring box serves several important purposes. It shields the source from leaves, insects, wildlife, surface runoff, and sunlight while providing a convenient location for inspection and maintenance. Depending on the design, it may also allow heavier sediment to settle before the water enters storage or distribution pipes.
A properly constructed spring box should include a secure lid, screened ventilation if required, an overflow outlet, and access for future cleaning. Overflow water should always have a safe path away from the spring box so excess water does not pool around the structure or erode the surrounding soil. At the same time, the overflow opening should be screened to prevent rodents, insects, frogs, or other small animals from entering the system.
Every connection within the collection system should be carefully inspected before placing it into service. Loose fittings, poorly sealed joints, or damaged pipes can allow contaminated surface water to enter the system or allow valuable spring water to escape before reaching storage. Spending additional time inspecting each component during installation often prevents difficult repairs later.
Step 10 – Protect the Spring from Contamination
Developing a spring is only part of the process. Protecting the water source over the long term is equally important. Even an excellent spring can gradually become contaminated if the surrounding area is neglected or land use changes over time. Preventing contamination is almost always easier and less expensive than attempting to correct it later.
The area immediately surrounding the spring should remain as undisturbed as possible. Vegetation helps stabilize the soil, reduces erosion, and filters rainwater before it reaches the groundwater system. Avoid removing large amounts of natural vegetation unless absolutely necessary for maintenance or access. Bare soil is much more susceptible to erosion during heavy rainfall, allowing sediment and contaminants to enter the collection area.
Surface runoff should always be directed away from the spring. Water flowing across the ground can carry bacteria, fertilizers, pesticides, fuel residues, and other contaminants directly toward the collection system. Small drainage swales or shallow diversion ditches may help redirect runoff around the protected area without interfering with the natural groundwater flow beneath the surface.
Livestock should never have unrestricted access to the spring itself. Animals walking through the collection area can damage pipes, compact the soil, destroy vegetation, and introduce harmful bacteria through manure. If livestock depend on spring water, it is much better to pipe the water to a separate watering trough located a safe distance away. This protects both the water quality and the integrity of the spring.
Chemical storage should also be carefully considered. Fuel, pesticides, herbicides, fertilizers, paint, solvents, and other hazardous materials should never be stored uphill from the recharge area whenever alternatives exist. Even small spills can migrate through the soil and eventually reach the groundwater supplying the spring.
Routine inspections should become part of your maintenance schedule. Walk around the spring several times each year looking for signs of erosion, damaged pipes, cracked lids, excessive sediment, unusual vegetation changes, animal activity, or anything else that could affect water quality. Small problems are usually inexpensive to correct when discovered early but can become much more serious if ignored for months or years.
Step 11 – Incorporate the Spring into Your Household Water System
A dependable spring becomes even more valuable when it is integrated into a complete household water plan rather than being treated as an isolated water source. Even if the spring does not produce enough water to meet every household need directly, it can still significantly reduce dependence on municipal water or other supplies.
One of the most effective ways to use a spring is by continuously filling a storage tank. Because springs often flow twenty-four hours a day, even modest production gradually accumulates into a substantial reserve. A spring producing only a few gallons each minute can refill hundreds or even thousands of gallons over the course of a day if properly stored. This stored water can then be used when demand temporarily exceeds the spring’s natural output.
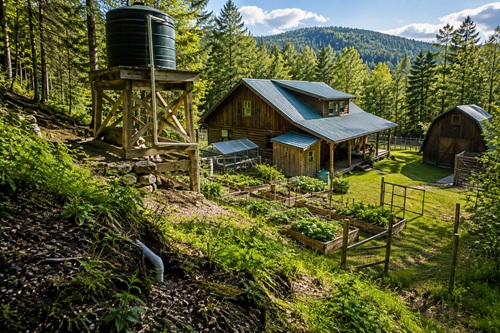
Whenever possible, locate storage tanks at a higher elevation than the buildings they will serve. Gravity-fed systems eliminate the need for pumps during normal operation and continue supplying water even during power outages. Where gravity systems are not practical, backup pumps powered by generators, batteries, or solar energy can provide additional flexibility while maintaining redundancy.
Water treatment should also be incorporated into the overall system. Depending on laboratory test results, treatment may include sediment filtration, activated carbon filtration, ultraviolet disinfection, reverse osmosis, chemical disinfection, or several methods working together. The treatment system should always be selected based on actual water test results rather than assumptions about water quality.
Finally, remember that no single water source should be your only source. Even a dependable natural spring benefits from additional layers of redundancy. Rainwater harvesting systems, emergency water storage, portable filters, wells, and nearby surface water sources all contribute to a more resilient household water strategy. If one system becomes unavailable because of drought, contamination, mechanical failure, or maintenance, the remaining sources continue providing valuable options.
A natural spring should therefore be viewed as one important component of a diversified water system rather than the entire solution. Combining multiple water sources provides greater reliability, greater flexibility, and greater resilience during both everyday use and emergency situations.
Common Mistakes to Avoid When Developing a Natural Spring
Developing a natural spring is often a long-term investment, and many of the problems that arise are the result of small mistakes made during the early stages of planning or construction. Fortunately, most of these mistakes can be avoided with careful observation and patience. Understanding what not to do is just as valuable as knowing the correct procedures.
One of the most common mistakes is assuming that every wet area is a natural spring. Surface runoff, seasonal seeps, broken irrigation lines, or poor drainage can all create the appearance of groundwater emerging from the soil. Before investing time or money, observe the area over several seasons and during extended dry weather. A dependable spring should continue producing water long after temporary surface moisture has disappeared.
Another frequent mistake is developing a spring before measuring its flow. A spring that appears to produce plenty of water during spring snowmelt or immediately after heavy rain may slow dramatically during the hottest part of summer. Measuring flow under different weather conditions provides a much better understanding of the spring’s true long-term capability and helps determine whether additional storage will be required.
Many people also overlook the importance of professional water testing. A spring may produce water that is crystal clear, cold, and pleasant tasting, yet still contain bacteria, parasites, agricultural chemicals, or naturally occurring minerals that make it unsuitable for drinking. Appearance alone cannot determine water quality. Every spring intended for household use should be professionally tested before it becomes part of a drinking water system, and testing should continue regularly throughout the life of the spring.
Excessive excavation is another mistake that can permanently alter the spring itself. Digging too aggressively may collapse underground flow paths, redirect groundwater, increase sediment, or even reduce the amount of water reaching the surface. The objective is to work with the natural flow rather than forcing the spring into a completely different configuration. Careful excavation with minimal disturbance almost always produces better long-term results than aggressive digging.
Poor protection of the recharge area is another common problem. Everything occurring uphill from the spring has the potential to influence water quality. Livestock, fertilizers, septic systems, fuel storage, pesticides, and heavy equipment can all introduce contaminants into groundwater long before the water reaches the spring outlet. Protecting the surrounding landscape is often more important than the design of the collection system itself.
Some property owners also underestimate the importance of regular maintenance. Pipes can shift, fittings may loosen, sediment gradually accumulates, vegetation changes, and wildlife can damage exposed components. A spring should be inspected several times each year, particularly after severe storms, flooding, earthquakes, or prolonged drought. Small maintenance tasks performed regularly help prevent larger and more expensive repairs later.
Finally, one of the biggest mistakes is depending entirely on a single water source. Although a dependable spring can provide excellent long-term reliability, every water system has limitations. Drought, contamination, landslides, wildfires, freezing temperatures, or mechanical failures can interrupt even the best-designed system. A resilient household water plan always includes multiple sources of water, allowing one system to support another when unexpected problems occur.
Preparedness Action Plan
If you believe your property may contain a natural spring, begin by learning as much as possible about the land before making any physical changes. Walk the property during dry weather and carefully observe areas that remain wet while surrounding ground has dried. Record the locations using a notebook, GPS, or mapping application, and return several times throughout the year to determine whether the water continues flowing under different seasonal conditions.
Once you identify a promising location, measure the spring’s flow rate and document your observations over time. Pay attention to changes following heavy rainfall, drought, freezing temperatures, and seasonal snowmelt. The more information you collect before development begins, the better your long-term decisions will be.
Before using the water for drinking, arrange for professional laboratory testing to determine its quality. If contamination is detected, identify the source before investing in treatment equipment. Protect the recharge area by minimizing contamination risks, controlling erosion, and preventing livestock or surface runoff from entering the collection area.
If the spring proves dependable, consider how it fits within your overall household water strategy. A storage tank, filtration system, backup treatment method, rainwater collection system, and emergency water reserves can all work together to create a much more resilient water supply than any single source alone.
Approach spring development as a long-term stewardship project rather than a one-time construction task. A properly protected and maintained spring can continue serving your household for many years while reducing dependence on outside infrastructure.
Key Takeaways
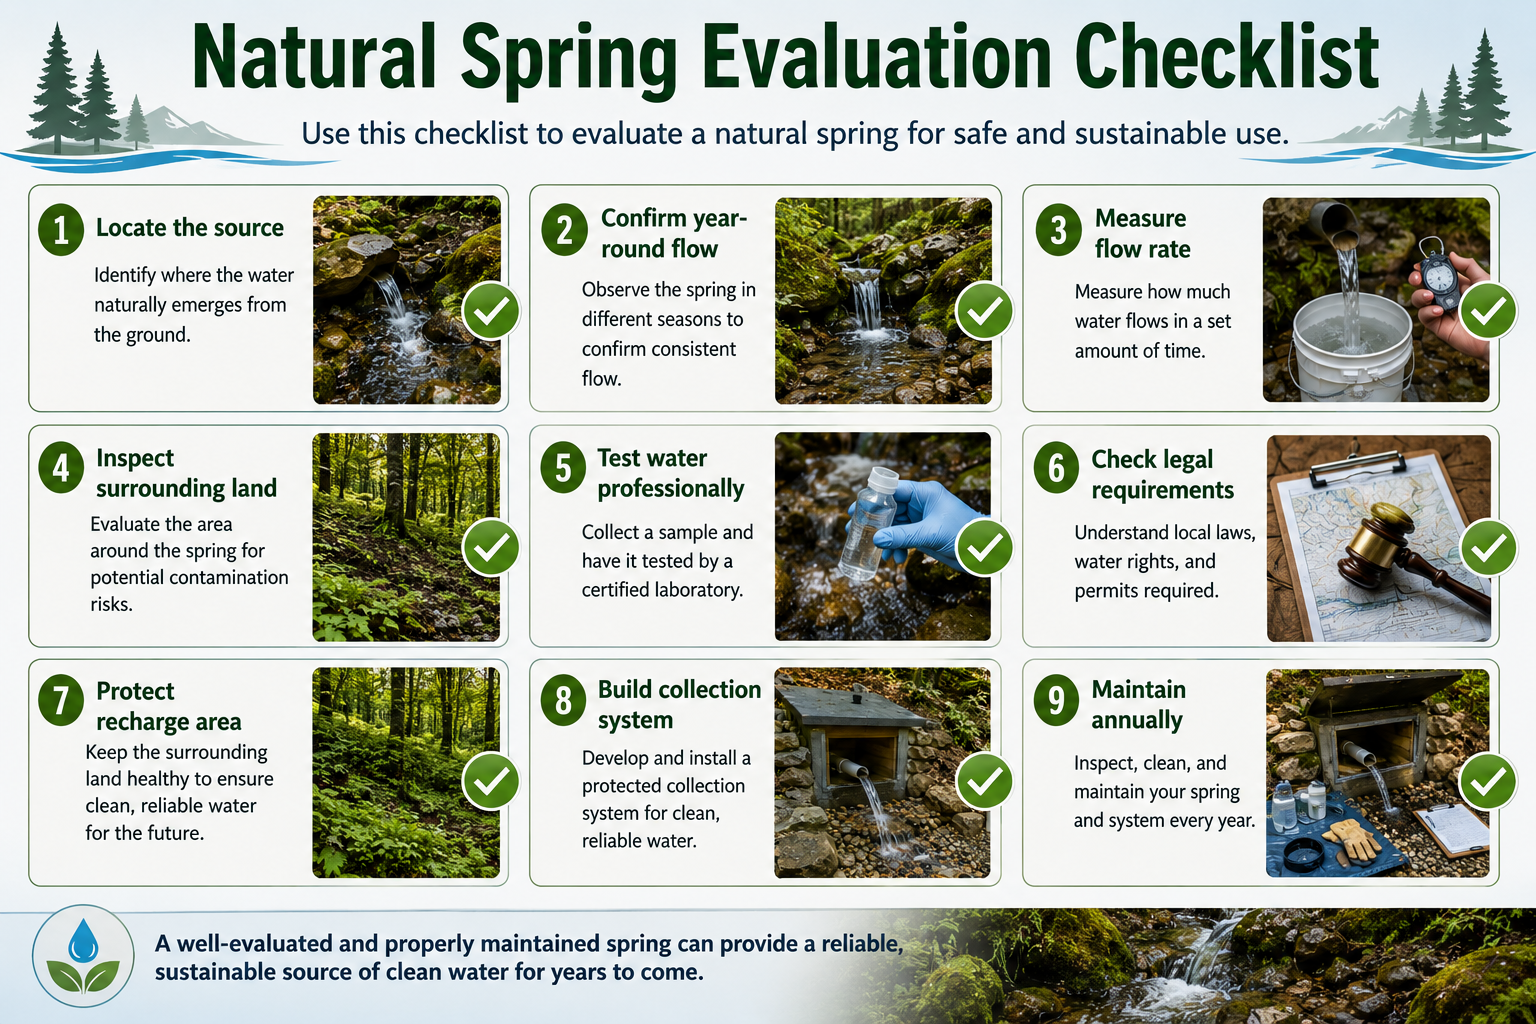
A natural spring can become one of the most dependable long-term water sources available to a property, but only if it is properly located, evaluated, developed, and maintained. Successful spring development begins with understanding how groundwater moves beneath the landscape and recognizing the difference between a true spring and seasonal surface water. Before relying on any spring for household use, observe its flow throughout the year, measure its output during dry conditions, and have the water professionally tested to ensure it is safe for drinking.
Protecting the recharge area is just as important as developing the spring itself. Limiting contamination, minimizing disturbance around the source, using food-grade materials, and performing regular inspections all help preserve water quality over the long term. Finally, remember that no single water source should stand alone. A natural spring is most valuable when combined with stored water, rainwater collection, filtration, purification, and other backup supplies, creating a resilient household water system capable of adapting to changing conditions and unexpected emergencies.
© Prepping Communities. This content is for informational purposes only and not professional advice. Use at your own risk.
Terms | Privacy | Guidelines