
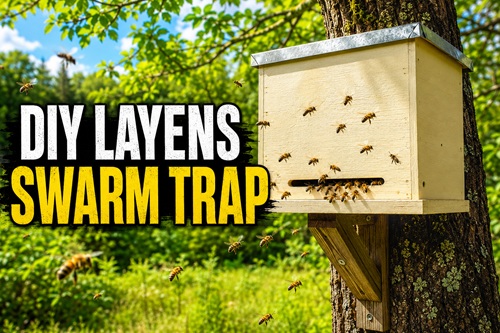
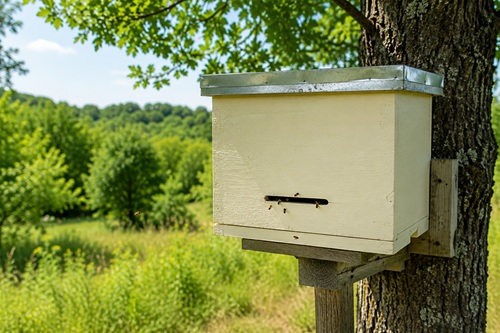
Build a Simple Swarm Trap for Catching Honey Bees
Catching a honey bee swarm can be an inexpensive way to start or expand an apiary. During swarm season, part of an established colony leaves its original hive with a queen and begins searching for a new home. Scout bees investigate hollow trees, cavities, empty hive equipment, and other sheltered spaces before the swarm commits to a location.
A swarm trap gives those scout bees another possible home. It is essentially a lightweight wooden cavity containing compatible hive frames, a small entrance, and a weather-resistant lid. If the bees accept the trap, they can begin establishing their colony directly on frames that can later be transferred into a permanent hive.
This DIY trap is designed to hold six Layens frames. That compatibility is important. Instead of allowing a captured swarm to build comb inside an empty box that later has to be cut apart, the bees can begin building directly on Layens frames.
The construction is fairly simple for someone comfortable using basic woodworking tools, but accuracy matters. The frame rests need to line up, the box needs to remain square, and the finished interior must provide enough clearance for six frames.
Finished Trap Measurements
Before cutting any wood, have at least one of your actual Layens frames available. Layens equipment can vary slightly, especially when frames or hives are homemade, so the measurements below should be treated as the starting dimensions for this particular six-frame design rather than assuming they’ll fit every Layens frame ever made.
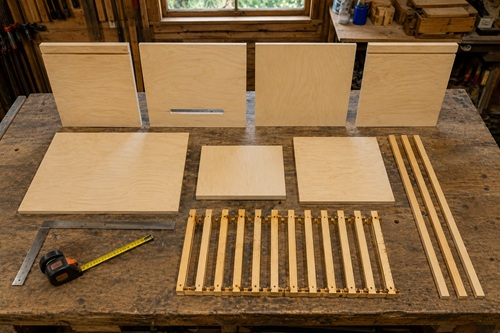
The two end walls are 16-7/8 inches by 9-1/8 inches. The front and back panels are 14-7/8 inches wide by 16-7/8 inches high. The bottom is 13-15/16 inches by 9-1/8 inches, and the plywood portion of the lid is 15-13/16 inches by 10-13/16 inches.
The entrance is approximately 1/2 inch high by 4 inches wide and is centered horizontally about 4 inches above the bottom edge of the front wall.
The frame-rest rabbets are approximately 1/4 inch deep by 7/16 inch wide along the appropriate upper edges of the two end walls.
These dimensions are particularly useful to keep nearby while working because they prevent you from having to search through the entire project every time you need another measurement.
Most importantly, dry-fit the entire trap with six actual Layens frames before applying the final glue and fasteners. All six frames should hang properly from the rests without binding against the walls or one another.
What You’ll Need
For the trap body, you’ll need untreated construction-grade plywood. Approximately 15/32-inch plywood can be used for the end walls and bottom, while 3/8-inch plywood can be used for the front, back, and lid. You’ll also need a short piece of untreated 2-by-4 lumber that can be ripped into narrow strips to create the rim underneath the removable lid.
For assembly, have wood glue along with approximately 1- to 1-1/4-inch nails or staples. If you have a narrow-crown pneumatic stapler, it can make assembly considerably faster, although a hammer and ordinary nails work perfectly well for a small project.
You’ll also need approximately 12-inch-wide aluminum flashing for protecting the lid from rain. Short staples can be used to secure the flashing after it has been folded around the lid.
For finishing the trap, have exterior acrylic primer/sealer and light-colored exterior acrylic paint. These products will be used on the outside surfaces only.
Useful woodworking tools include a table saw or circular saw with a straightedge, a miter saw if available, a router with a straight bit for creating the frame rests, a carpenter’s square, tape measure, pencil, utility knife, hammer or staple gun, paintbrush, clamps, and metal shears.
You’ll obviously also need six Layens frames for the completed trap.
Wear appropriate eye, hearing, and respiratory protection while cutting plywood and routing the frame rests.
Cut the Main Box Pieces
Begin by marking the plywood carefully before making any cuts. Measure twice and use a carpenter’s square to establish straight cutting lines.
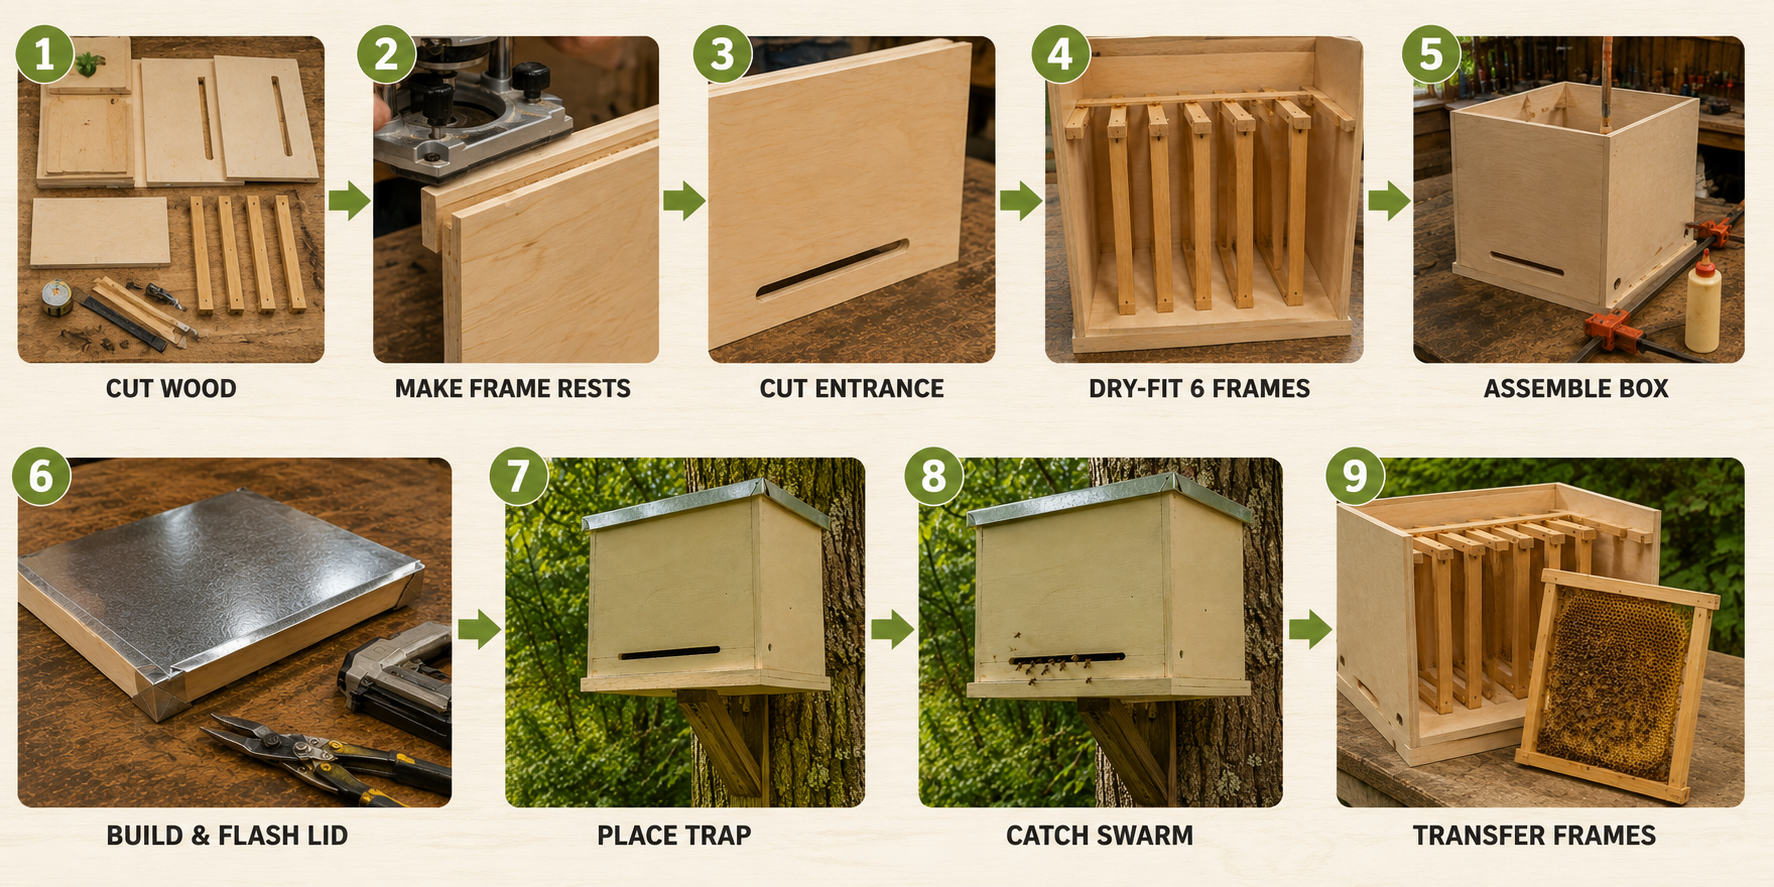
Cut the front and back panels to approximately 14-7/8 by 16-7/8 inches. Cut the bottom to approximately 13-15/16 by 9-1/8 inches and the plywood lid to approximately 15-13/16 by 10-13/16 inches.
Cut two end walls measuring 16-7/8 inches by 9-1/8 inches.
Don’t permanently assemble anything yet.
Arrange the pieces on a flat workbench and confirm that the bottom and walls come together correctly. Put one of your Layens frames between the end panels and make sure the overall dimensions make sense before moving on.
A swarm trap doesn’t require furniture-quality woodworking, but reasonably accurate cuts make everything that follows much easier.
Make the Frame Rests
Layens frames need ledges near the top of the box from which they can hang.
Create these by cutting a shallow rabbet along the appropriate upper inside edge of each end wall. A frame rest approximately 1/4 inch deep by 7/16 inch wide provides the ledge in this design.
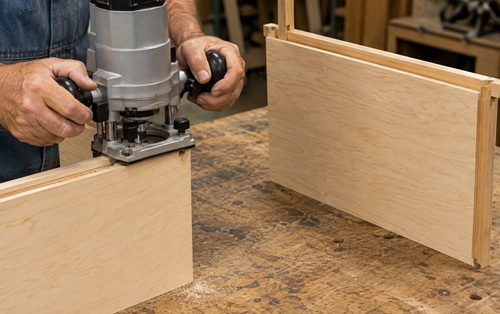
A router fitted with a straight bit makes this relatively easy. Secure the plywood firmly to the work surface, establish the correct router depth, and make the cut carefully along each end panel.
The two rabbets need to face inward when the box is assembled.
After cutting them, stand the two end panels approximately where they’ll sit in the completed trap and place a Layens frame across them. The frame should hang naturally from both rests.
This simple test can catch a mistake before the box is permanently assembled.
Make the Entrance
The trap only needs a relatively small entrance. A smaller opening provides the colony with a more defensible entrance and reduces the amount of wind and rain entering the cavity.
Mark a horizontal slot approximately 1/2 inch high by 4 inches wide in the front panel. Center it horizontally and position it approximately 4 inches above the bottom edge.
Cut the opening carefully with an appropriate saw, router, or other woodworking tool.
If practical, give the bottom of the entrance a slight outward slope so rainwater is encouraged to drain away instead of running into the trap.
Sand or trim away any large splinters around the opening. Bees will continually travel through this entrance once the trap is occupied, so leave it reasonably smooth.
Dry-Fit the Entire Trap
This is the additional step worth taking before reaching for the glue.
Place the bottom on a flat work surface and position the two end walls, front, and back around it. Clamp or temporarily hold everything together.
Now install all six Layens frames.
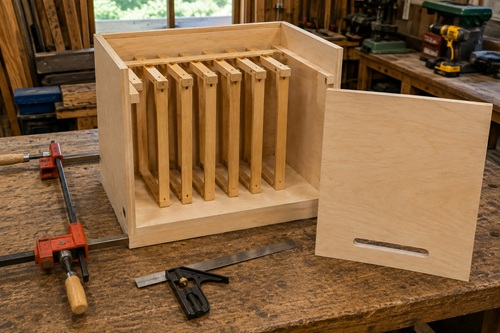
Look carefully at how they fit. The frames should sit securely on the rests, hang vertically, and move in and out without excessive force. They shouldn’t be wedged tightly against the walls.
Also check the box with a carpenter’s square.
If something is wrong, correct it now. Moving a frame rest, trimming an edge, or adjusting a panel is much easier before the box is covered in glue and staples.
Once the box is square and all six frames fit correctly, remove the frames and begin permanent assembly.
Assemble the Trap Body
Place the bottom panel on a flat work surface. Apply wood glue along the joining edge and attach the first end wall, making sure its frame rest faces inward.
Secure the wall with nails or staples while the glue sets.
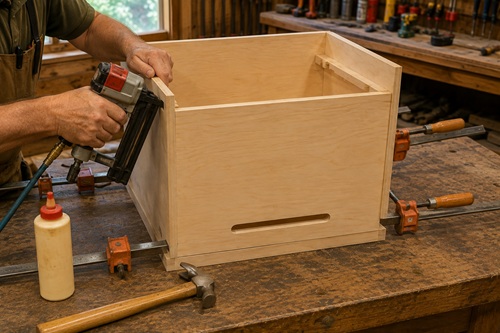
Install the opposite end wall the same way, again confirming that the frame rest faces inward.
Attach the front panel containing the entrance, followed by the solid back panel. Apply glue to the mating surfaces and fasten each panel securely.
Use your carpenter’s square throughout the process. Check one corner, fasten it, and then check the next rather than assembling the entire box and discovering afterward that it twisted out of square.
Once the walls are attached, place the six frames inside one more time.
They should still hang freely.
Build the Removable Lid
The trap needs a lid that protects it from rain but can easily be removed when you need access to the colony.
Cut narrow wooden strips from the untreated 2-by-4 to form a rectangular rim underneath the plywood lid. For this design, the two longer pieces are approximately 15-13/16 inches long, while the shorter pieces are approximately 10-1/16 inches long.
Arrange the strips into a rectangle and dry-fit them around the upper portion of the trap. You want the lid to fit securely without becoming so tight that humidity and normal wood movement make it difficult to remove.
Once you’re satisfied with the fit, glue and fasten the rectangular rim together.
Place the plywood lid over the rim, make sure everything remains square, and secure the plywood with glue and nails or staples.
Test the completed lid on the trap before adding the metal covering.
Add the Aluminum Flashing
Plywood exposed directly to rain will eventually deteriorate. Covering the lid with aluminum flashing gives it a simple weather-resistant roof.
Cut a piece of approximately 12-inch-wide flashing large enough to cover the lid and fold around its edges. A piece approximately 17-5/16 inches long by 12 inches wide works with the dimensions used in this design.
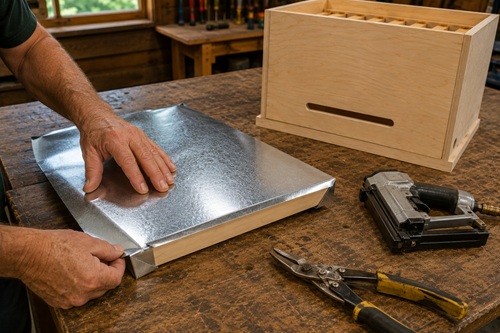
Center the lid on the flashing and lightly mark where the folds need to occur. Cut relief notches at the corners with metal shears so the material can fold neatly around the lid.
Wear gloves when handling freshly cut flashing because the edges can be extremely sharp.
Fold the flashing around the lid and secure it with short staples. Keep the fasteners positioned so they don’t interfere with the lid fitting onto the trap.
Inspect the finished corners and flatten or trim any sharp exposed edges.
Prime and Paint the Outside
Once construction is complete, protect the plywood from weather.
Apply exterior primer/sealer to the outside of the trap only and allow it to dry thoroughly. Follow with a coat of light-colored exterior acrylic paint.
A lighter exterior can help reduce heat buildup when the trap receives direct sunlight.
Don’t paint the interior cavity, frame rests, or other surfaces where the bees will be living.
After painting, allow the trap to dry and air out thoroughly. If possible, build your traps well before swarm season so the odors from fresh plywood, glue, primer, and paint have time to dissipate.
Prepare the Trap for Bees
Once the trap has aired out, install the six Layens frames.
If you have suitable old drawn comb available, placing a frame of old comb inside can give the cavity a familiar hive odor that scout bees may investigate. Old comb needs to be managed carefully, however, because it can also attract wax moths and other pests.
Some beekeepers use commercial swarm lure or a very small amount of lemongrass-based attractant inside a trap.
Don’t assume more scent is better. You are trying to make the cavity interesting to scout bees, not overwhelm it with fragrance.
The physical characteristics and location of the trap remain extremely important.
Choose a Good Location
There is no location guaranteed to catch a swarm, which is part of what makes swarm trapping interesting.
Look for areas where honey bees are already active. Gardens, orchards, flowering fields, woodland edges, farms, and areas containing established bee colonies can all provide possibilities.
The entrance should remain reasonably visible and the trap shouldn’t spend the entire day baking in intense sunlight.
Just as importantly, put the trap somewhere you can safely retrieve it.
Swarm traps are sometimes positioned above ground because elevated cavities can be attractive to scouting bees, but don’t turn retrieval into a dangerous ladder operation. An empty plywood trap is relatively light. The same box containing six frames, comb, honey, and thousands of bees can be substantially heavier and more awkward.
Whatever location you choose, secure the trap so wind cannot knock it down.
Watch for Scout Bees
Once the trap is in place, check it periodically from a comfortable distance.
Seeing a single bee at the entrance doesn’t necessarily mean a swarm is coming. Individual bees may investigate all kinds of openings.
Repeated visits are more interesting.
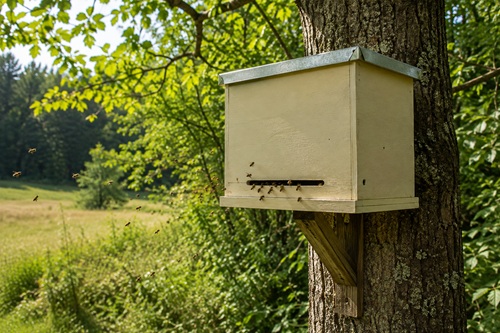
Scout bees may fly around the trap, land near the entrance, enter the cavity, leave again, and return later. As a swarm becomes increasingly interested in a location, you may notice more scouts investigating it.
Then the situation can change quickly.
A swarm may suddenly arrive as a moving cloud containing thousands of bees. They gather around the trap and gradually move through the entrance until what was an empty plywood box becomes an occupied hive.
After a Swarm Moves In
Unless circumstances require immediate removal, give the bees some time to settle rather than disturbing the trap the moment they arrive.
Once you’re ready to relocate the colony, plan the move for a time when most of the foraging bees have returned. The entrance needs to be securely closed for transportation while still providing suitable ventilation.
Wear normal protective beekeeping equipment and handle the trap carefully. Even a normally gentle swarm can become defensive when its new home is being moved.
Take the trap to the permanent apiary and transfer the Layens frames into the prepared Layens hive.
This is where building the trap around your normal frames pays off. Instead of cutting wild comb from a temporary box, you’re moving compatible frames from one container into another.
Once the colony has been transferred, inspect the empty trap for damage, clean it as necessary, and prepare it for another swarm.
Why Build a Layens Swarm Trap?
A six-frame Layens swarm trap is simple enough to build with ordinary woodworking equipment but useful enough to be reused for many swarm seasons.
Plywood keeps the trap relatively lightweight, the metal-covered lid provides weather protection, and using standard Layens frames means a captured colony can begin building on equipment that will eventually become part of its permanent hive.
The trap is also much less expensive than dedicating an entire hive to swarm catching.
There is never a guarantee that a swarm will move in. One trap might remain empty for an entire season while another receives intense scout activity and catches a swarm surprisingly quickly.
That uncertainty is simply part of swarm trapping.
What you can control is the quality of the trap. Build the box square, verify the dimensions against your actual frames, provide a protected entrance and weather-resistant lid, position it safely, and make sure you can retrieve it if bees move in.
Then the woodworking portion of the project is finished.
The next decision belongs to the bees.
© Prepping Communities. This content is for informational purposes only and not professional advice. Use at your own risk.
Terms | Privacy | Guidelines