
A Complete Guide to Creating and Maintaining a Razor-Sharp Edge
by Natural Born Prepper
1 Introduction
A sharp knife is one of the most important tools a person can own. Whether you are preparing food in the kitchen, processing game in the field, carving wood around camp, working on a homestead, or maintaining a survival kit, a properly sharpened knife is safer, more efficient, and more enjoyable to use than a dull one.
 Many people assume a dull knife is safer because it is less sharp. In reality, the opposite is often true. A dull blade requires more force to cut, making it more likely to slip and cause injury. A sharp knife bites into the material being cut and requires less pressure and less effort.
sharpening a knife is not a mysterious skill reserved for craftsmen and professionals. It is a practical skill that anyone can learn with a little patience and practice. Once you understand a few basic principles, sharpening becomes straightforward and even relaxing.
This guide will explain how knife edges work, how sharpening stones function, the proper sharpening process, common mistakes, maintenance techniques, and long-term care practices that will help keep your knives performing at their best.
2 Understanding the Knife Edge
Before sharpening a knife, it helps to understand what the edge actually is.
 The cutting edge of a knife is not infinitely thin. Under magnification, even the sharpest blade appears as two sides of steel meeting at a precise angle.
Many people imagine a knife edge as being perfectly thin, almost like a razor-thin line. In reality, even the sharpest knife has a measurable edge geometry. Under magnification, the edge appears as two angled surfaces of steel meeting at a precise point known as the apex. The quality of this meeting point largely determines how well the knife cuts.
As a knife is used, the edge is constantly subjected to stress. Every cut places pressure on a very small amount of steel. Over time, this causes gradual wear and deformation. The edge may roll slightly to one side, develop tiny chips, or become worn down through abrasion. These changes are often invisible to the naked eye, yet they have a significant impact on cutting performance.
A knife does not suddenly become dull overnight. Instead, dullness occurs gradually as the original edge geometry begins to change. The once-crisp apex becomes rounded, the bevels become less defined, and cutting efficiency decreases. What was once a clean slicing tool may begin tearing, crushing, or slipping through materials rather than cutting them cleanly.
Sharpening restores the knife by removing small amounts of steel and recreating the original edge geometry. Rather than simply grinding metal away, the objective is to rebuild the precise point where both sides of the blade meet. A properly sharpened knife has a clean, consistent edge that balances sharpness, strength, and durability.
Understanding how the edge functions provides valuable insight into the sharpening process. It explains why maintaining a consistent angle is so important and why different sharpening techniques produce different results. The better you understand the structure of the edge, the easier it becomes to create and maintain a knife that performs reliably in the kitchen, workshop, campsite, or field.
Key Concepts:
- The cutting edge consists of two sides of steel meeting at a precise point called the apex.
- Even the sharpest knife edge has measurable geometry and is not infinitely thin.
- Normal use causes the edge to roll, chip, deform, and wear over time.
- Dullness usually occurs gradually as the original edge geometry changes.
- Sharpening restores the edge by recreating the point where both sides of the blade meet.
- The goal is to create a strong, consistent edge that cuts efficiently.
- Understanding edge geometry helps improve sharpening technique and results.
- Consistent angle control is essential for producing a durable and effective cutting edge.
3 Why Knives Become Dull
Every time a knife is used, the edge experiences wear. While a knife may appear solid and durable, the cutting edge is actually very thin and delicate. Each cut removes a tiny amount of steel or causes microscopic changes to the edge. Over time, these small changes accumulate and gradually reduce the knife’s cutting performance.
 Some materials dull knives much faster than others. Cardboard, for example, is surprisingly abrasive because it often contains microscopic dirt, sand, and mineral particles embedded within the fibers. Repeatedly cutting cardboard can wear down an edge much faster than many people realize. In the kitchen, knives are exposed to moisture, acids from foods, and constant contact with cutting boards, all of which contribute to edge wear. Outdoor and survival knives may encounter even harsher conditions, including dirt, wood, rope, bone, and other materials that place significant stress on the blade.
Not all dullness comes from metal being worn away. In many cases, the edge simply bends or rolls slightly to one side during normal use. Because the cutting edge is so thin, even light impacts against hard surfaces can cause it to deform. Under magnification, what appears to be a sharp edge may actually be rounded, flattened, or folded over in tiny areas. This loss of edge alignment can make a knife feel dull even though very little steel has been removed.
Most dull knives are not truly worn out. Instead, they suffer from a combination of edge rolling, minor deformation, and gradual abrasion. This is why regular maintenance is so important. A knife that is touched up periodically requires very little effort to keep sharp, while a severely neglected blade may require extensive sharpening to restore its original cutting ability.
Maintaining a knife regularly not only saves time but also extends the life of the blade. A few minutes spent honing or lightly sharpening a knife can preserve a keen edge for weeks or even months, depending on how the knife is used. Waiting until a knife becomes completely dull often means removing much more metal during sharpening, which shortens the blade’s lifespan and requires considerably more work.
Understanding why knives become dull helps knife owners develop better maintenance habits. By recognizing the factors that contribute to edge wear and addressing them early, it is possible to keep knives performing efficiently while reducing the amount of sharpening required over the long term.
4 The Difference Between Honing and Sharpening
Many people use the terms honing and sharpening interchangeably, but they are actually two different processes. Understanding the difference is important because each serves a specific purpose in maintaining a knife’s cutting performance. Knowing when to hone and when to sharpen can help keep knives working efficiently while extending the life of the blade.
 Sharpening involves removing small amounts of metal from the blade to create a new cutting edge. Over time, normal use gradually wears away the edge of a knife, causing it to become rounded and less effective at cutting. Sharpening restores the edge by grinding away enough steel to recreate the precise point where the two sides of the blade meet. Depending on the condition of the knife, sharpening may require the use of whetstones, diamond stone, guided sharpening systems, or other sharpening tools.
Honing, on the other hand, does not significantly remove metal. Instead, it realigns the existing edge. During normal use, the extremely thin edge of a knife can bend or roll slightly to one side. Even though the edge is still present, this deformation can make the knife feel dull and reduce its cutting performance. A honing rod helps straighten the edge, restoring much of the knife’s original cutting ability without the need for sharpening.
This is why many professional chefs use a honing rod regularly, sometimes even daily. Frequent honing helps maintain a straight edge and keeps knives performing well between sharpening sessions. By realigning the edge before it becomes excessively worn, chefs can go much longer before needing to remove metal through sharpening.
However, honing has its limitations. A honing rod cannot repair an edge that has become truly dull, chipped, or rounded from wear. Once the edge itself has been worn away, only sharpening can restore the knife’s cutting ability. Continuing to hone a severely dull knife will not make it sharp again because there is no longer a properly formed edge to realign.
Understanding the difference between honing and sharpening can save time, reduce frustration, and help preserve your knives. Regular honing can extend the life of a sharp edge, while periodic sharpening restores the blade when normal wear eventually takes its toll. Together, these two maintenance techniques are the foundation of proper knife care and can keep a knife performing at its best for many years.
5 Choosing the Right Sharpening Method
There are several ways to sharpen a knife.
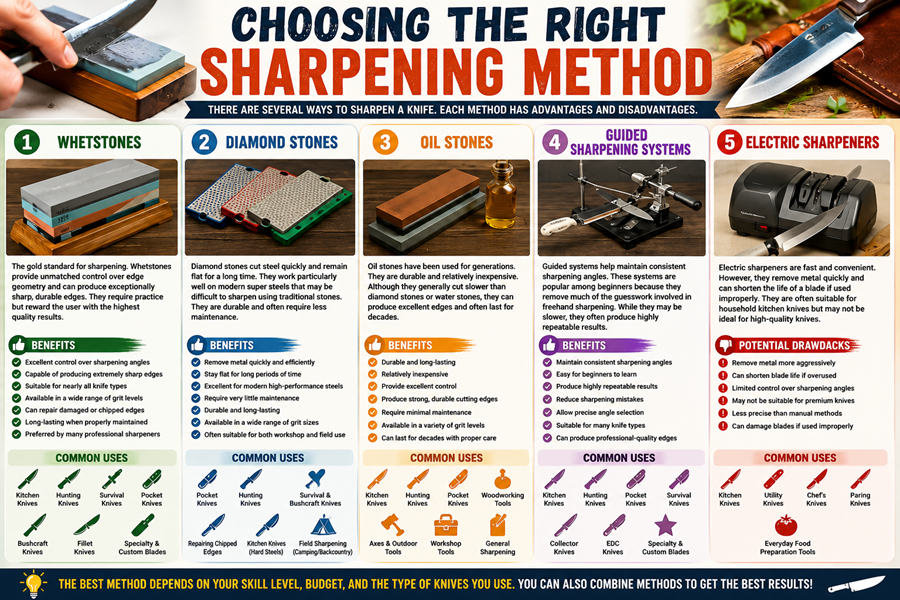
Each method has advantages and disadvantages.
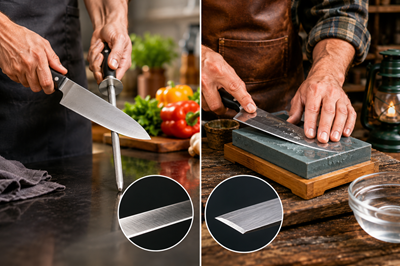
1. Whetstones
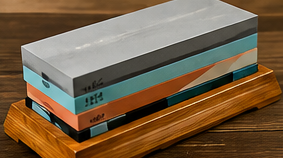 Whetstones are widely considered the gold standard for knife sharpening and have been used for centuries by craftsmen, chefs, hunters, woodworkers, and outdoorsmen. While modern sharpening systems offer convenience and speed, many experienced users continue to prefer whetstones because they provide unmatched control over the sharpening process and can produce exceptionally sharp, durable edges.
One of the greatest advantages of whetstones is the level of control they provide over edge geometry. The user can choose the sharpening angle, adjust pressure as needed, and customize the edge to suit a specific purpose. Whether creating a razor-sharp slicing edge for kitchen work or a stronger, more durable edge for outdoor use, whetstones allow for precise adjustments that are difficult to achieve with many other sharpening methods.
Learning to sharpen with whetstones does require practice. Maintaining a consistent angle throughout the sharpening process can be challenging for beginners, and developing proper technique takes time. However, many knife enthusiasts find that the effort is well worth it. Once mastered, whetstones can produce some of the sharpest and most refined edges possible, often outperforming mechanical sharpeners and many guided systems.
Another advantage of whetstones is their versatility. They can be used on a wide variety of blades, making them a valuable tool for anyone who owns multiple types of knives. With the proper grit progression, a whetstone can repair damaged edges, restore dull blades, and create highly polished cutting edges suitable for demanding tasks.
Benefits of Whetstones
- Excellent control over sharpening angles
- Capable of producing extremely sharp edges
- Suitable for nearly all knife types
- Available in a wide range of grit levels
- Can repair damaged or chipped edges
- Long-lasting when properly maintained
- Preferred by many professional sharpeners
Common Uses for Whetstones
- Kitchen knives
- Hunting knives
- Survival knives
- Pocket knives
- Bushcraft knives
- Fillet knives
- Specialty and custom blades
Although whetstones may require more skill and patience than some modern sharpening systems, they remain one of the most effective and versatile methods available. For those willing to invest the time to learn proper technique, a quality whetstone can provide decades of reliable service and consistently produce exceptionally sharp knives.
2 Diamond Stones
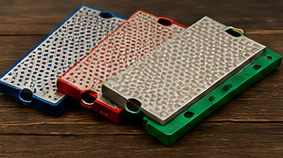 Diamond stones have become increasingly popular among knife owners, outdoorsmen, and professional sharpeners because of their speed, durability, and effectiveness. Unlike traditional sharpening stones that rely on abrasive materials such as aluminum oxide or ceramic compounds, diamond stones use industrial-grade diamonds bonded to a flat metal surface. Since diamonds are among the hardest materials known, they are exceptionally effective at cutting and shaping steel.
One of the biggest advantages of diamond stones is their ability to remove metal quickly. A dull knife that might take considerable time to sharpen on a traditional stone can often be restored much faster using a diamond stone. This makes them particularly useful for repairing damaged edges, re-establishing bevels, and sharpening blades made from hard modern steels.
Another benefit is that diamond stones remain flat for a very long time. Traditional water stones gradually wear down during use and eventually require flattening to maintain their effectiveness. Diamond stones experience very little wear and generally maintain a flat sharpening surface throughout their lifespan. This consistency helps produce more accurate and predictable sharpening results.
Diamond stones are especially well-suited for sharpening modern high-performance steels, often referred to as “super steels.” These advanced steels are designed to hold an edge longer and resist wear, but those same qualities can make them more difficult to sharpen using conventional stones. The hardness of industrial diamonds allows diamond stones to sharpen these steels efficiently, making them a favorite among users of premium knives.
In addition to their cutting performance, diamond stones are known for their durability and low maintenance requirements. Many can be used dry or with a small amount of water, eliminating the need for soaking. They are also less prone to cracking, chipping, or wearing unevenly compared to some traditional sharpening stones.
Benefits of Diamond Stones
- Remove metal quickly and efficiently
- Stay flat for long periods of time
- Excellent for modern high-performance steels
- Require very little maintenance
- Durable and long-lasting
- Available in a wide range of grit sizes
- Often suitable for both workshop and field use
Common Uses for Diamond Stones
- Sharpening pocket knives
- Maintaining hunting knives
- Sharpening survival and bushcraft knives
- Repairing chipped or damaged edges
- Sharpening kitchen knives made from hard steels
- Field sharpening during camping or backcountry trips
For those looking for a fast, durable, and versatile sharpening solution, diamond stones are an excellent choice. Their ability to handle virtually any type of steel while requiring minimal maintenance has made them one of the most popular sharpening tools available today.
3 Oil Stones
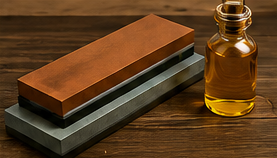 Oil stones have been a trusted sharpening tool for generations and remain popular among knife owners, woodworkers, hunters, and outdoorsmen. Long before modern diamond stones and synthetic water stones became widely available, oil stones were the standard sharpening method used in homes, workshops, and trades around the world. Their proven effectiveness and durability have allowed them to remain a respected option even today.
One of the primary advantages of oil stones is their durability. Made from natural or synthetic abrasive materials, these stones are designed to withstand years of regular use. When properly cared for, a quality oil stone can last for decades, making it an economical investment for anyone who regularly sharpens knives and tools. Many craftsmen still use oil stones that have been passed down through multiple generations.
Oil stones generally cut steel more slowly than diamond stones or water stones. While this slower cutting speed may require more time and patience, it also provides greater control during the sharpening process. Many experienced sharpeners appreciate this characteristic because it reduces the risk of removing too much metal and allows for precise edge refinement.
Another reason oil stones remain popular is their ability to produce excellent working edges. Although they may not create highly polished edges as quickly as some modern sharpening systems, they are fully capable of producing sharp, durable edges suitable for kitchen knives, hunting knives, woodworking tools, and many other cutting instruments.
Traditional woodworkers, hunters, and outdoorsmen often favor oil stones because of their simplicity and reliability. Unlike water stones, which may require soaking and periodic flattening, oil stones are relatively low-maintenance. A light application of honing oil helps carry away metal particles and keeps the stone functioning effectively during sharpening.
Benefits of Oil Stones
- Durable and long-lasting
- Relatively inexpensive compared to some sharpening systems
- Provide excellent control during sharpening
- Produce strong, durable cutting edges
- Require minimal maintenance
- Available in a variety of grit levels
- Can last for decades with proper care
Common Uses for Oil Stones
- Sharpening kitchen knives
- Maintaining hunting knives
- Sharpening pocket knives
- Woodworking tools and chisels
- Axes and outdoor tools
- General workshop sharpening
While oil stones may not be the fastest sharpening option available, their durability, affordability, and proven performance continue to make them a favorite among traditional craftsmen and outdoor enthusiasts. For those who value reliability and long-term service, an oil stone remains an excellent addition to any sharpening kit.
4 Guided Sharpening Systems
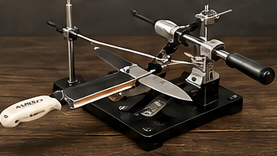 Guided sharpening systems are designed to help users maintain a consistent sharpening angle throughout the sharpening process. Unlike freehand sharpening, where the user must manually hold the blade at the correct angle, guided systems use clamps, rods, angle guides, or fixed mechanisms to keep the blade and sharpening stone aligned. This greatly reduces the chances of inconsistent sharpening and helps produce more predictable results.
One of the biggest advantages of guided sharpening systems is their ease of use. Many people struggle to maintain a consistent angle when learning to sharpen freehand, which can lead to uneven edges and frustration. Guided systems eliminate much of this learning curve by mechanically controlling the sharpening angle. As a result, beginners can often achieve sharp, professional-looking edges much sooner than they would using traditional freehand methods.
Although guided systems can be slower than experienced freehand sharpening, they often deliver highly repeatable results. Once the desired angle is set, the system helps maintain that angle throughout the sharpening process. This consistency is especially valuable for knife enthusiasts who want identical edge geometry every time they sharpen a blade.
Another benefit of guided systems is their versatility. Many models allow users to select different sharpening angles depending on the type of knife being sharpened. A fine kitchen knife may benefit from a narrower angle for maximum sharpness, while a hunting or survival knife may require a wider angle for greater durability. The ability to precisely set and repeat these angles helps users tailor the edge to the knife’s intended purpose.
Guided sharpening systems are popular among collectors, hunters, chefs, and anyone who wants reliable sharpening results without spending years mastering freehand techniques. While they may require a larger initial investment than basic sharpening stones, many users find the consistency and ease of use well worth the cost.
Benefits of Guided Sharpening Systems
- Maintain consistent sharpening angles
- Easy for beginners to learn
- Produce highly repeatable results
- Reduce sharpening mistakes
- Allow precise angle selection
- Suitable for many knife types
- Can produce professional-quality edges
Common Uses for Guided Sharpening Systems
- Kitchen knives
- Hunting knives
- Pocket knives
- Survival knives
- Collector knives
- Everyday carry (EDC) knives
- Specialty and custom blades
For individuals who value precision and consistency, guided sharpening systems offer an excellent balance between ease of use and high-quality results. While they may not be as fast as freehand sharpening in experienced hands, they provide a reliable way to achieve sharp, consistent edges with minimal guesswork.
5 Electric Sharpeners
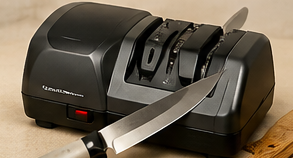 Electric sharpeners have become a popular choice for people who want a fast and convenient way to maintain their kitchen knives. Instead of manually moving a blade across a sharpening stone, electric sharpeners use motorized abrasive wheels or belts to sharpen the edge with minimal effort from the user. For many households, this simplicity and speed make them an attractive option.
One of the biggest advantages of electric sharpeners is their convenience. Most models are designed to be easy to use, even for people with little or no sharpening experience. The user simply guides the knife through the sharpening slots while the machine does the work. In just a few minutes, a dull knife can often be restored to a usable edge.
However, this convenience comes with some trade-offs. Electric sharpeners remove metal much more aggressively than most manual sharpening methods. While this allows them to sharpen quickly, it can also shorten the lifespan of a knife if used too frequently or improperly. Each sharpening session removes a small amount of steel, and over time excessive metal removal can significantly reduce the life of the blade.
Another consideration is edge precision. Many electric sharpeners are designed around fixed sharpening angles that work well for common kitchen knives. While this is suitable for most household users, it may not be ideal for high-quality knives, custom blades, or specialty knives that require specific edge geometries. In these cases, whetstones or guided sharpening systems often provide greater control and more refined results.
For everyday kitchen use, electric sharpeners can be an excellent solution. They offer a quick way to maintain working edges without requiring extensive sharpening knowledge or technique. For premium knives or users seeking maximum sharpness and precision, however, manual sharpening methods may be a better choice.
Benefits of Electric Sharpeners
- Fast and convenient to use
- Minimal sharpening skill required
- Consistent sharpening angles
- Ideal for routine kitchen knife maintenance
- Can restore dull edges quickly
- Widely available and easy to operate
- Suitable for most household users
Potential Drawbacks
- Remove metal more aggressively than manual methods
- Can shorten blade life if overused
- Limited control over sharpening angles
- May not be suitable for premium or custom knives
- Less precise than whetstones or guided systems
- Can damage blades if used improperly
Common Uses for Electric Sharpeners
- Household kitchen knives
- Utility knives
- Chef’s knives
- Paring knives
- Everyday food preparation tools
Electric sharpeners provide a practical balance between speed and convenience, making them a popular option for many households. While they may not offer the precision and control of traditional sharpening methods, they can be an effective tool for keeping everyday kitchen knives sharp and ready for use.
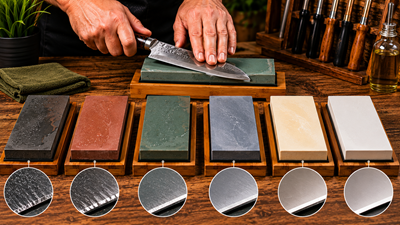
6 Understanding Grit Sizes
One of the most important concepts in knife sharpening is understanding grit sizes. The grit rating of a sharpening stone refers to the size of the abrasive particles embedded within the stone. These particles determine how aggressively the stone removes metal and how refined the final edge will become.
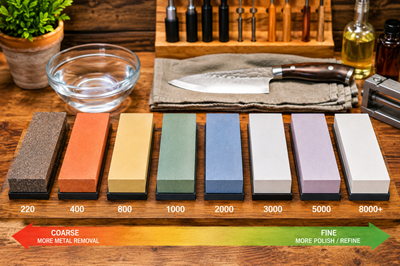 In simple terms, lower grit stones are more aggressive and remove metal quickly, while higher grit stones remove metal more slowly and leave behind a smoother, more polished edge. Selecting the proper grit depends on the condition of the knife and the type of edge you want to achieve. A severely damaged blade may require a coarse stone to restore the edge, while a knife that is already reasonably sharp may only need a finer stone to refine and polish the cutting edge.
Most sharpening is performed using a progression of grits. The process typically begins with a coarser stone when significant edge work is needed and then moves to progressively finer stones to remove scratches, refine the bevel, and improve sharpness. This gradual progression allows the sharpener to efficiently shape the edge while producing a clean, durable cutting surface.
Understanding how different grit ranges work can help you select the right stone for the job and avoid removing more metal than necessary. In many cases, a knife can be restored with only a medium-grit stone, while more advanced users may choose to work through multiple grit levels to achieve maximum sharpness and edge refinement.
Coarse Grit Stones (200–600)
coarse grit stones are designed for heavy sharpening tasks and edge repair. They remove metal rapidly and are commonly used when a blade has become severely dull, chipped, or damaged. These stones can quickly reshape bevels and restore neglected edges, making them valuable tools for knife restoration and repair work.
Because coarse stones remove metal aggressively, they are generally not used for routine maintenance. Instead, they are reserved for situations where significant edge correction is required.
Common Uses for Coarse Grit Stones
- Repairing chipped edges
- Restoring extremely dull knives
- Reprofiling blade angles
- Removing edge damage
- Reshaping bevels
- Initial sharpening of neglected blades
Medium Grit Stones (800–2000)
medium grit stones are the workhorses of knife sharpening. Most routine sharpening and edge maintenance takes place within this grit range. They remove enough metal to restore sharpness efficiently while leaving behind a refined working edge suitable for most cutting tasks.
For many knife owners, a medium-grit stone may be the only sharpening stone they ever need. A properly sharpened edge at this grit level can provide excellent cutting performance for kitchen work, outdoor use, and everyday carry knives.
Common Uses for Medium Grit Stones
- Routine knife sharpening
- Maintaining working edges
- Touch-up sharpening
- Refining edges after coarse stones
- Kitchen knife maintenance
- General-purpose sharpening
Fine Grit Stones (3000–8000)
fine grit stones are used to refine, polish, and perfect an already sharp edge. Rather than removing large amounts of metal, these stones smooth the scratch pattern left by lower grits and create a more refined cutting surface. The result is an exceptionally sharp edge that often cuts more smoothly and efficiently.
Fine grit stones are especially popular among chefs, woodworkers, and knife enthusiasts who demand the highest levels of sharpness and precision. While a highly polished edge is not always necessary for every task, many users appreciate the improved cutting performance and clean slicing action these stones provide.
Common Uses for Fine Grit Stones
- Polishing knife edges
- Refining bevels
- Achieving razor-sharp edges
- Chef’s knife finishing
- Woodworking tools
- Preparing blades for stropping
Choosing the Right Grit
The best grit depends on both the condition of the knife and your sharpening goals. A damaged blade may require a coarse stone, while a slightly dull knife may only need a medium stone. If maximum sharpness is desired, finishing with a fine stone can significantly improve edge quality.
A common sharpening progression might include:
- Coarse stone (if needed for repairs)
- Medium stone for sharpening
- Fine stone for polishing
- Leather strop for final refinement
By understanding grit sizes and how they affect the sharpening process, you can choose the right tools for the job and consistently produce sharper, longer-lasting knife edges.
7 Understanding Sharpening Angles
One of the most important factors in knife sharpening is the sharpening angle. The angle at which the blade meets the sharpening stone directly affects the knife’s sharpness, durability, cutting performance, and edge retention. Even a perfectly sharpened knife can perform poorly if the edge angle is not appropriate for its intended use.
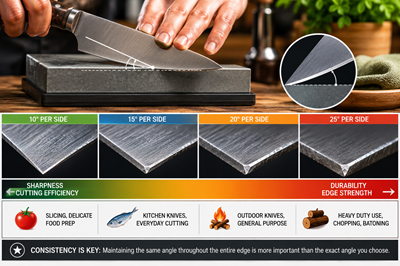 The sharpening angle is measured between one side of the blade and the sharpening stone. When discussing knife sharpening, angles are usually expressed as degrees per side. For example, a knife sharpened at 20 degrees per side has a total included edge angle of approximately 40 degrees. Smaller angles create thinner edges, while larger angles create thicker, stronger edges.
Lower sharpening angles generally produce sharper and more efficient cutting edges. Because less metal supports the edge, these knives can glide through materials with less resistance and require less cutting force. However, the trade-off is durability. Thin edges are more susceptible to rolling, chipping, and damage when used on hard materials or for heavy-duty tasks.
Higher sharpening angles provide more steel behind the edge, increasing strength and durability. These edges may not feel quite as razor sharp, but they are better suited for demanding tasks that place significant stress on the blade. Outdoor knives, work knives, and chopping tools often benefit from stronger edge geometries that prioritize toughness over maximum sharpness.
Choosing the correct angle depends on how the knife will be used. A chef’s knife designed for slicing vegetables has different requirements than a survival knife used for carving wood or a hatchet used for chopping. Understanding these differences helps you create an edge that balances sharpness and durability for the intended task.
Perhaps the most important concept for beginners is that consistency matters more than perfection. Maintaining the same angle throughout the sharpening process is often far more important than selecting the exact ideal angle. A consistent edge will generally outperform an edge sharpened at constantly changing angles, even if the chosen angle is not technically perfect.
Common Sharpening Angles
Fine Kitchen Knives (10°–15° per side)
These knives are optimized for precision slicing and food preparation. The thinner edge geometry allows them to cut extremely efficiently but requires careful use.
Examples:
- Japanese chef’s knives
- Slicing knives
- Fillet knives
- Specialty culinary knives
General-Purpose Knives (17°–20° per side)
This range offers an excellent balance between sharpness and durability. Many factory knife edges fall within this category because it works well for a wide variety of tasks.
Examples:
- Everyday carry knives
- Utility knives
- Pocket knives
- General kitchen knives
Outdoor and Hunting Knives (20°–25° per side)
These knives are often subjected to tougher materials and more demanding conditions. The slightly thicker edge provides additional durability while maintaining good cutting performance.
Examples:
- Hunting knives
- Survival knives
- Bushcraft knives
- Camp knives
Heavy-Duty and Chopping Tools (25°+ per side)
Tools used for chopping, splitting, and heavy impact work benefit from stronger edge angles that resist chipping and damage.
Examples:
- Machetes
- Axes
- Hatchets
- Large camp choppers
Factors That Influence Angle Selection
- Intended use of the knife
- Blade steel hardness
- Edge retention requirements
- Risk of impact or abuse
- Desired cutting performance
- Ease of field maintenance
- Personal preference
Benefits of Lower Angles
- Extremely sharp cutting edges
- Reduced cutting resistance
- Excellent slicing performance
- Cleaner cuts
- Improved food preparation performance
Benefits of Higher Angles
- Increased durability
- Better resistance to chipping
- Improved edge stability
- Greater toughness
- Better performance during hard use
Common Angle Mistakes
- Constantly changing angles during sharpening
- Using extremely low angles on heavy-duty knives
- Using overly steep angles on slicing knives
- Focusing on perfect angles instead of consistency
- Sharpening without understanding the knife’s intended purpose
Why Consistency Matters Most
Many beginners become obsessed with finding the “perfect” sharpening angle. In reality, a knife sharpened consistently at 18 degrees per side will usually outperform a knife sharpened inconsistently between 15 and 25 degrees. Consistency creates a symmetrical edge, improves cutting performance, and helps the knife wear evenly over time.
Developing the ability to maintain a steady angle is one of the most valuable sharpening skills you can learn. As your technique improves, muscle memory will make angle control easier and more natural. Over time, maintaining a consistent sharpening angle becomes second nature and leads to more predictable, repeatable results.
Ultimately, the best sharpening angle is the one that provides the right balance of sharpness, durability, and performance for the tasks your knife is expected to perform. Understanding sharpening angles allows you to tailor each edge to its intended purpose and get the most out of every blade.
8 Preparing Your Sharpening Station
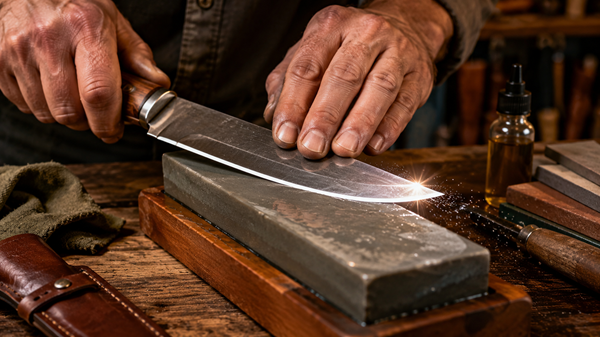
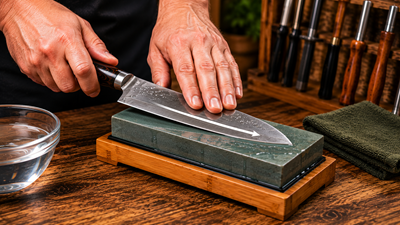
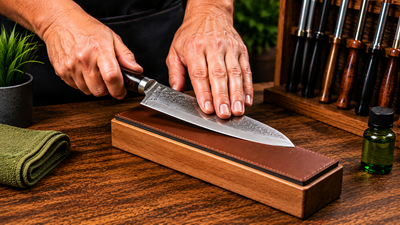
A successful sharpening session begins long before the knife touches the stone. Proper preparation of your sharpening station helps improve safety, maintain consistent sharpening angles, and produce better results. Even the best sharpening stone and technique can be undermined by a poor setup. Taking a few minutes to prepare your workspace can make the sharpening process smoother, safer, and more effective.
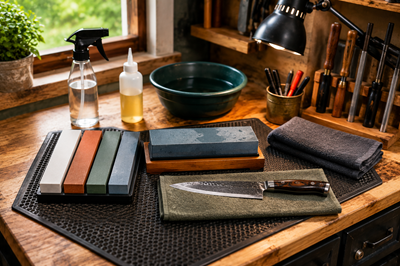 The first step is selecting a stable work surface. A sturdy table, workbench, or countertop provides the solid foundation needed for controlled sharpening. Wobbly surfaces can cause inconsistent sharpening angles and increase the risk of accidents. Good lighting is equally important because it allows you to clearly see the edge of the blade, monitor your sharpening progress, and inspect the condition of the edge as you work.
Your sharpening stone should also be secured so it cannot move during use. Many sharpening stones come with rubber bases, non-slip mats, or dedicated stone holders. If your stone does not include a holder, placing it on a damp cloth can often provide enough grip to keep it stable. A secure stone allows you to focus on maintaining proper technique rather than constantly repositioning your sharpening equipment.
Depending on the type of sharpening stone you are using, you may need water or honing oil nearby. Water stones often require soaking before use and occasional rewetting during sharpening. Oil stones perform best when lubricated with a light sharpening oil that helps carry away metal particles. Having these supplies within reach prevents interruptions and helps maintain a smooth workflow.
Sharpening should never feel rushed. The goal is not speed but consistency and precision. Taking your time allows you to maintain proper angles, monitor burr formation, and avoid mistakes that can damage the edge. Many experienced sharpeners view the process as a skill-building exercise that rewards patience and attention to detail.
A well-organized sharpening station not only improves results but also makes the experience more enjoyable. With the right setup, you can focus entirely on developing a sharp, durable edge while working safely and efficiently.
Essential Sharpening Station Equipment
- Stable work surface
- Adequate lighting
- Sharpening stone or sharpening system
- Stone holder or non-slip base
- Water or honing oil (if required)
- Clean towel or cloth
- Leather strop (optional)
- Safety gloves (optional)
Tips for a Better Sharpening Setup
- Work in a well-lit area
- Secure the sharpening stone before starting
- Keep your workspace free of clutter
- Position tools within easy reach
- Use consistent body positioning while sharpening
- Keep a towel nearby for cleaning blades and stones
- Avoid distractions while sharpening
Common Setup Mistakes to Avoid
- Using an unstable table or surface
- Allowing the stone to slide during sharpening
- Working in poor lighting
- Forgetting lubrication for water or oil stones
- Rushing the sharpening process
- Sharpening in a cramped or cluttered area
- Failing to inspect the blade before beginning
By investing a little time in preparing your sharpening station, you create the conditions needed for consistent, repeatable sharpening results. A stable workspace, proper tools, and a patient approach will make sharpening easier, safer, and far more effective.
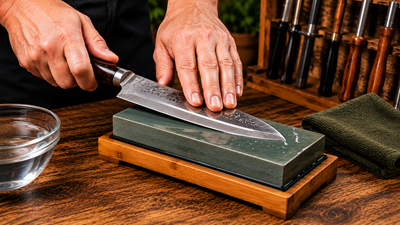
9 Establishing the Edge
Establishing the edge is one of the most important stages of the sharpening process. This is the point where you begin shaping the steel to create a new cutting edge. While polishing and refining come later, none of those steps will matter if the edge has not been properly established first. Taking your time during this stage lays the foundation for a sharp, durable, and long-lasting blade.
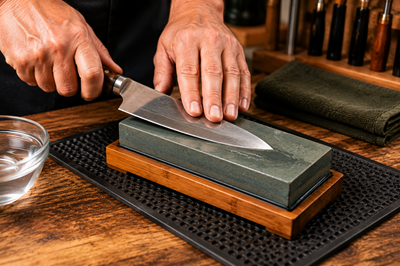 To begin, place the knife against the sharpening stone at the desired sharpening angle. The exact angle will depend on the type of knife and its intended use, but maintaining a consistent angle is far more important than achieving a perfect one. Once the blade is positioned correctly, move it smoothly across the stone as though you are trying to slice a very thin layer from the surface. This motion helps ensure that the entire length of the edge contacts the stone during each pass.
During the initial stages of sharpening, moderate pressure is usually appropriate. The goal is to remove enough metal to reach the very edge of the blade and begin forming a new cutting surface. Too much pressure can make it difficult to maintain a consistent angle and may remove more metal than necessary. Too little pressure may slow progress significantly, especially on a dull knife.
Many beginners focus on speed rather than technique. It is common to see new sharpeners making rapid strokes in an attempt to sharpen faster. In reality, sharpening is a process that rewards patience and precision. Slow, controlled movements allow you to maintain consistent contact with the stone, monitor your progress, and develop muscle memory that leads to better results over time.
Consistency is the key to success during this stage. Every stroke should follow the same angle and motion whenever possible. Even small variations can create uneven bevels and make it more difficult to develop a sharp edge. By focusing on control rather than speed, you can create a strong foundation for the remaining stages of sharpening.
Key Steps for Establishing the Edge
- Position the knife at the desired sharpening angle
- Maintain the same angle throughout each stroke
- Move the blade smoothly across the stone
- Ensure the entire edge contacts the stone
- Use moderate, controlled pressure
- Work methodically and consistently
- Focus on technique rather than speed
Signs You Are Making Progress
- Scratch patterns become more uniform
- The edge begins to feel more consistent
- Dull sections gradually disappear
- A burr starts to form along the edge
- The knife cuts more effectively during testing
Common Mistakes to Avoid
- Changing angles between strokes
- Applying excessive pressure
- Moving too quickly across the stone
- Ignoring parts of the blade near the tip or heel
- Using inconsistent stroke lengths
- Becoming impatient and rushing the process
Remember that establishing the edge is not about creating immediate razor sharpness. It is about building the foundation of a proper cutting edge. Once this stage is completed correctly, the remaining steps of refining, polishing, and burr removal become much easier and far more effective. A few extra minutes spent focusing on consistency during this stage can make a dramatic difference in the final sharpness of the knife.
10 Creating a Burr
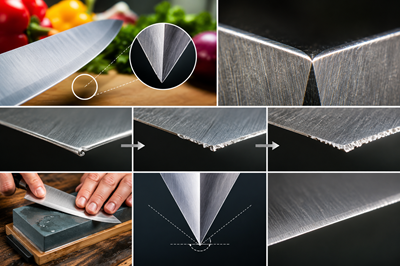
One of the most important milestones in the sharpening process is creating a burr. While many beginners focus entirely on making a knife feel sharp, experienced sharpeners often focus on something much more specific: the burr. Understanding what a burr is and how to identify it can dramatically improve sharpening results and eliminate much of the guesswork involved in creating a truly sharp edge.
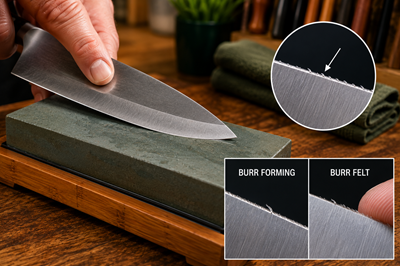 As you sharpen one side of the blade, the abrasive surface of the stone removes small amounts of steel. Eventually, enough metal is removed that the edge becomes extremely thin and begins to fold over to the opposite side of the blade. This thin fold of displaced metal is known as a burr. Although it is tiny and often difficult to see, it can usually be felt with careful inspection.
The formation of a burr is significant because it confirms that you have sharpened all the way to the very edge of the blade. Without creating a burr, there is a risk that you are only grinding or polishing the sides of the bevel without actually reaching the cutting edge itself. Many sharpening frustrations stem from failing to reach the edge, leaving the knife no sharper despite considerable effort.
Once a burr has formed along the entire length of the blade, from the heel to the tip, it is time to sharpen the opposite side. The goal is to move the burr back across the edge by removing steel from the second side. This process ensures that both sides of the blade meet at a properly formed apex, creating the foundation for a sharp cutting edge.
Learning to recognize a burr takes practice, but it is one of the most valuable sharpening skills you can develop. Rather than guessing whether the knife is ready to move to the next stage, the burr provides a clear indicator that sufficient sharpening has occurred.
How to Check for a Burr
- Carefully move your finger from the spine toward the edge
- Never slide your finger along the cutting edge
- Feel for a slight roughness or raised lip of metal
- Check multiple points along the blade
- Inspect the entire edge from heel to tip
- Use light pressure to avoid injury
Signs a Burr Has Formed
- A slight rough or scratchy feeling on one side of the edge
- A tiny lip of metal that can be felt but may not be visible
- Consistent burr formation along the entire edge
- Increased resistance when lightly touching the edge from the spine
- Confirmation that the sharpening stone has reached the apex
Common Mistakes When Creating a Burr
- Switching sides before a burr has formed
- Checking the edge improperly by sliding a finger along it
- Assuming the burr exists without inspecting the full blade
- Using inconsistent sharpening angles
- Moving to finer stones too early
- Applying excessive pressure that damages the edge
Safety Tips
- Always move your finger from the spine toward the edge
- Never drag your finger parallel to the cutting edge
- Work slowly and deliberately
- Keep your attention focused on the blade
- Use adequate lighting when inspecting the edge
Creating a burr is often the turning point in the sharpening process. It provides proof that you have reached the cutting edge and are no longer simply polishing the sides of the blade. Once a burr has been formed along the entire length of the knife, you can confidently move on to sharpening the opposite side and refining the edge. Mastering this concept is one of the biggest steps toward consistently producing razor-sharp knives.
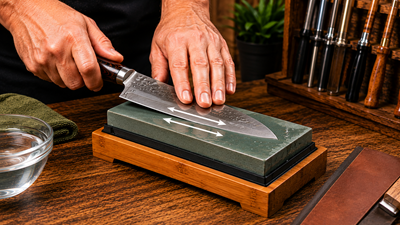
11 Sharpening the Opposite Side
Once a burr has been formed along the entire length of the blade, the next step is to sharpen the opposite side. This stage is just as important as the first because it ensures that both sides of the blade are sharpened evenly and meet at a precise cutting edge. A properly sharpened knife depends on balance and symmetry, and sharpening the second side completes the process of forming the edge.
 The goal during this stage is to remove metal from the opposite side until the burr moves back across the edge. Just as the burr formed on the first side, continued sharpening will gradually push the thin fold of metal back toward the side where you originally started. This movement confirms that the sharpening process has once again reached the very apex of the edge.
Maintaining a consistent sharpening angle is critical throughout this process. The angle used on the second side should closely match the angle used on the first side. Significant differences between the two sides can create an uneven bevel, weaken the edge, and reduce cutting performance. Consistency is often more important than achieving a perfect angle. A symmetrical edge will generally perform better and last longer than one sharpened at varying angles.
The same sharpening strokes and pressure used on the first side should also be used on the second. If heavy pressure was required to establish the initial edge, similar pressure may be appropriate here. As the burr begins to form and the edge becomes more refined, pressure can gradually be reduced. Controlled, deliberate movements help maintain uniformity and prevent unnecessary removal of steel.
Eventually, the burr will flip back to the original side of the blade. This indicates that both sides have now been sharpened all the way to the apex, creating a properly formed cutting edge. At this point, the knife is ready for the next stages of sharpening, which typically involve refining the edge, reducing the burr, and polishing the bevels.
Goals of Sharpening the Opposite Side
- Move the burr back across the edge
- Sharpen all the way to the apex
- Create a balanced cutting edge
- Maintain symmetrical bevels
- Prepare the edge for refinement and polishing
Best Practices
- Use the same sharpening angle as the first side
- Apply consistent pressure throughout the process
- Match the stroke pattern used previously
- Work methodically from heel to tip
- Periodically check for burr formation
- Take your time and focus on consistency
Signs of Success
- The burr moves back to the original side
- Scratch patterns appear consistent on both bevels
- The edge feels uniform along its entire length
- Both sides show similar bevel widths
- The knife begins to feel noticeably sharper
Common Mistakes to Avoid
- Changing the sharpening angle between sides
- Applying significantly more pressure on one side
- Sharpening one side much longer than the other
- Failing to sharpen the entire length of the blade
- Ignoring burr formation and moving on too early
- Rushing the process in an attempt to save time
Why Symmetry Matters
A symmetrical edge cuts more efficiently and experiences more even wear during use. When both sides of the blade are sharpened consistently, the cutting forces are distributed evenly across the edge. This not only improves performance but also helps the knife maintain its sharpness longer. Achieving symmetry may take practice, but it is one of the key factors that separates an average sharpening job from an excellent one.
By carefully sharpening the opposite side and ensuring the burr has fully transferred, you complete the fundamental process of edge creation. At this stage, both sides of the blade have been sharpened to the apex, providing the foundation for the final refining and polishing steps that will transform the knife into a truly sharp cutting tool.
12 Refining the Edge
Once the edge has been fully established and both sides of the blade have been sharpened to the apex, the focus shifts from shaping the edge to refining it. This stage is where a good edge becomes a great one. Rather than aggressively removing metal, the goal now is to smooth the edge, reduce the burr, and improve the overall cutting performance of the blade.
 At this point, sharpening pressure should be significantly reduced. Heavy pressure was useful when establishing the edge and creating the burr, but continuing to use excessive force can actually work against you during refinement. Lighter strokes provide greater control and help preserve the precise geometry that has already been created. Many experienced sharpeners describe this stage as allowing the stone to do the work rather than forcing the blade into the abrasive surface.
As refinement progresses, many sharpeners begin alternating sides after each stroke or every few strokes. This technique gradually weakens and reduces the burr while maintaining balance between both sides of the edge. By alternating sides frequently, the burr becomes smaller and smaller until only a clean, sharp apex remains. This process also helps prevent the burr from becoming excessively large or difficult to remove later.
The refinement stage often requires patience and attention to detail. While the knife may already feel sharp at this point, rushing through refinement can leave behind a weakened edge or a stubborn burr that will quickly break away during use. Taking the time to perform controlled, consistent strokes often results in a noticeably sharper and longer-lasting edge.
Many sharpeners find that the difference between an average edge and an exceptional edge is determined during this phase. A carefully refined edge will cut more cleanly, feel smoother during use, and retain its sharpness longer than one that was rushed through the final stages of sharpening.
Goals of Edge Refinement
- Reduce and weaken the burr
- Improve edge consistency
- Smooth the bevel surfaces
- Increase overall sharpness
- Prepare the blade for polishing or stropping
- Create a stronger and cleaner cutting edge
Refinement Techniques
- Use light, controlled pressure
- Alternate sides frequently
- Maintain a consistent sharpening angle
- Use smooth and deliberate strokes
- Focus on precision rather than speed
- Gradually reduce pressure as sharpening progresses
Signs the Edge Is Improving
- The burr becomes smaller and harder to detect
- The edge feels more uniform from heel to tip
- Cutting performance becomes smoother
- Scratch patterns become finer and more consistent
- The blade begins to reflect light evenly along the bevel
Common Mistakes During Refinement
- Continuing to use heavy pressure
- Rushing through the final sharpening stages
- Failing to alternate sides frequently enough
- Changing sharpening angles unexpectedly
- Moving to polishing or stropping before reducing the burr
- Assuming the knife is finished simply because it feels sharp
Why Patience Matters
Refinement is often where sharpening transitions from basic edge creation to true edge optimization. The improvements made during this stage may appear subtle, but they have a significant impact on the final performance of the knife. A patient approach allows the sharpener to gradually remove imperfections, reduce the burr, and create a cleaner apex that cuts more efficiently and lasts longer.
By slowing down, reducing pressure, and focusing on consistency, you can transform a merely sharp knife into a finely refined cutting tool. The time invested during this stage is often rewarded with better edge retention, smoother cutting performance, and a noticeably sharper blade.
13 Progressing Through Higher Grits
After the edge has been established and refined on a lower-grit stone, the next step is progressing through increasingly finer grits. This stage is where the edge begins to transform from simply sharp to exceptionally sharp. Higher grit stones are designed to refine the work performed by the coarser stones, smoothing the bevels and improving the quality of the cutting edge.
 Each sharpening stone leaves behind a pattern of microscopic scratches on the blade. Coarse stones leave deeper scratches because they remove metal more aggressively, while finer stones leave progressively smaller scratches. The purpose of moving to a higher grit is to remove the scratch pattern created by the previous stone and replace it with a finer, more refined finish. This process gradually improves both the appearance and performance of the edge.
One of the most common mistakes made by beginners is rushing through grit progression. Many people move to a finer stone before fully completing the work on the previous grit. When this happens, deeper scratches remain hidden beneath the polished surface, limiting the potential sharpness of the edge. Taking the time to fully remove the previous scratch pattern ensures that each grit level builds upon the work of the last.
As you progress through finer grits, the edge becomes smoother, cleaner, and more precise. While the improvements may appear subtle at first, they become increasingly noticeable during actual cutting tasks. A properly refined edge glides through materials with less resistance, produces cleaner cuts, and often feels noticeably sharper than an edge finished on a lower grit stone alone.
For many users, the level of refinement needed depends on how the knife will be used. A working outdoor knife may perform perfectly well with a medium-grit finish, while chefs, woodworkers, and knife enthusiasts often prefer highly refined edges created with fine and ultra-fine stones. Understanding the intended purpose of the knife helps determine how far to progress through the grit sequence.
Why Progress Through Higher Grits?
- Remove scratches from previous stones
- Refine the cutting edge
- Improve overall sharpness
- Create smoother bevel surfaces
- Enhance cutting performance
- Prepare the blade for polishing and stropping
- Increase edge consistency
Signs You Are Ready to Move to a Higher Grit
- Scratch pattern appears uniform
- Previous deep scratches have been removed
- The edge feels consistent along its entire length
- Burr formation has been properly addressed
- Sharpening marks are evenly distributed
Benefits of Higher Grit Stones
- Produce finer, cleaner edges
- Improve slicing performance
- Create smoother bevel finishes
- Reduce friction during cutting
- Enhance edge refinement
- Improve the appearance of the blade
- Help maximize sharpness potential
Common Grit Progressions
For general-purpose sharpening:
- 400 grit
- 1000 grit
- 3000 grit
For highly refined edges:
- 400 grit
- 1000 grit
- 3000 grit
- 6000 grit
- Strop
For damaged blades:
- 220 grit
- 600 grit
- 1000 grit
- 3000 grit
- Strop
Common Mistakes to Avoid
- Moving to a finer stone too early
- Failing to remove the previous scratch pattern
- Using inconsistent sharpening angles
- Skipping too many grit levels
- Rushing the refinement process
- Applying excessive pressure on fine stones
Understanding the Final Result
Every grit progression contributes to the final quality of the edge. Coarse stones shape the edge, medium stones sharpen it, and fine stones refine and polish it. The more carefully each stage is completed, the better the final result will be. While not every knife requires a mirror-polished finish, properly progressing through the grits allows the blade to achieve its maximum sharpness potential.
The difference becomes especially noticeable during precise cutting tasks such as food preparation, woodworking, carving, or detailed field work. A well-refined edge cuts more cleanly, requires less effort, and often retains its cutting performance longer. By taking the time to work through the appropriate grit progression, you can significantly improve both the sharpness and overall quality of your knife’s edge.
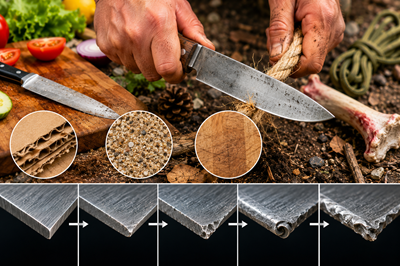
14 Removing the Burr
Removing the burr is one of the most critical steps in the sharpening process, yet it is often overlooked by beginners. A knife may feel extremely sharp immediately after sharpening, but if a burr remains attached to the edge, that sharpness can disappear quickly during use. The burr is made up of thin, weakened metal that folds over during sharpening. While it may initially contribute to a sharp-feeling edge, it lacks the strength and durability needed for long-term cutting performance.
 The goal of burr removal is to eliminate any loose or weakened metal remaining along the apex of the edge. Once both sides of the blade have been sharpened and the burr has been moved back and forth across the edge, it must be removed completely. If left in place, the burr will eventually break away during use, leaving behind an edge that feels noticeably duller than expected.
One of the most effective ways to reduce and remove a burr is by using extremely light alternating strokes on the sharpening stone. Unlike the earlier stages of sharpening, which may require moderate pressure, burr removal demands a delicate touch. The lighter the pressure, the less likely you are to create a new burr while attempting to remove the existing one. Many sharpeners gradually reduce pressure with each pass until they are barely applying any force at all.
As the burr becomes smaller, it may become difficult to detect. This is a good sign that the edge is becoming cleaner and more refined. Some sharpeners finish this stage by moving to a finer grit stone or by using a leather strop. stropping can help remove microscopic burr remnants while further refining and polishing the edge.
A properly deburred knife will generally perform better and hold its sharpness longer than a knife with a remaining burr. This final cleanup process helps create a strong, stable apex capable of withstanding real-world use without rapidly losing sharpness.
Why Burr Removal Is Important
- Eliminates weak metal at the edge
- Improves edge durability
- Increases edge retention
- Creates a cleaner cutting surface
- Reduces the likelihood of premature dulling
- Improves overall cutting performance
- Produces a more consistent edge
Effective Burr Removal Techniques
- Use very light alternating strokes
- Gradually reduce sharpening pressure
- Alternate sides after each stroke
- Move to a finer grit stone if needed
- Finish with a leather strop
- Inspect the edge regularly during the process
Signs the Burr Has Been Removed
- The edge feels smooth and consistent
- No roughness can be felt on either side
- The blade cuts cleanly without snagging
- Sharpness remains consistent during testing
- The edge reflects very little light at the apex
Common Mistakes to Avoid
- Using excessive pressure during final passes
- Failing to alternate sides frequently
- Moving on before the burr is fully removed
- Creating a new burr while trying to remove the old one
- Skipping the deburring stage entirely
- Assuming the burr is gone without checking carefully
Final Inspection
Before moving on to polishing or final sharpness testing, take a moment to inspect the edge. A properly deburred edge should feel clean, even, and uniform from heel to tip. Running a finger carefully from the spine toward the edge can help identify any remaining burr fragments, but always use caution and never slide your finger along the cutting edge.
Many experienced sharpeners believe that burr removal is what separates a good sharpening job from an excellent one. A knife with a properly removed burr will not only feel sharper, but it will also maintain that sharpness longer and perform more consistently during demanding cutting tasks. Taking a few extra minutes to carefully remove the burr is often rewarded with a noticeably better edge and longer-lasting results.
15 Stropping the Knife
Stropping is often considered the final step in the knife sharpening process. While sharpening stones create and refine the cutting edge, a strop helps perfect it. Many experienced sharpeners view stropping as the finishing touch that transforms a sharp knife into an exceptionally sharp one. Although it removes very little metal, stropping can have a dramatic effect on edge quality and overall cutting performance.
 A strop is typically made from leather, although other materials can also be used. As the blade is drawn across the strop, microscopic burr fragments and imperfections left behind by the sharpening stones are removed. The process also helps align and polish the very apex of the edge, creating a cleaner and more refined cutting surface. Even knives that already seem sharp often benefit noticeably from a few minutes of stropping.
Unlike sharpening on a stone, the knife should always be pulled away from the cutting edge when stropping. Pushing the edge into the leather can cut or damage the strop and may even dull the blade. A useful way to think about the motion is to imagine spreading butter on toast backwards. The spine leads while the cutting edge trails behind. This motion allows the leather to gently polish and refine the edge without damaging it.
One of the reasons stropping is so popular is that the improvements can often be felt immediately. Many people are surprised by how much smoother and sharper a knife becomes after only a few passes. A properly stropped edge can slice more cleanly, require less cutting force, and often feel noticeably sharper during use.
Stropping is also an excellent maintenance technique. Regular stropping between sharpening sessions can help maintain edge performance and reduce the frequency of full sharpening. By keeping the edge aligned and removing minor imperfections before they become significant problems, a strop can extend the useful life of a sharpened edge.
Benefits of Stropping
- Removes microscopic burr remnants
- Refines and polishes the cutting edge
- Improves overall sharpness
- Enhances cutting performance
- Helps align the edge
- Extends the time between sharpening sessions
- Produces a cleaner and smoother cutting action
How to Strop Properly
- Pull the blade away from the cutting edge
- Maintain a consistent angle
- Use light pressure
- Alternate sides regularly
- Move smoothly and deliberately
- Allow the leather to do the work
- Perform multiple light passes rather than a few heavy ones
Common Stropping Materials
- Leather strops
- Leather with polishing compound
- Balsa wood strops
- Denim strops
- Specialty synthetic strops
Signs of a Properly Stropped Edge
- Increased sharpness
- Smoother cutting performance
- Cleaner slicing through paper
- Improved shaving ability
- Reduced edge roughness
- More polished bevel appearance
Common Mistakes to Avoid
- Pushing the edge into the strop
- Using excessive pressure
- Stropping at an inconsistent angle
- Rushing through the process
- Neglecting to alternate sides
- Expecting stropping to fix a poorly sharpened edge
Why Stropping Matters
Many sharpeners consider stropping to be the final refinement stage that unlocks the full potential of a sharpened knife. While sharpening stones establish and shape the edge, the strop helps perfect it. The improvements may be microscopic, but the results are often easy to feel during real-world cutting tasks.
A few minutes spent stropping can significantly enhance sharpness, improve edge consistency, and create a smoother cutting experience. Whether used after every sharpening session or as part of regular knife maintenance, stropping remains one of the simplest and most effective ways to maximize the performance of a sharp knife.
16 Testing Sharpness
After investing time and effort into sharpening a knife, it is important to evaluate the results. Testing sharpness allows you to determine whether the edge has been properly sharpened, refined, and deburred. It also helps identify any remaining problem areas that may require additional work before the knife is ready for use.
 There are many ways to test a knife’s sharpness, ranging from simple household methods to more advanced evaluations used by knife enthusiasts. No single test is perfect, and each method provides different information about the condition of the edge. Some tests measure slicing ability, while others reveal edge consistency, refinement, or the presence of remaining burrs.
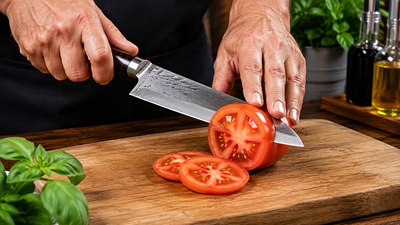
One of the most popular sharpness tests involves cutting a sheet of paper. A properly sharpened knife should slice smoothly through paper without tearing, snagging, or catching. This test is simple, safe, and effective because it quickly reveals inconsistencies along the edge. Areas that fail to cut cleanly often indicate sections of the blade that need additional sharpening or refinement.
Another commonly used test is shaving arm hair. A very sharp knife should be capable of shaving hair with little pressure. While this test can provide a good indication of edge quality, it should be performed carefully and is not necessary for every knife. Many working knives perform exceptionally well without being sharp enough to shave hair.
Food preparation provides another practical method of testing sharpness. A kitchen knife should easily slice tomatoes, onions, peppers, and other foods without crushing or tearing them. Thin slicing tasks often reveal subtle differences in edge quality that may not be obvious during simpler tests.
Ultimately, the most meaningful sharpness test is the task the knife was designed to perform. A hunting knife should process game efficiently, a camp knife should handle outdoor cutting chores with ease, and a chef’s knife should excel at food preparation. Real-world performance often tells you more about a knife than any standardized sharpness test.
Common Sharpness Tests
- Paper slicing test
- Shaving arm hair
- Slicing tomatoes
- Cutting onions
- Rope cutting
- Cardboard cutting
- Food preparation tasks
- Outdoor cutting tasks
Signs of a Sharp Edge
- Cuts paper smoothly without snagging
- Slices food cleanly with minimal effort
- Requires less pressure during cutting
- Feels consistent from heel to tip
- Produces clean, controlled cuts
- Maintains performance across the entire blade
What Sharpness Tests Can Reveal
- Uneven sharpening along the edge
- Remaining burrs
- Dull sections of the blade
- Inconsistent bevels
- Areas requiring additional refinement
- Overall edge quality
Common Testing Mistakes
- Assuming sharpness based on appearance alone
- Using unsafe testing methods
- Applying excessive force during testing
- Ignoring sections of the blade that perform poorly
- Confusing aggressiveness with true sharpness
- Failing to test the knife in its intended role
Matching the Test to the Knife
Different knives serve different purposes, and the ideal sharpness test should reflect how the knife will actually be used.
Kitchen Knives
- Vegetable slicing
- Tomato tests
- Paper slicing
- Food preparation tasks
Outdoor and Survival Knives
- Rope cutting
- Wood carving
- Feather stick creation
- General camp tasks
Hunting Knives
- Precision cutting
- Skinning tasks
- Processing game
- Controlled slicing
Pocket Knives and EDC Knives
- Package opening
- Cardboard cutting
- Utility tasks
- Everyday slicing
The Importance of Real-World Performance
While sharpness tests are useful, they should never become the sole measure of a knife’s effectiveness. A knife can pass a paper test and still perform poorly in its intended role if the edge geometry is not appropriate for the task. Conversely, some working knives may not shave hair yet perform exceptionally well in the field.
The best test of a knife’s sharpness is often the work it was designed to do. When a knife cuts efficiently, safely, and consistently during real-world use, it has achieved its true purpose. Sharpness tests provide valuable feedback, but practical performance remains the ultimate measure of a well-sharpened blade.
17 Common Sharpening Mistakes
Learning to sharpen a knife is a skill that improves with practice, but nearly every beginner encounters a few common mistakes along the way. Fortunately, most sharpening problems are not caused by poor equipment. Instead, they result from technique issues that can be corrected with patience and experience. Understanding these common mistakes can help shorten the learning curve and lead to better sharpening results more quickly.
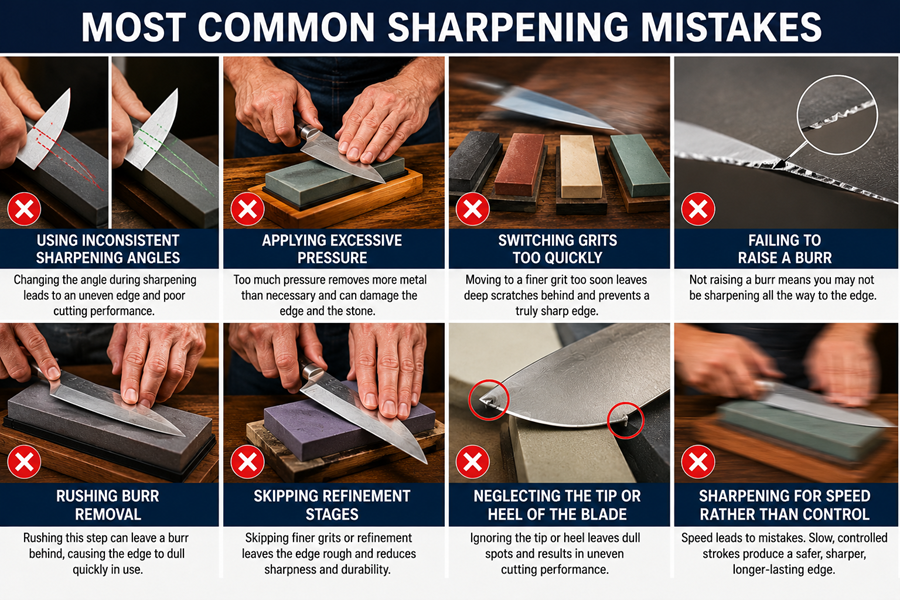 One of the most frequent errors is failing to maintain a consistent sharpening angle. Even small variations in angle can create uneven bevels and make it difficult to form a clean, sharp edge. Many beginners unconsciously change angles during each stroke, especially near the tip of the blade. Consistency is often more important than the exact angle being used. A steady angle throughout the sharpening process will generally produce far better results than constantly changing between different angles.
Another common mistake is applying too much pressure. While moderate pressure may be useful when repairing damaged edges or establishing a new bevel, excessive force often causes more harm than good. Heavy pressure can remove unnecessary amounts of steel, wear out sharpening stones more quickly, and make it difficult to maintain proper control. As sharpening progresses, pressure should gradually decrease, especially during refinement and burr removal.
Many new sharpeners also move through grit progressions too quickly. Each grit level serves a specific purpose, and failing to completely remove the scratch pattern from the previous stone can limit the final sharpness of the edge. Rushing to finer stones before completing the work on coarser grits often leaves imperfections hidden beneath a polished surface.
Another critical mistake is failing to raise a burr. The burr is one of the clearest indicators that sharpening has reached the apex of the edge. Without forming a burr, there is a strong possibility that only the sides of the bevel are being polished rather than actually sharpening the cutting edge. Many sharpening frustrations can be traced back to this single issue.
Finally, some sharpeners rush through burr removal and edge refinement. While the knife may feel sharp initially, a remaining burr often breaks away during use, leaving behind an edge that dulls quickly. Proper burr removal and final refinement are essential for creating a durable, long-lasting edge.
The good news is that these mistakes are entirely normal. Every experienced sharpener has made them at some point. By recognizing and correcting these common issues, you can dramatically improve both your sharpening results and your confidence.
Most Common Sharpening Mistakes
- Using inconsistent sharpening angles
- Applying excessive pressure
- Switching grits too quickly
- Failing to raise a burr
- Rushing burr removal
- Skipping refinement stages
- Neglecting the tip or heel of the blade
- Sharpening for speed rather than control
Signs You May Be Making a Mistake
- The knife remains dull after sharpening
- Scratch patterns appear uneven
- The edge feels sharp in some areas but not others
- The burr never forms
- Sharpness disappears quickly after use
- The bevels look uneven from side to side
- The blade cuts inconsistently along its length
How to Avoid These Problems
- Focus on maintaining a consistent angle
- Use controlled, deliberate strokes
- Let the abrasive do the work
- Fully complete each grit before moving to the next
- Verify burr formation before switching sides
- Use progressively lighter pressure during refinement
- Take time to remove the burr completely
- Inspect your progress frequently
Beginner Habits That Lead to Better Results
- Sharpen slowly and methodically
- Practice on inexpensive knives first
- Develop muscle memory through repetition
- Use good lighting to inspect the edge
- Keep sharpening stones clean and maintained
- Track your progress rather than rushing for results
Remember: Technique Matters More Than Equipment
Many people assume that buying expensive sharpening stones or advanced sharpening systems will instantly solve their sharpening problems. In reality, technique plays a far larger role than equipment. A skilled sharpener can often achieve excellent results with basic tools, while poor technique can produce disappointing results even with premium equipment.
By understanding and avoiding these common sharpening mistakes, you can develop better habits, sharpen more efficiently, and consistently produce sharper, longer-lasting edges. Every sharpening session becomes an opportunity to improve, and even small corrections in technique can lead to significant improvements in performance.
18 Maintaining Sharp Knives
Sharpening is only one part of proper knife care. While a well-executed sharpening session can restore a dull edge, regular maintenance is what keeps a knife performing at its best over the long term. A knife that is cared for properly will stay sharp longer, require less frequent sharpening, and provide more reliable performance throughout its life.
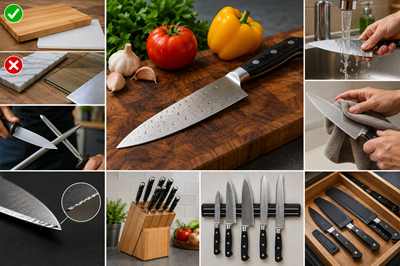 One of the most important aspects of knife maintenance is using appropriate cutting surfaces. Even the sharpest knife edge can be damaged by repeatedly cutting on hard materials. Wooden and plastic cutting boards are generally the best choices because they provide enough resistance for effective cutting while minimizing wear on the edge. In contrast, glass, ceramic, stone, and metal surfaces can dull a knife surprisingly quickly and should be avoided whenever possible.
Proper cleaning is another essential part of knife maintenance. Food acids, moisture, and residue can contribute to corrosion and edge degradation over time. After use, knives should be washed promptly, cleaned thoroughly, and dried completely before storage. Leaving a knife wet or dirty can lead to staining, rust, and damage to both the blade and handle materials.
Regular honing can also help maintain a sharp edge between sharpening sessions. As a knife is used, the edge may gradually roll or bend slightly out of alignment. A honing rod can help straighten the edge and restore much of the knife’s cutting performance without removing significant amounts of metal. This simple maintenance step can greatly extend the time between full sharpening sessions.
Storage is often overlooked, but it plays a major role in preserving a knife’s edge. Knives that are tossed into drawers can strike other utensils, causing chips, dents, and dulling. Storing knives in a knife block, on a magnetic strip, in edge guards, or in protective sheaths helps protect the edge and reduces unnecessary wear.
Good maintenance habits not only improve performance but also extend the life of the knife itself. Every sharpening session removes a small amount of steel, so reducing the need for frequent sharpening helps preserve the blade for many years of service.
Daily Knife Care Practices
- Clean knives after each use
- Dry blades thoroughly before storage
- Store knives in a safe, protected location
- Use a honing rod when needed
- Inspect edges regularly for damage
- Avoid unnecessary impacts or misuse
Best Cutting Surfaces
- Wooden cutting boards
- Plastic cutting boards
- End-grain butcher blocks
- Soft composite cutting surfaces
Surfaces to Avoid
- Glass cutting boards
- Ceramic surfaces
- Stone countertops
- Metal work surfaces
- Concrete or masonry materials
Benefits of Regular Maintenance
- Longer-lasting sharp edges
- Reduced sharpening frequency
- Improved cutting performance
- Greater safety during use
- Extended knife lifespan
- Better resistance to corrosion and damage
Common Maintenance Mistakes
- Leaving knives wet after cleaning
- Using dishwashers for quality knives
- Cutting on hard surfaces
- Storing knives loose in drawers
- Ignoring edge alignment issues
- Waiting until a knife is completely dull before maintenance
Signs Your Knife Needs Attention
- Increased effort required during cutting
- Food tearing instead of slicing cleanly
- Reduced control while cutting
- Visible edge damage or rolling
- Poor performance despite recent sharpening
A Long-Term Approach to Knife Care
The best knife maintenance strategy is preventive rather than reactive. Small maintenance tasks performed regularly are far easier than repairing a neglected blade. By cleaning, drying, honing, and storing knives properly, you can keep them performing at a high level while minimizing the need for major sharpening sessions.
A well-maintained knife is safer, more efficient, and more enjoyable to use. With just a few simple habits, you can dramatically extend the life of your knives and ensure they remain reliable tools for years or even decades to come.
19 Sharpening Different Types of Knives
While the basic principles of knife sharpening remain the same, different types of knives often require different sharpening approaches. Factors such as blade design, intended use, steel type, and edge geometry all influence how a knife should be sharpened. Understanding these differences allows you to tailor the edge to the knife’s purpose and achieve the best possible performance.
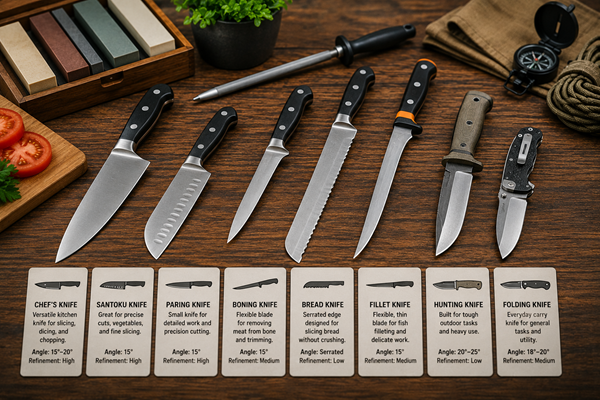 One of the most common mistakes made by beginners is assuming that every knife should be sharpened to the same angle and level of refinement. In reality, a kitchen knife designed for precise food preparation has very different requirements than a survival knife intended for heavy outdoor use. Sharpening each knife according to its intended purpose helps maximize both performance and durability.
The ideal edge is often a balance between sharpness and strength. Extremely thin edges can provide incredible cutting performance but may be more prone to rolling or chipping under heavy use. Thicker, more durable edges may not feel quite as razor sharp but can withstand tougher cutting tasks and rougher conditions. The best sharpening strategy depends on how the knife will actually be used.
Understanding the role of each knife allows you to make informed decisions about sharpening angles, grit progression, edge refinement, and overall edge geometry. A properly sharpened knife should be optimized for its intended task rather than simply sharpened to the highest possible level of sharpness.
Kitchen Knives
Kitchen knives are typically designed for slicing, chopping, and food preparation. These tasks benefit from thin, highly refined edges that pass easily through vegetables, meats, and other ingredients. Many kitchen knives are sharpened to relatively narrow angles to maximize cutting efficiency.
Chefs and home cooks often prefer polished edges because they produce clean cuts and reduce resistance during food preparation. Fine grit stones and stropping are commonly used to achieve the desired level of sharpness.
Common Characteristics of Kitchen Knife Edges
- Narrow sharpening angles
- Highly refined cutting edges
- Excellent slicing performance
- Smooth cutting action
- Fine grit finishes
Outdoor and Survival Knives
Outdoor and survival knives are often expected to perform a wide variety of tasks, including carving, batoning, rope cutting, food preparation, and general camp chores. Because these knives encounter tougher materials, they typically benefit from slightly wider edge angles that provide greater strength and durability.
A survival knife does not necessarily need a mirror-polished edge. Many users prefer a practical working edge that balances sharpness with toughness and can be maintained easily in the field.
Common Characteristics of Outdoor Knife Edges
- Stronger edge geometry
- Wider sharpening angles
- Increased durability
- Easier field maintenance
- Good all-around cutting performance
Hunting Knives
Hunting knives occupy a unique middle ground between kitchen knives and survival knives. They must be sharp enough for precise skinning and meat processing while remaining durable enough to handle tougher materials such as hide, cartilage, and connective tissue.
Many hunters prefer an edge that combines excellent slicing ability with sufficient toughness to resist damage during field dressing. Medium-to-fine grit finishes are often popular because they provide aggressive cutting performance while maintaining durability.
Common Characteristics of Hunting Knife Edges
- Excellent slicing capability
- Good edge retention
- Balanced sharpness and toughness
- Durable working edge
- Reliable field performance
Pocket Knives and EDC Knives
Pocket knives and everyday carry (EDC) knives are designed to handle a wide variety of daily tasks. Opening packages, cutting rope, slicing cardboard, and performing utility work all place different demands on the edge. Because of this versatility, many EDC knives are sharpened with a balanced edge geometry that offers both sharpness and durability.
A pocket knife that is too delicate may require constant maintenance, while one that is too thick may struggle with fine cutting tasks. The goal is usually to create a versatile edge that performs well across many different applications.
Common Characteristics of EDC Knife Edges
- Balanced edge geometry
- Good edge retention
- Versatile cutting performance
- Moderate sharpening angles
- Practical maintenance requirements
Specialty Knives
Some knives are designed for highly specialized tasks and may require unique sharpening approaches. Fillet knives, carving knives, woodworking knives, and custom blades often have specific edge requirements based on their intended function.
In these cases, the manufacturer’s recommendations and the knife’s primary purpose should guide sharpening decisions.
Examples of Specialty Knives
- Fillet knives
- Boning knives
- Wood carving knives
- Bushcraft knives
- Tactical knives
- Custom handmade knives
Choosing the Right Edge Geometry
When deciding how to sharpen a knife, ask yourself a simple question:
What is this knife designed to do?
The answer often determines the ideal sharpening strategy. A knife intended for delicate slicing should prioritize sharpness and refinement, while a knife expected to perform heavy-duty work should emphasize strength and durability.
Key Factors to Consider
- Intended use
- Blade steel type
- Edge retention requirements
- Durability needs
- Ease of maintenance
- Sharpening equipment available
- Personal preference
By understanding the intended purpose of a knife and tailoring the sharpening process accordingly, you can create an edge that performs exceptionally well in its specific role. The sharpest possible edge is not always the best edge. The best edge is the one that provides the right balance of sharpness, durability, and performance for the task at hand.
20 Field Sharpening
Sharpening a knife in the field is often very different from sharpening one at home or in a workshop. In outdoor, survival, hunting, and emergency situations, you may not have access to a full sharpening station, multiple grit stones, or specialized equipment. Instead, field sharpening focuses on maintaining a functional edge using simple, portable tools that can be carried in a pack, pocket, or survival kit.
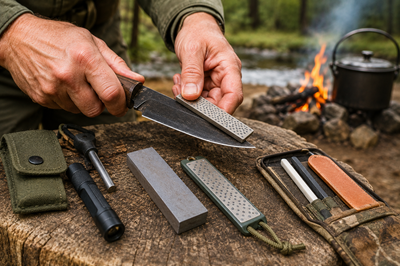 The primary goal of field sharpening is not perfection. In most real-world situations, a knife does not need a mirror-polished edge capable of shaving hair. What matters is restoring enough sharpness for the knife to safely and effectively perform the tasks at hand. Whether you are processing firewood, preparing food, carving tent stakes, cleaning game, or cutting rope, a functional working edge is far more valuable than an edge that looks perfect under magnification.
Compact diamond sharpeners are among the most popular field sharpening tools because they are lightweight, durable, and highly effective. Diamond sharpeners can quickly restore an edge and require little maintenance. Many models are small enough to fit in a pocket or survival kit while still providing enough abrasive surface to sharpen a variety of blade sizes.
pocket stones are another excellent option for field use. These small sharpening stones are easy to carry and can be used to touch up a dull edge before it becomes a serious problem. While they may not sharpen as quickly as larger bench stones, they are more than capable of restoring a practical working edge when needed.
Field sharpening also encourages a proactive approach to knife maintenance. Rather than waiting until a knife becomes extremely dull, experienced outdoorsmen often touch up their blades regularly. A few minutes of maintenance can prevent major sharpening work later and help ensure the knife remains ready for use throughout a trip.
One of the most important lessons in field sharpening is learning when “sharp enough” is truly sharp enough. In survival situations, spending excessive time trying to create a perfect edge may not be practical. The objective is to maintain capability, conserve energy, and keep tools functioning reliably under real-world conditions.
Benefits of Field Sharpening
- Maintains knife performance away from home
- Extends the useful life of the edge
- Reduces the need for major sharpening later
- Keeps tools ready for critical tasks
- Requires minimal equipment
- Supports self-reliance and preparedness
Common Field Sharpening Tools
- Compact diamond sharpeners
- Pocket sharpening stones
- Folding sharpeners
- Ceramic sharpening rods
- Small guided sharpeners
- Leather strops
- Multi-tool sharpeners
Good Field Sharpening Practices
- Touch up the edge before it becomes extremely dull
- Use light, controlled sharpening strokes
- Maintain a consistent angle
- Inspect the edge regularly
- Carry sharpening tools as part of your gear
- Prioritize function over perfection
Tasks That Require a Sharp Field Knife
- Cutting rope and cordage
- Food preparation
- Processing game
- Carving wood
- Creating feather sticks
- Building shelters
- Camp chores and repairs
Common Field Sharpening Mistakes
- Waiting until the knife is completely dull
- Carrying no sharpening equipment
- Spending too much time chasing perfection
- Using excessive pressure
- Sharpening at inconsistent angles
- Ignoring minor edge damage until it becomes severe
Emergency Sharpening Options
In a true emergency, improvised sharpening methods may be necessary. While they are not ideal, several common items can help restore a basic working edge:
- The unglazed bottom ring of a ceramic mug
- Certain smooth river stones
- Ceramic tiles
- Fine concrete surfaces (used carefully)
- Leather belts for light stropping
These improvised methods will not replace proper sharpening equipment, but they can help restore enough sharpness to complete essential tasks when no dedicated sharpener is available.
Field Sharpening and Preparedness
For preppers, hunters, campers, and outdoor enthusiasts, field sharpening is more than a convenience—it is an important self-reliance skill. A knife is often one of the most heavily used tools in any outdoor kit, and its usefulness depends directly on the condition of its edge. Knowing how to maintain that edge with limited resources ensures that the knife remains a dependable tool when it is needed most.
In the field, practicality always takes priority. A reasonably sharp knife that can safely and efficiently perform its intended tasks is far more valuable than an imperfectly maintained blade waiting for workshop-quality sharpening. field sharpening is ultimately about preserving capability, adapting to available resources, and keeping essential tools operational under real-world conditions.
21 Long-Term Knife Care
A quality knife can last for decades—or even generations—if it is properly cared for. While sharpening is important, long-term knife care involves much more than maintaining a sharp edge. Proper storage, routine inspections, cleaning, and preventive maintenance all play important roles in preserving both the performance and lifespan of a knife. A small investment of time and attention can help ensure that a knife remains reliable for many years.
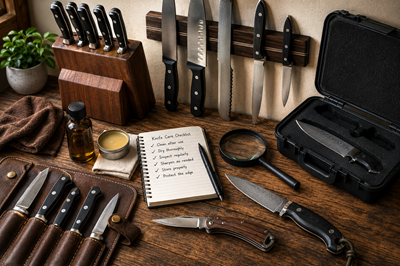 One of the most important aspects of long-term knife care is proper storage. A sharp edge can be damaged surprisingly easily if it repeatedly comes into contact with hard objects. Tossing knives into drawers with other utensils, tools, or metal objects often leads to chips, dents, and premature dulling. Instead, knives should be stored in a manner that protects both the edge and the user handling them.
Knife blocks, magnetic knife racks, blade guards, sheaths, and dedicated storage cases are all excellent options. These storage methods help prevent unnecessary contact between blades and other objects while also reducing the risk of accidental injury. Proper storage is one of the simplest ways to preserve edge quality between uses.
Regular inspection is another important habit. Small issues such as minor chips, rust spots, loose handles, or rolled edges are much easier to address when caught early. Periodically examining your knives allows you to identify problems before they become serious enough to require major repairs or extensive sharpening.
Keeping blades clean and dry is equally important, especially for high-carbon steels that are more susceptible to corrosion. Moisture, food acids, and environmental contaminants can all contribute to staining and rust if left on the blade for extended periods. After use, knives should be cleaned, dried thoroughly, and stored in a dry location. Some knife owners also apply a light protective oil to blades that will be stored for long periods.
Another key principle of long-term knife care is avoiding severe dullness. Many people wait until a knife becomes extremely dull before sharpening it. In reality, performing occasional touch-ups is far more effective. Light maintenance sharpening requires less effort, removes less metal, and helps preserve the original geometry of the blade.
Long-term knife care is ultimately about prevention rather than repair. Consistent maintenance helps avoid unnecessary wear and extends the useful life of the knife while ensuring it remains ready for use whenever needed.
Best Knife Storage Options
- Wooden knife blocks
- Magnetic knife racks
- Blade guards
- Protective sheaths
- Knife rolls
- Dedicated knife cases
- Drawer organizers designed for knives
Storage Methods to Avoid
- Loose storage in drawers
- Tossing knives into toolboxes
- Stacking knives directly on top of each other
- Storing knives in damp environments
- Leaving knives exposed to the elements
- Storing dirty or wet blades
Long-Term Maintenance Practices
- Clean knives after every use
- Dry blades thoroughly before storage
- Touch up edges regularly
- Inspect knives for damage
- Address rust spots immediately
- Lubricate pivot points on folding knives
- Protect carbon steel blades with light oil when appropriate
Signs Your Knife Needs Attention
- Edge feels noticeably dull
- Visible rust or staining
- Small chips along the edge
- Loose handle scales
- Difficulty cutting materials previously handled with ease
- Corrosion forming around pivots or fasteners
Benefits of Regular Knife Care
- Longer blade life
- Reduced sharpening frequency
- Improved cutting performance
- Greater safety during use
- Better resistance to corrosion
- Lower replacement costs
- Improved reliability in the field
Special Considerations for Outdoor Knives
Outdoor, hunting, and survival knives often face harsher conditions than kitchen knives. Exposure to moisture, dirt, blood, plant sap, and changing weather conditions can accelerate wear and corrosion. These knives should be cleaned and inspected after every trip and stored in a dry location. If stored in leather sheaths for long periods, periodic inspections are recommended since leather can retain moisture.
Protecting Your Investment
Many knives represent a significant investment of money, craftsmanship, or sentimental value. Whether it is a premium chef’s knife, a custom hunting knife, a family heirloom, or a trusted everyday carry blade, proper care helps protect that investment. The few minutes spent cleaning, inspecting, and maintaining a knife after use can prevent years of unnecessary wear and damage.
In the end, long-term knife care is built on simple habits. Store knives properly, keep them clean and dry, touch up the edge before it becomes excessively dull, and inspect them regularly. These small maintenance efforts add up over time and can dramatically extend the lifespan, performance, and reliability of any knife.
22 Summary
Knife sharpening is one of the most valuable practical skills a person can learn. It improves safety, efficiency, self-reliance, and confidence. Whether you are a home cook, hunter, camper, woodworker, homesteader, or prepper, the ability to maintain a sharp edge ensures your tools remain ready when needed.
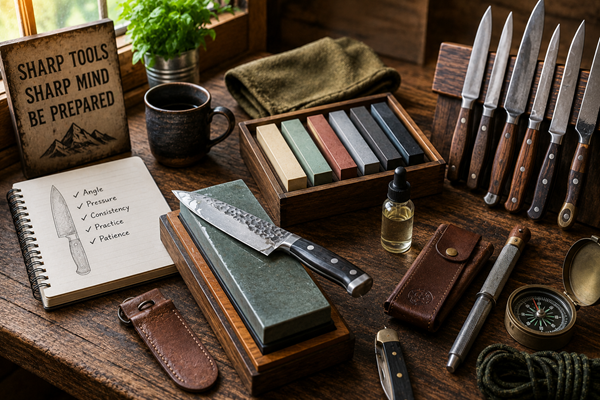 The secret to sharpening is not expensive equipment. It is consistency. Consistent angles, consistent pressure, and consistent practice will produce excellent results.
Every expert sharpener started with the same challenge: learning how steel behaves against a stone. With time, the process becomes intuitive. Eventually, sharpening transforms from a chore into a rewarding skill that keeps one of humanity’s oldest and most useful tools performing at its best.
Index
A
Apex
B
Bevel
Blade Geometry
Burr
Bushcraft Knife
C
Carbide Sharpener
Ceramic Rod
Chipping
Coarse Grit
Corrosion
D
Deburring
Diamond Stone
E
Edge Alignment
Edge Durability
Edge Geometry
Edge Maintenance
Edge Refinement
Edge Retention
Edge Stability
Everyday Carry (EDC) Knife
F
Feather Stick
Field Sharpening
Fine Grit
G
Grit
Grit Progression
H
Heel
Honing
Honing Rod
Hunting Knife
I
Included Angle
K
Kitchen Knife
Knife Block
L
Leather Strop
M
Medium Grit
Metal Removal
Mirror Finish
O
Outdoor Knife
P
Pocket Stone
Polishing
Preventive Maintenance
R
Reprofiling
Rolled Edge
Rust
S
Scratch Pattern
Sharpening
Sharpening Angle
Sharpening Station
Sharpening Stone
Sharpening System
Stone Holder
Strop Compound
Stropping
Survival Knife
Symmetrical Edge
T
Tip
U
Utility Knife
W
Water Stone
Whetstone
Working Edge
Glossary
Apex
The very point where both sides of a sharpened edge meet. A properly formed apex is essential for a sharp knife.
Bevel
The angled surface of the blade that narrows down to form the cutting edge.
Blade Geometry
The overall shape, thickness, grind, and edge angle of a blade, all of which influence cutting performance.
Burr
A thin fold of metal that forms on the opposite side of the edge during sharpening. The burr indicates that sharpening has reached the apex.
Bushcraft Knife
A knife optimized for wood carving, fire preparation, shelter building, and other wilderness skills.
Carbide Sharpener
A sharpening tool that uses carbide inserts to rapidly remove metal and restore an edge.
Ceramic Rod
A sharpening rod made from ceramic material that is used for honing and light sharpening.
Chipping
Small pieces of metal breaking away from the cutting edge, often caused by impact, misuse, or an overly thin edge.
Coarse Grit
A low-grit abrasive surface, typically between 200 and 600 grit, used for repairing damaged edges and removing metal quickly.
Corrosion
The deterioration of metal caused by moisture, chemicals, or environmental exposure.
Cutting Edge
The sharpened portion of the blade that performs the actual cutting.
Deburring
The process of removing the burr left behind during sharpening to create a clean, durable edge.
Diamond Stone
A sharpening surface coated with industrial diamonds that removes metal quickly and remains flat over time.
Edge Alignment
The process of straightening a rolled or bent edge, usually accomplished through honing.
Edge Durability
The ability of a knife edge to withstand wear and maintain performance over time.
Edge Geometry
The specific shape and angle of the cutting edge that determines sharpness, durability, and cutting performance.
Edge Maintenance
Routine care such as honing, stropping, and touch-up sharpening used to preserve knife performance.
Edge Refinement
The process of improving edge smoothness and sharpness after the initial sharpening stages.
Edge Retention
The ability of a knife to remain sharp during use before requiring maintenance or sharpening.
Edge Stability
The ability of an edge to resist rolling, chipping, or deformation during use.
Everyday Carry (EDC) Knife
A pocket knife routinely carried for general daily cutting tasks.
Feather Stick
Thin curls of wood shaved from a stick, often used for fire starting in bushcraft and survival situations.
Field Sharpening
The process of sharpening a knife outdoors using portable tools and limited resources.
Fine Grit
A high-grit sharpening surface, typically between 3000 and 8000 grit, used for refining and polishing an edge.
Grit
A measurement of abrasive particle size used in sharpening stones. Lower numbers remove metal quickly, while higher numbers refine and polish.
Grit Progression
The process of moving from coarser stones to finer stones during sharpening.
Heel
The rear portion of the knife edge closest to the handle.
Honing
The process of realigning a knife edge without significantly removing metal.
Honing Rod
A steel, ceramic, or diamond rod used to straighten and maintain an existing edge.
Hunting Knife
A knife designed for field dressing, skinning, and processing game.
Included Angle
The total angle formed by both sides of a knife edge combined.
Kitchen Knife
A knife designed primarily for food preparation and culinary tasks.
Knife Block
A storage device designed to protect knife edges and improve safety.
Leather Strop
A strip of leather used to polish and refine a knife edge after sharpening.
Medium Grit
A sharpening surface generally ranging from 800 to 2000 grit, commonly used for routine sharpening and maintenance.
Metal Removal
The process of grinding away steel during sharpening to create or restore an edge.
Mirror Finish
A highly polished blade or edge surface that reflects light similarly to a mirror.
Outdoor Knife
A knife designed for camping, bushcraft, hunting, and survival tasks.
Pocket Stone
A small portable sharpening stone designed for field use.
Polishing
The final stages of sharpening where fine abrasives improve smoothness and edge refinement.
Preventive Maintenance
Regular care practices that help avoid major repairs, excessive sharpening, or premature blade wear.
Reprofiling
Changing the shape or angle of a knife’s bevel to create a new edge geometry.
Rolled Edge
An edge that has bent slightly during use rather than becoming worn away.
Rust
A form of corrosion that affects steel when exposed to moisture and oxygen.
Scratch Pattern
The microscopic scratches left on a blade by sharpening stones. Finer stones remove the scratch patterns created by coarser stones.
Sharpening
The process of removing metal to create a new cutting edge.
Sharpening Angle
The angle between the blade and sharpening surface during sharpening.
Sharpening Station
A dedicated workspace organized for safe and effective knife sharpening.
Sharpening Stone
An abrasive surface used to sharpen knives and other cutting tools.
Sharpening System
A tool or collection of tools designed to assist with maintaining consistent sharpening angles and edge quality.
Stone Holder
A device used to secure a sharpening stone and prevent movement during sharpening.
Strop Compound
A polishing compound often applied to a leather strop to improve polishing effectiveness.
Stropping
The process of refining and polishing an edge using a leather strop or similar material.
Survival Knife
A rugged knife intended for emergency and wilderness use.
Symmetrical Edge
An edge where both sides of the bevel have been sharpened evenly.
Tip
The front portion of the knife blade used for precision cutting tasks.
Utility Knife
A general-purpose knife designed for everyday cutting tasks.
Water Stone
A sharpening stone designed to be used with water as a lubricant.
Whetstone
A traditional sharpening stone used to sharpen knives and tools. The term applies to both water stones and oil stones.
Working Edge
A practical, durable edge designed for real-world cutting tasks rather than maximum polish.
© Prepping Communities. This content is for informational purposes only and not professional advice. Use at your own risk.
Terms | Privacy | Guidelines