
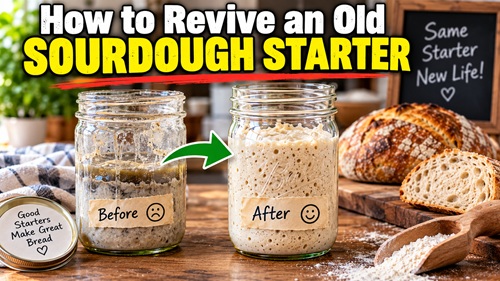
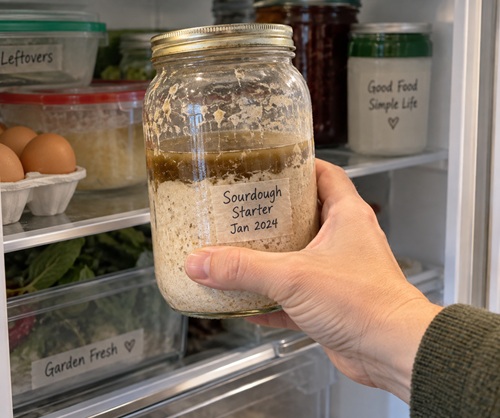
A forgotten sourdough starter can look remarkably unpromising. After weeks or months in the refrigerator, it may have separated, developed a dark layer of liquid, stopped producing bubbles, and acquired a strong alcoholic or solvent-like smell. None of those signs automatically means the starter is dead. A mature sourdough starter contains a living community of yeasts and bacteria, and when those microorganisms run short of food, their activity can slow dramatically. Refrigeration slows them even further. What appears to be a dead starter may actually be a severely underfed culture waiting for better conditions.
Learning how to recognize and revive that culture is a useful food-resilience skill. Instead of depending entirely on commercial yeast whenever bread is needed, an established sourdough culture provides a renewable leavening system based primarily on flour, water, time, and fermentation knowledge. The real preparedness value isn’t simply keeping a jar of starter alive. It is understanding the process well enough that you can maintain the culture, recognize problems, recover it after neglect, and create backups.
Understand What You Are Reviving
Sourdough starter is more than old flour and water. Once established, it contains microorganisms that consume carbohydrates in the flour and produce acids and gases. When regularly fed, this activity can become strong enough to leaven bread dough. When the available food is depleted, fermentation slows. Cold storage slows it even further, which is why refrigeration can extend the amount of time a healthy culture can go between feedings.
This distinction becomes important when examining a neglected starter because an inactive starter and a spoiled starter are not the same thing. Inactivity may be reversible. Contamination may not be. Before adding fresh flour or attempting to revive anything, the first job is therefore to determine what condition the culture is actually in.
Inspect the Starter Before Feeding It
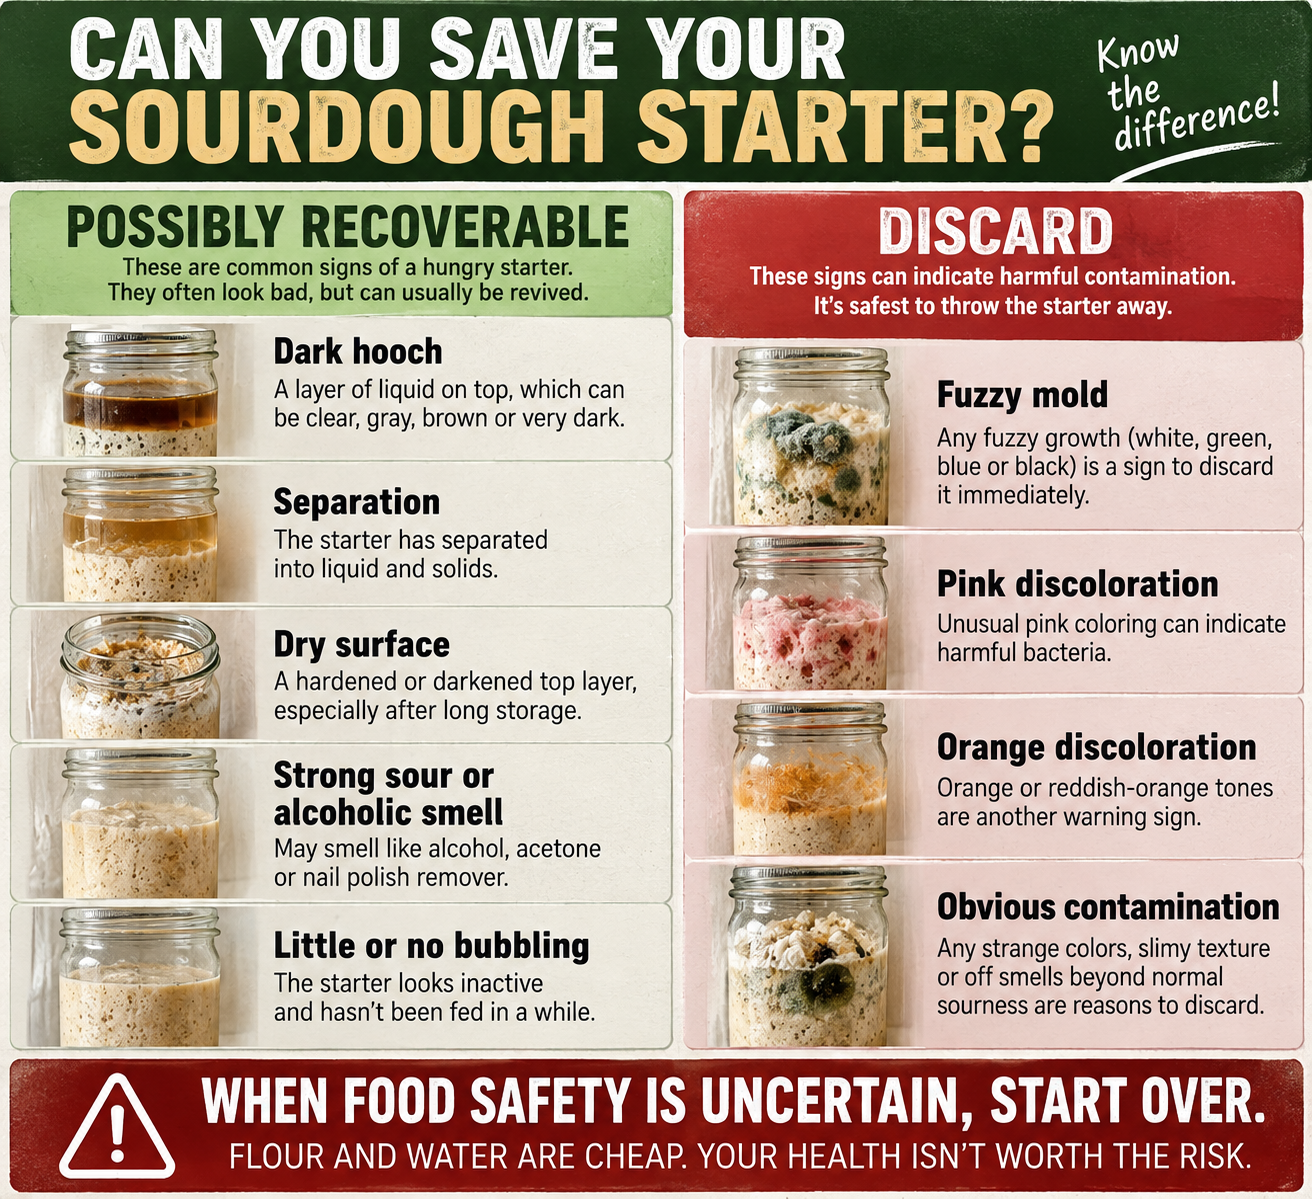
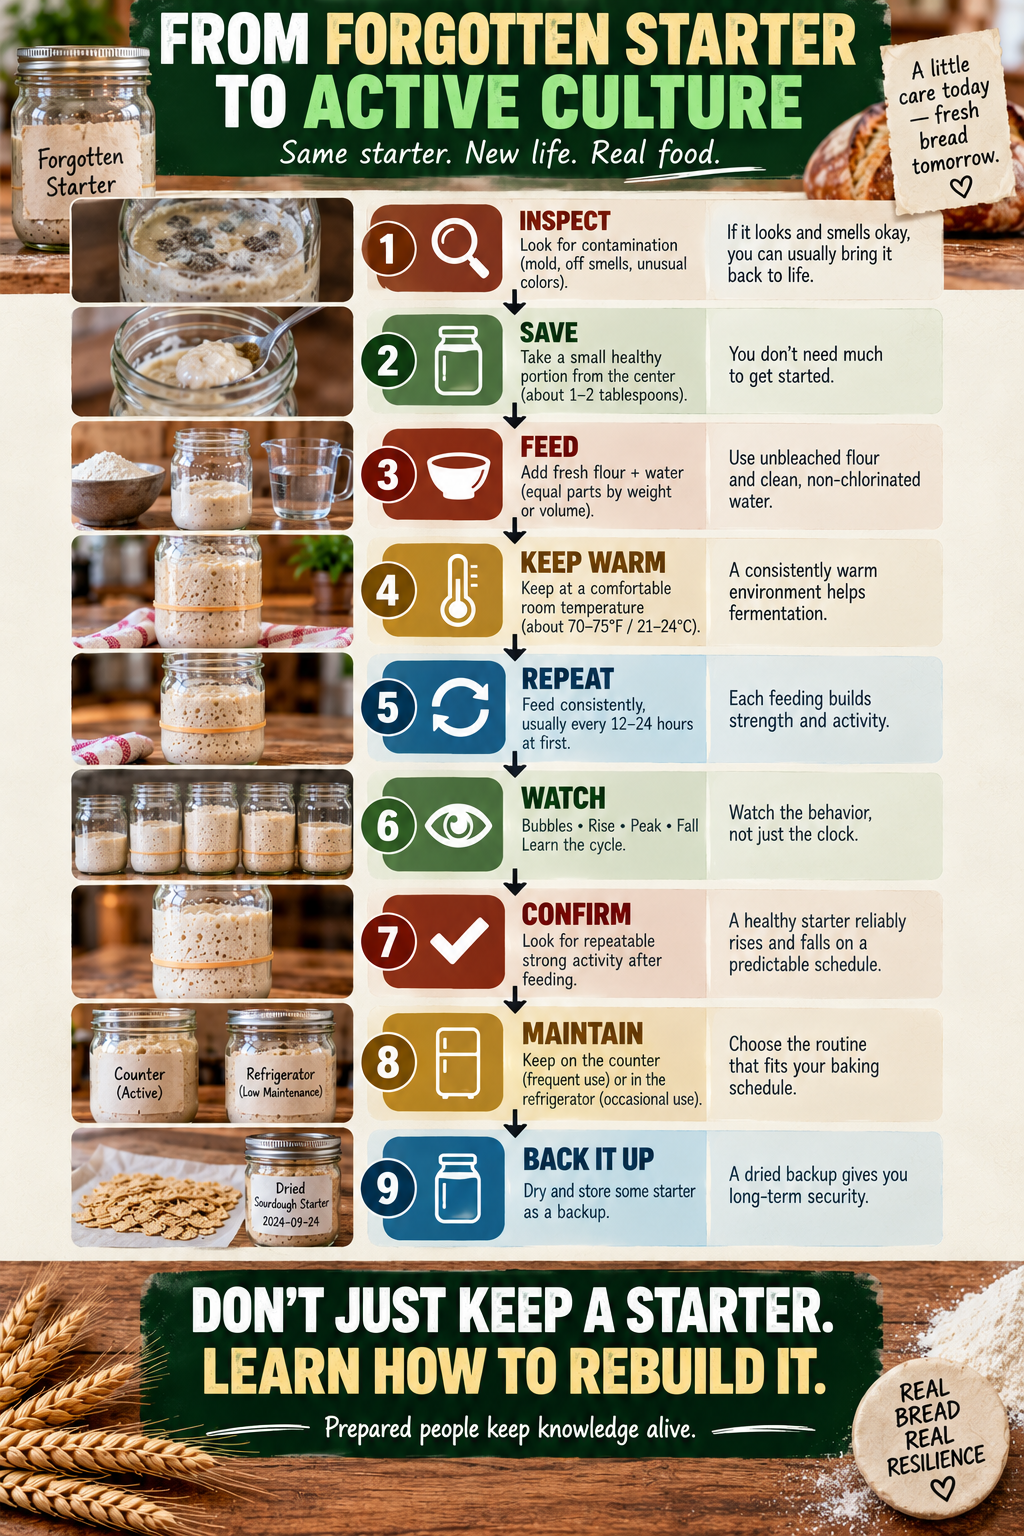
Take the starter from storage and examine it carefully before stirring. A layer of gray, brown, or very dark liquid may have accumulated on top. This liquid, commonly called hooch, develops as the culture runs short of available food. A dried or darkened surface may also form, particularly when the starter has been stored for a long period or has been exposed to more air than usual.
The smell can be surprising as well. A badly neglected starter may smell strongly sour, alcoholic, or even somewhat like acetone or nail-polish remover. Although unpleasant, those conditions can occur when a culture has gone too long without feeding and do not automatically mean that it must be discarded.
Visible fuzzy mold is different. If obvious mold growth is present, the safest choice is to discard the starter rather than scrape away the visible growth and attempt to rescue what remains underneath. Pink or orange discoloration should also be treated as a warning that the culture should not be used. Flour and water are inexpensive compared with the consequences of trying to rescue something that may be contaminated, so uncertainty should always favor food safety.
Start With a Clean Jar
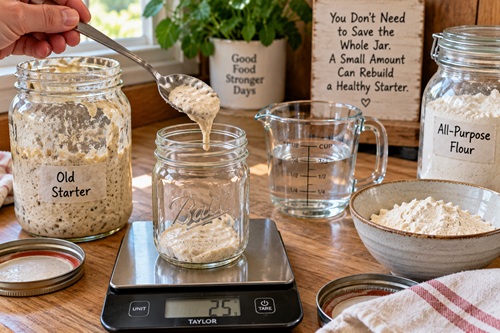
Once the starter has been inspected and appears suitable for recovery, prepare a clean container. If dark liquid has accumulated on top, it can be poured away. Remove any dried surface material and then take a small amount of apparently healthy starter from underneath and transfer it into the clean jar.
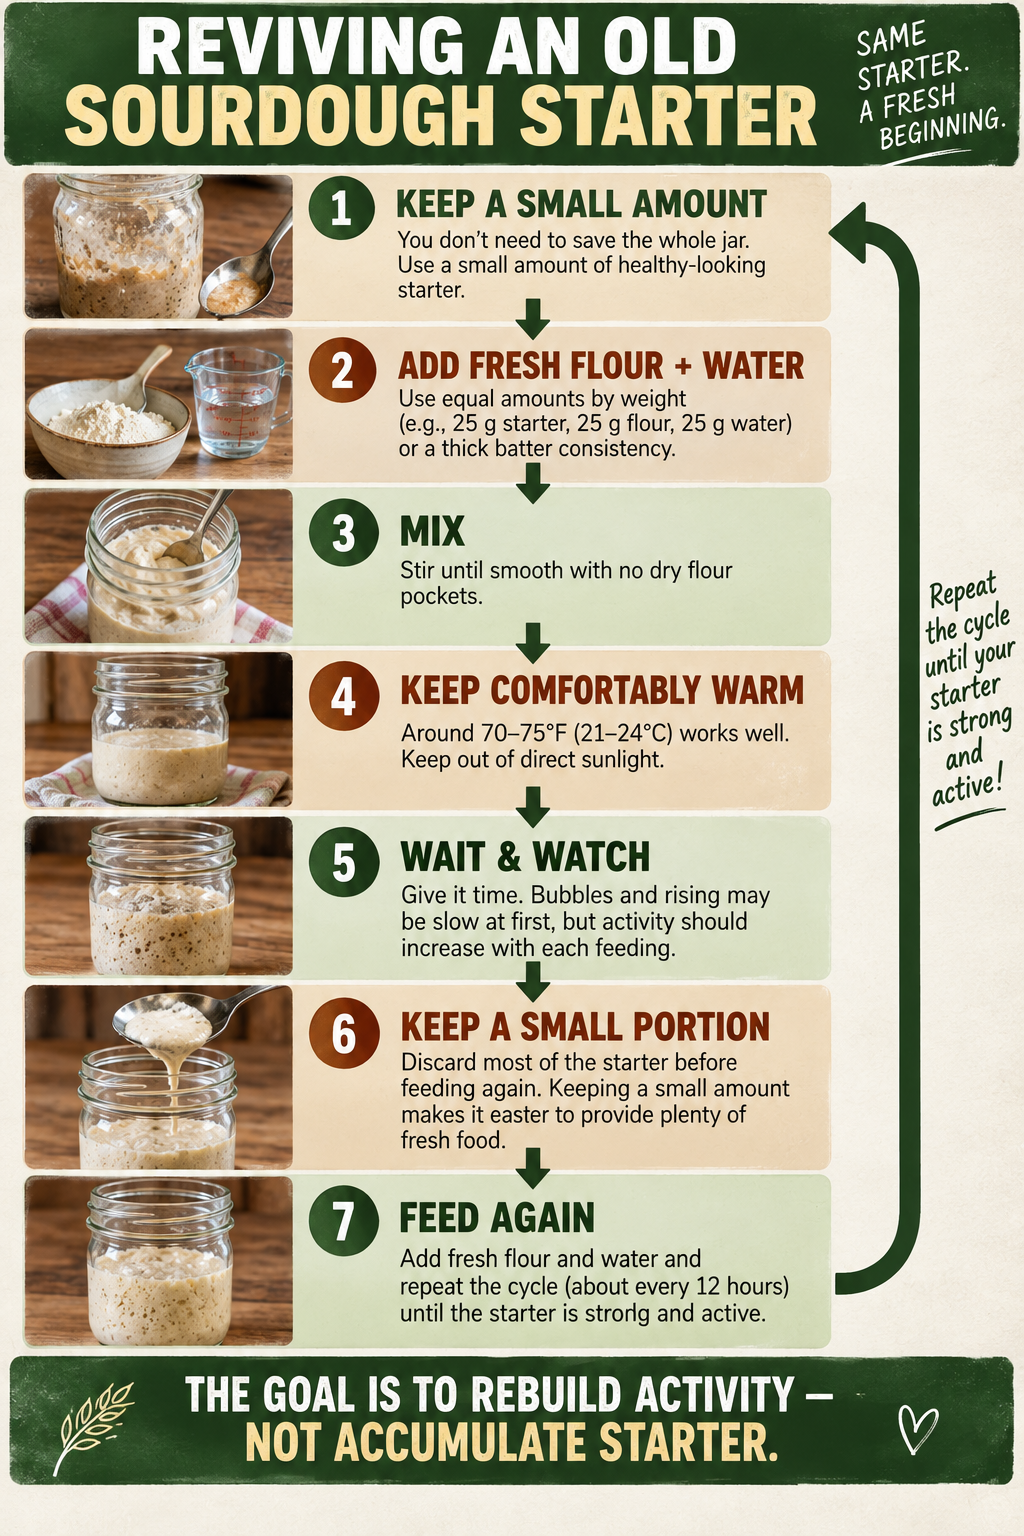
There is no need to rescue the entire quantity. In fact, beginning with a small amount makes recovery easier because that small surviving culture can be surrounded by plenty of fresh food without requiring large amounts of flour at every feeding. Think of the process as rebuilding the culture rather than trying to preserve every ounce of the old starter.
Give the Starter Fresh Food
The recovering culture now needs flour and water. If a kitchen scale is available, using equal weights of starter, flour, and water provides a simple starting point. For example, 25 grams of old starter can be mixed with 25 grams of water and 25 grams of flour. Stir everything thoroughly so there are no dry pockets of flour.
A scale is useful but not essential. Without one, add flour and enough water to produce a thick batter-like consistency. The exact volume matters less than establishing a repeatable feeding method that provides the culture with plenty of fresh food. Consistency also makes it easier to recognize whether the starter is becoming stronger from one feeding to the next.
Give It the Right Environment
A recovering starter will generally become active much faster at a comfortable room temperature than it will inside a refrigerator. Around 70–75°F (21–24°C) is a reasonable environment for recovery. There is no need to place the jar somewhere excessively hot. Too much heat can create a different set of problems.
Keep the jar out of direct sunlight and cover it appropriately to protect the contents while allowing fermentation to continue. Then give the culture time. One of the easiest mistakes is expecting dramatic activity immediately after the first feeding. A culture that has spent months nearly dormant may require several feeding cycles before obvious activity returns.
Establish a Regular Feeding Cycle
After roughly 12 hours, examine the starter again. Keep a small portion, remove the excess, and provide fresh flour and water. Continue this cycle approximately every 12 hours while the culture is recovering. At first, throwing away much of the mixture may seem wasteful, but continually feeding an ever-growing jar would require increasingly large quantities of flour. Keeping only a small amount allows each feeding to provide the microorganisms with a substantial supply of fresh food.
The objective at this stage is not to accumulate a large quantity of starter. The objective is to rebuild a healthy and active culture. Once the starter becomes strong, the quantity can easily be increased when more is required for baking.
Learn to Read the Starter
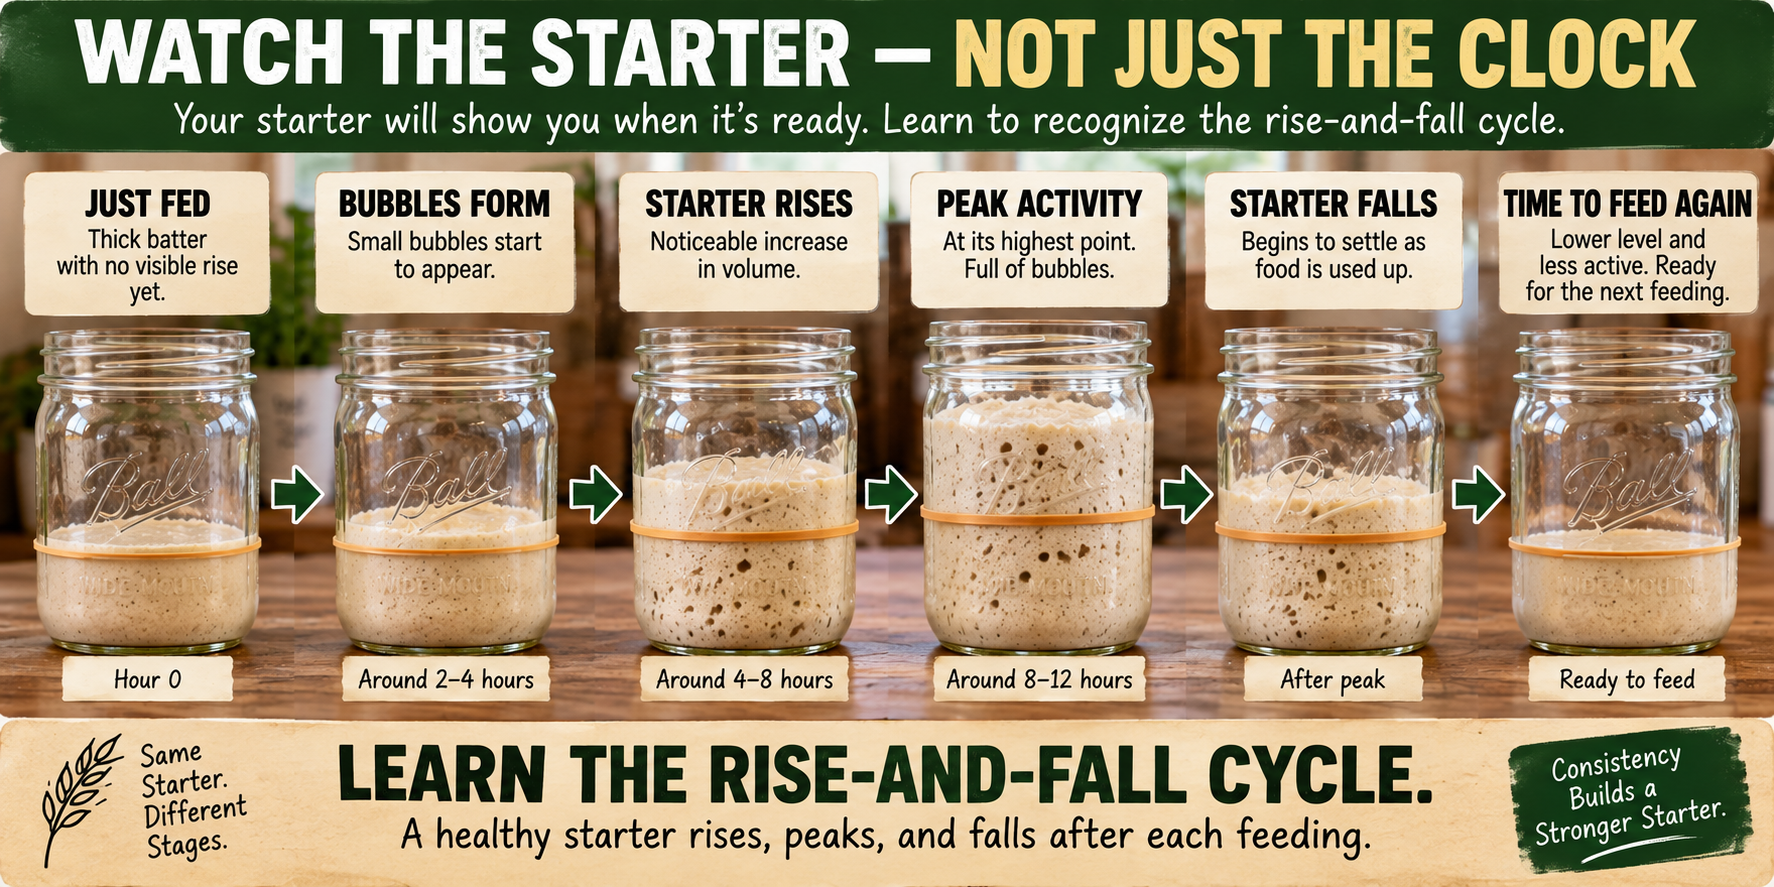
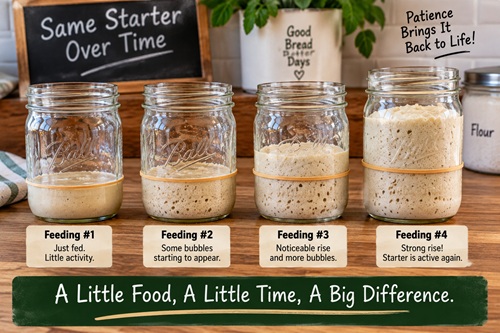
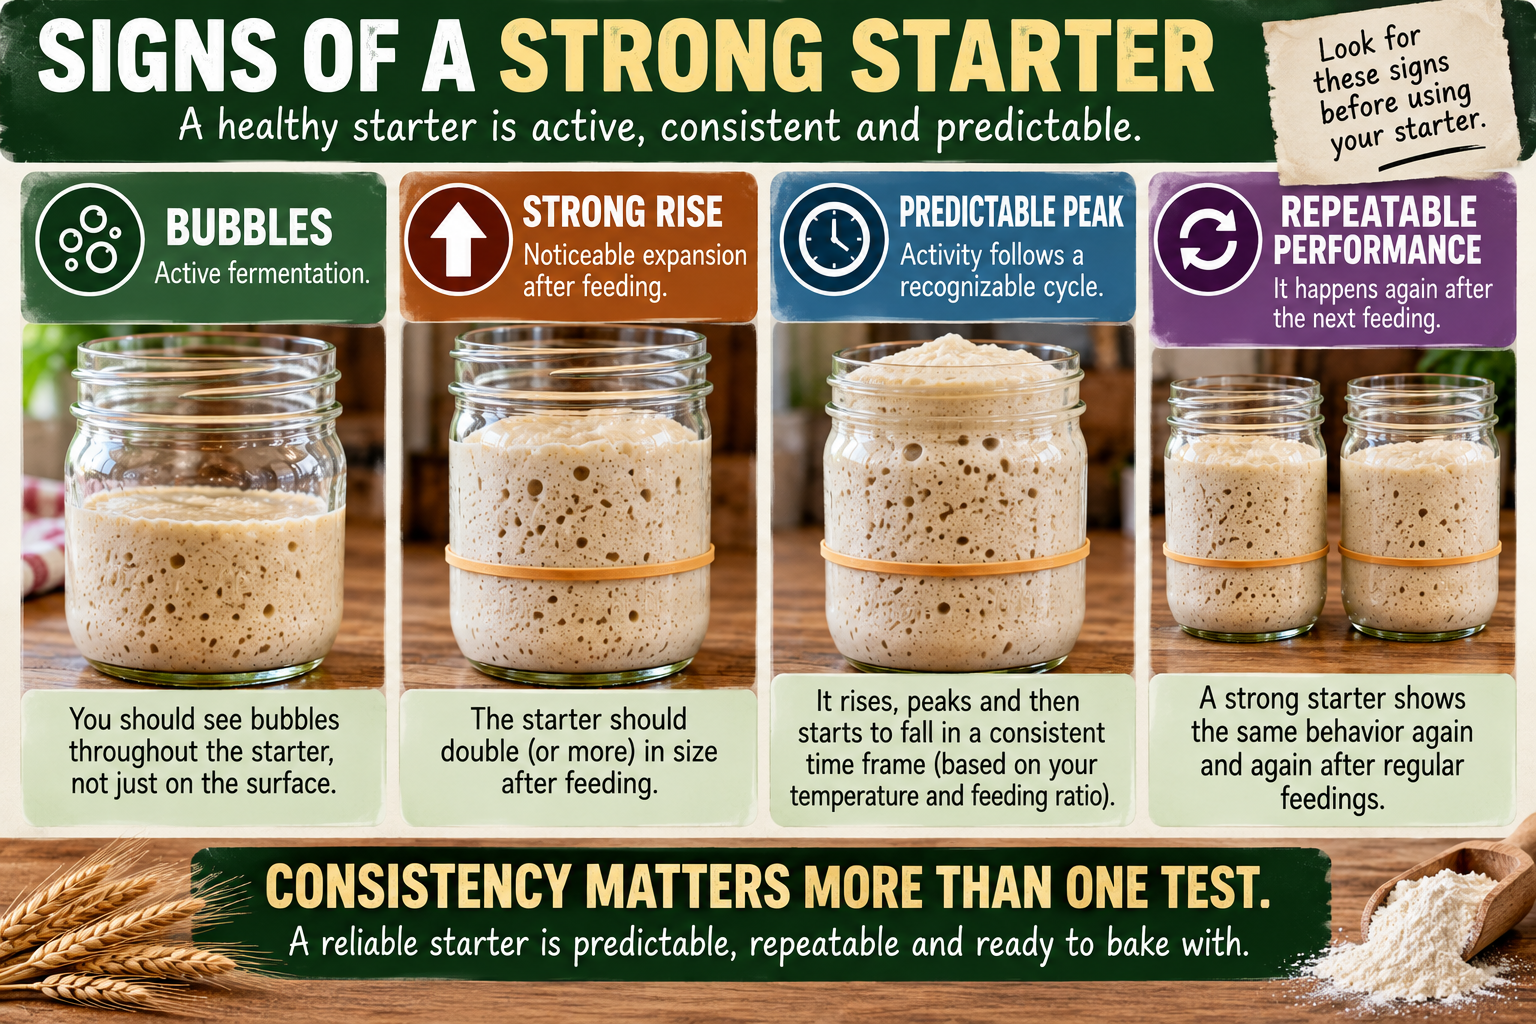
The starter itself will tell you more about its recovery than the clock will. During the first few feedings, there may be very little visible activity. Small bubbles may eventually appear along the sides of the jar or across the surface. With continued feeding, the starter should begin expanding more noticeably.
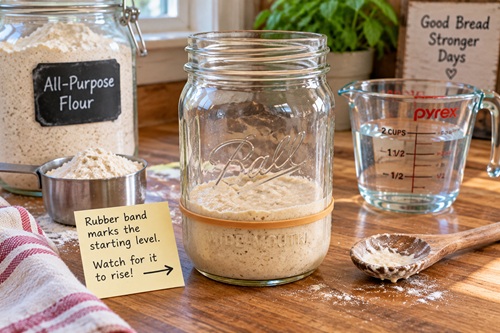
Marking the level immediately after each feeding makes this change much easier to see. A rubber band around the jar works well, as does a small piece of tape or a washable marker. Several hours later, compare the starter’s new height with the original mark. Increasingly predictable expansion is a sign that fermentation is becoming stronger.
Eventually, a healthy culture develops a recognizable cycle. It is fed, begins producing gas, expands, reaches a peak, and then gradually falls as its available food is consumed. Learning to recognize this cycle is more useful than simply looking for bubbles because bubbles alone do not tell you how vigorous the culture has become.
Don’t Depend on the Float Test
A traditional method for checking sourdough starter involves placing a spoonful in water and seeing whether it floats. Although this can sometimes indicate that plenty of gas has accumulated in the starter, it should not be treated as the definitive test of whether the culture is ready.
A healthy starter can sometimes sink, while another sample may float simply because enough air happens to be trapped inside it. Watching how the culture behaves after repeated feedings provides much better information. A starter that repeatedly expands significantly after receiving fresh flour and water is demonstrating the fermentation activity needed for dependable bread making.
Help a Very Sluggish Starter
Some cultures recover quickly, while others take considerably longer. A starter neglected for only a short period may show strong activity within a couple of days. One that has spent months forgotten in the back of a refrigerator may require several days or longer before its behavior becomes predictable again.
Avoid responding to slow recovery by constantly changing everything. Give the starter several consistent feeding cycles first. If activity remains weak, incorporating some whole-wheat or rye flour into one or two feedings can sometimes encourage fermentation. Returning to the type of flour the starter previously performed well on can also help maintain consistency.
Changing flour, temperature, hydration, container, and feeding schedule simultaneously makes troubleshooting difficult. A better approach is to keep the basic process stable and make small adjustments only when they are actually needed.
Know When the Starter Has Recovered
A few bubbles do not necessarily mean the starter is ready to raise bread effectively. What matters is repeatable performance. After feeding, the culture should become visibly aerated and increase substantially in volume. A useful general benchmark is a starter capable of approximately doubling within several hours under comfortable room-temperature conditions.
The exact number of hours is less important than consistency. When the starter repeatedly follows a strong pattern of feeding, rising, peaking, and eventually falling, it has moved beyond merely surviving and has become a functioning culture again.
Maintain It According to How You Use It
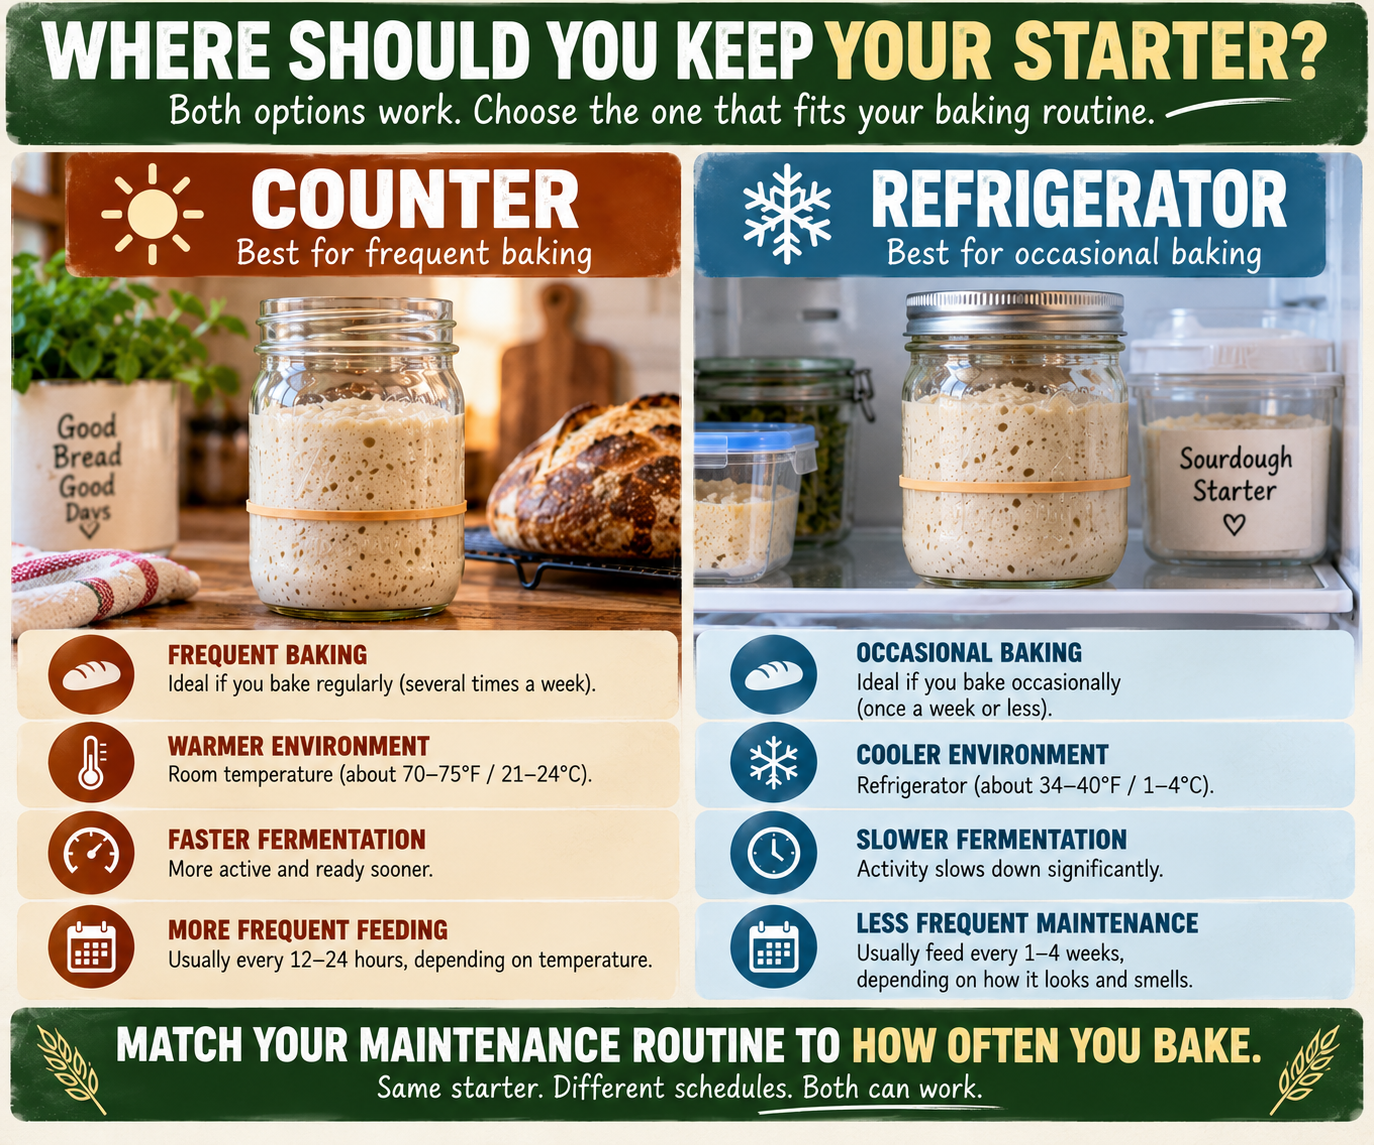
Once the starter is healthy, choose a maintenance routine that matches how frequently bread is actually made. A starter used constantly can remain at room temperature, but it will need to be fed more frequently because fermentation continues rapidly in warmer conditions.
For households that bake only occasionally, refrigeration is generally more practical. The cold dramatically slows fermentation and reduces the amount of flour and attention required to maintain the culture. The important principle is to build the maintenance schedule around actual household use. A system that requires daily attention when bread is made only occasionally creates unnecessary work and makes future neglect more likely.
Create a Dried Backup
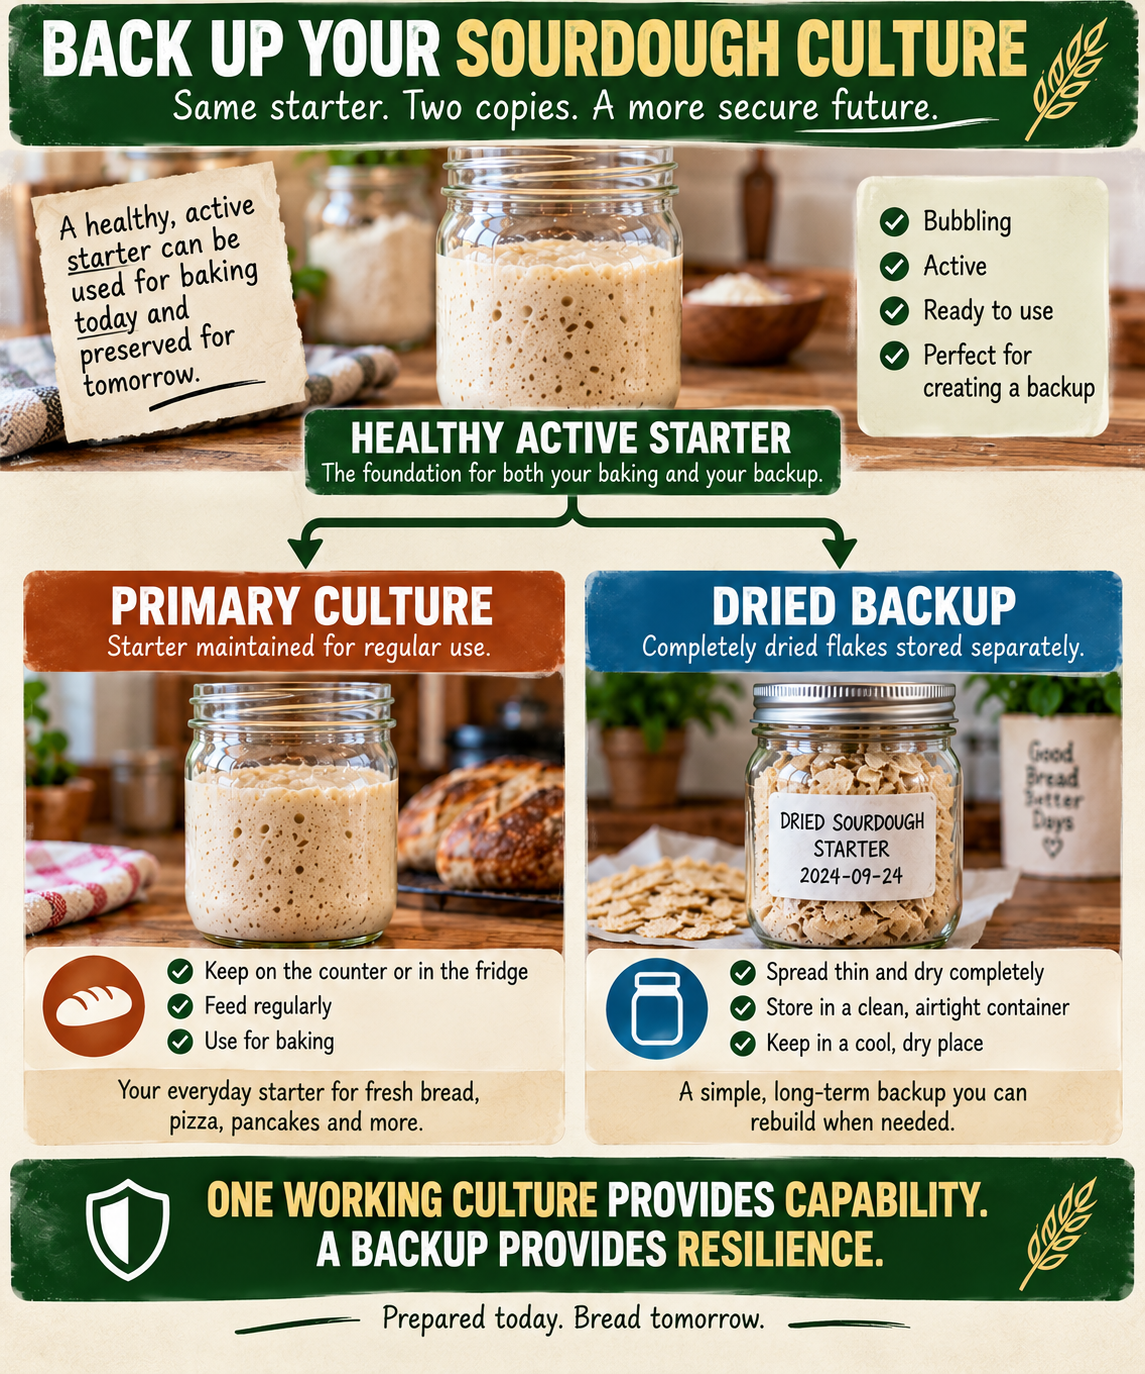
Once the starter is healthy and active again, take the opportunity to create a backup. Spread a small amount of active starter into a very thin layer on clean parchment paper and allow it to dry completely. Once thoroughly dry, break the material into flakes and store them in a clean, dry container. Label the container with the contents and date so there is no confusion later.
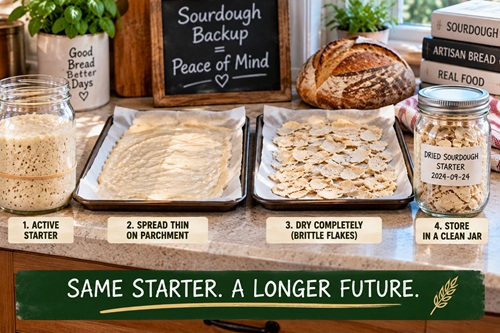
Complete drying is important because residual moisture can undermine storage. Properly dried starter provides another copy of the culture that can potentially be rebuilt later with flour and water if the primary jar becomes contaminated, accidentally discarded, or otherwise lost.
This is the same redundancy principle that applies throughout preparedness. Maintaining one functioning system provides capability. Maintaining an independent backup makes that capability more resilient.
Turn Sourdough Into a Household Skill
The greatest value of sourdough isn’t the jar sitting in the refrigerator. It is the knowledge required to keep that culture functioning. A household that understands fermentation can maintain a renewable bread culture, recognize when it is struggling, recover it after neglect, preserve a backup, and teach the process to someone else.
Sourdough does not eliminate every dependency involved in making bread. Flour must still be produced or stored. Clean water must remain available. Grain products require suitable storage, and baking requires a source of heat. What sourdough can do is reduce dependence on continuously purchasing commercial leavening products by replacing one consumable dependency with a renewable culture and the knowledge required to maintain it.
That is an important principle of practical self-sufficiency. Preparedness rarely means eliminating every dependency at once. More often, it means understanding the systems a household depends upon and gradually developing the knowledge, resources, backups, and skills necessary to control more of them.
Preparedness Action Plan
If an old sourdough starter is already sitting in the refrigerator, begin by inspecting it rather than automatically throwing it away. Learn to recognize the difference between normal signs of starvation and warning signs of contamination. When the culture appears recoverable, transfer a small amount to a clean jar and establish a consistent feeding routine using fresh flour and water.
Mark the starter’s level after feeding and watch what happens over the following hours. Continue feeding consistently until the culture develops a strong, repeatable rise-and-fall cycle. Once it is healthy again, establish a maintenance schedule that matches how frequently bread is actually made rather than relying on an unrealistic routine that will eventually be abandoned.
Finally, preserve some of the healthy culture as a completely dried backup and store it separately from the primary starter. The objective is not simply to keep one jar alive. It is to develop a repeatable household system for maintaining, recovering, reproducing, and protecting a useful food-producing culture.
Key Takeaways
An old sourdough starter that appears lifeless may simply be severely underfed rather than dead. Dark liquid, separation, drying, and strong alcoholic odors can develop during prolonged neglect, while obvious mold and abnormal pink or orange discoloration are warning signs that the culture should be discarded.
Recovery depends primarily on providing a small amount of viable starter with fresh flour, water, appropriate temperatures, time, and consistent feeding. Progress should be judged by increasingly predictable fermentation and rising after feeding rather than by one isolated test.
Once recovered, the starter should be maintained according to how frequently it is actually used, and a dried backup can provide valuable redundancy. A jar of sourdough starter provides the potential to make bread. Knowing how to maintain, recover, reproduce, and preserve that culture provides something considerably more valuable: a repeatable household food-production skill.
© Prepping Communities. This content is for informational purposes only and not professional advice. Use at your own risk.
Terms | Privacy | Guidelines