

A Practical Step-by-Step Guide to Protecting Emergency Electronics
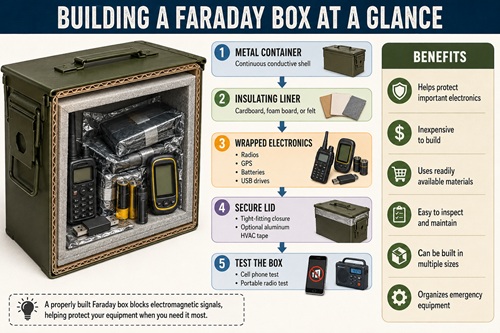
A Faraday box is a simple protective container designed to shield electronic equipment from electromagnetic interference. While no home-built container can be guaranteed to withstand every electromagnetic event, a properly constructed Faraday box can provide an additional layer of protection for many of the electronic devices you rely on during an emergency.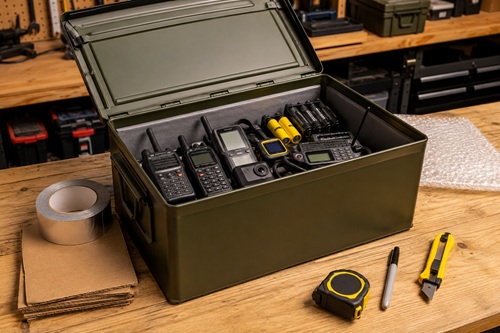
In this chapter, you’ll build a Faraday box from start to finish using common materials and basic hand tools. Along the way, you’ll learn how to select an appropriate container, install an insulated liner, organize emergency electronics, test the completed box, and maintain it over time.
No previous experience is required. If you can measure accurately, cut cardboard with a utility knife, and follow simple instructions, you can complete this project.
What You’ll Build
 By the end of this chapter, you’ll have a completed Faraday box suitable for storing small emergency electronics such as:
- Handheld radios
- Weather radios
- GPS receivers
- USB flash drives
- External hard drives
- Rechargeable batteries
- Charging cables
- Small electronic accessories
You’ll also understand how the box is constructed, allowing you to build larger versions later if your preparedness needs grow.
Difficulty
Beginner
Estimated Time
45 to 60 minutes
Estimated Cost
Approximately $25–75 USD
(The final cost depends primarily on the container you choose.)
Tools Required
Before starting, gather the following tools:
☐ Tape measure
☐ Utility knife
☐ Metal ruler or straightedge
☐ Permanent marker
☐ Heavy scissors
☐ Clean shop cloth
Materials Required
You’ll also need the following materials:
☐ Metal container with a tight-fitting lid
☐ Cardboard, rigid foam board, or heavy felt
☐ Aluminum HVAC foil tape
☐ Bubble wrap or soft cloth
☐ Resealable plastic bags
☐ Optional silica gel desiccant packs
Safety
Although this is a beginner-friendly project, you’ll be working with sharp cutting tools and metal edges.
Always cut away from your body when using a utility knife. Replace dull blades as needed, since sharp blades require less force and produce cleaner cuts. If you’re smoothing rough metal edges, wear safety glasses to protect your eyes from small metal particles.
Take your time. Most mistakes occur when builders rush through the measuring or cutting process.
Before You Begin
Resist the temptation to buy a container immediately.
Instead, gather every electronic device you intend to protect and place them on your workbench. Include chargers, antennas, spare batteries, USB drives, programming cables, adapters, memory cards, and any other accessories that belong with those devices.
Arrange everything the way you expect it will fit inside the finished Faraday box. This simple exercise gives you a realistic idea of the space you’ll need and often reminds you of accessories that would otherwise be forgotten.
Only after you’ve laid everything out should you purchase your container.
For most people, a military surplus ammunition can is the ideal starting point. It’s inexpensive, durable, widely available, and large enough to protect many of the electronic devices commonly found in an emergency kit. If you need additional space, the same construction techniques described in this chapter can be used with larger metal toolboxes or galvanized steel containers.
Check Your Progress
Before moving on, make sure you have:
✓ Gathered the electronics you want to protect.
✓ Included all accessories.
✓ Estimated the storage space you’ll need.
✓ Chosen an appropriate container.
Common Mistake
One of the most common mistakes is purchasing the container first and discovering later that important equipment or accessories won’t fit inside. Planning first almost always results in a better finished project.
Workshop Tip
If you’re shopping in person, take one of your handheld radios with you. Place it inside the container before buying it. It’s one of the quickest ways to judge whether the container is the right size.
Choose the Right Container
The container is the most important part of your Faraday box. Everything else in this project is built around it. Choosing the right container now will make the rest of the project easier, while choosing the wrong one can lead to problems that are difficult—or impossible—to correct later.
A Faraday box works because the electronics are surrounded by a continuous metal enclosure. For that reason, your container should be made entirely of metal and have a lid that closes tightly. Small gaps around the lid are normal, but the container should not have plastic windows, plastic side panels, or large openings that interrupt the metal body.
For most preparedness projects, a military surplus ammunition can is an excellent choice. These containers are inexpensive, widely available, and designed to withstand rough handling. A standard 30-caliber or 50-caliber ammunition can is large enough to hold several handheld radios, a weather radio, GPS receiver, USB drives, rechargeable batteries, charging cables, and other small electronic devices.
If you plan to protect larger equipment such as a laptop, portable solar equipment, battery chargers, or multiple radios, consider using a metal toolbox or a galvanized steel trash can with a tight-fitting lid. The construction techniques described in this chapter are the same regardless of which container you choose.
Before purchasing a used container, inspect it carefully. Open and close the lid several times. The hinges should move freely, the latch should close securely, and the lid should sit evenly against the body of the container. Check for rust, deep dents, cracked welds, or bent edges that could prevent the lid from fitting correctly.
Don’t worry about small scratches or chipped paint. Cosmetic damage rarely affects the usefulness of the container. Instead, focus on the overall condition and how well the lid seals against the body.
Check Your Progress
Before continuing, confirm that:
✓ Your container is made entirely of metal.
✓ The lid closes securely.
✓ The hinges and latch work properly.
✓ The container is large enough for your equipment.
✓ The overall condition is good.
Common Mistake
Many first-time builders buy the smallest container that will barely fit their equipment. As soon as they add another radio, spare batteries, or charging cable, they discover there’s no room left. Choosing a slightly larger container now gives you flexibility for future additions.
Workshop Tip
If possible, take one of your handheld radios or GPS receivers with you when shopping. Placing it inside the container provides a much better sense of usable space than relying on the outside dimensions alone.
Gather Your Tools and Materials
With the container selected, gather everything you’ll need before beginning construction. One of the easiest ways to avoid mistakes is to prepare your workspace before you start cutting or assembling anything.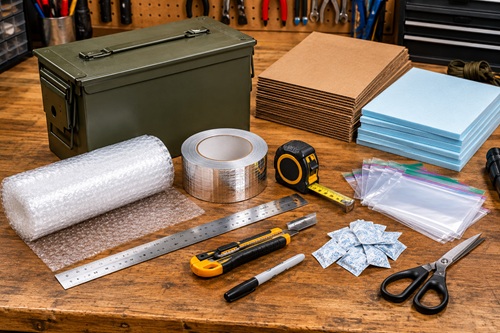
Lay every tool and material on your workbench where it’s easy to reach. Having everything organized allows you to concentrate on building the Faraday box instead of searching for missing supplies halfway through the project.
Inspect each tool before you begin. Replace dull utility knife blades, make sure your ruler is straight, and confirm that your tape measure locks securely. Small problems with your tools often lead to inaccurate measurements or poor-quality cuts.
Next, inspect your materials. Cardboard and foam board should be flat and free from moisture. Bubble wrap should be clean and undamaged. If you’re using aluminum HVAC foil tape, unroll a short section to confirm that the adhesive backing separates easily and that the tape hasn’t been damaged during storage.
Take a few minutes to organize your work area. Place cutting tools on one side of the bench, insulation materials on the other, and keep the container in the center. A clean, organized workspace reduces mistakes and makes the project much more enjoyable.
Good lighting is just as important as good tools. Position your workbench where every measurement and cut is easy to see. Poor lighting often leads to inaccurate measurements and uneven cuts that must be redone later.
Check Your Progress
Before continuing, confirm that:
✓ All tools are ready.
✓ All materials are present.
✓ Your workbench is clean.
✓ You have adequate lighting.
✓ You have enough room to work comfortably.
Common Mistake
Many people assume they can substitute ordinary cloth-backed duct tape for aluminum HVAC foil tape. Although they look similar, they serve completely different purposes. Use aluminum HVAC foil tape for this project.
Workshop Tip
Keep a small container on your workbench for your marker, knife, spare blades, and measuring tape. Returning each tool to the same place after using it keeps your workspace organized and prevents wasted time searching for misplaced items.
Prepare the Container
Before installing the insulation, prepare the container by inspecting, cleaning, and correcting any problems you find. Taking a few minutes to do this now helps ensure the insulation fits properly and prevents issues that could affect the finished Faraday box.
Open the container and inspect both the inside and outside. Look for dents, bent corners, rust, cracked welds, damaged hinges, or a latch that doesn’t close securely. Open and close the lid several times to make sure it moves freely and sits evenly against the body of the container.
Next, inspect the inside carefully. Run your hand over the bottom, sides, corners, and underside of the lid. Feel for rough welds, sharp edges, or metal burrs that could damage the insulation or eventually wear through the protective wrapping around your electronics. If you find any rough spots, smooth them with fine sandpaper before continuing.
Once the inspection is complete, clean the entire container. Wipe away dust, grease, oil, loose rust, and any other debris using a clean cloth. Military surplus ammunition cans often contain a light coating of storage grease that should be removed before installing the insulation.
Allow the container to dry completely before moving on. Moisture trapped inside a sealed container can eventually lead to rust and may damage the electronics stored inside.
Now close the lid one final time and confirm that it latches securely without excessive force. If it doesn’t, correct the problem before continuing.
Check Your Progress
Before continuing, confirm that:
✓ The container is clean.
✓ The interior is completely dry.
✓ The lid closes smoothly.
✓ The latch locks securely.
✓ No sharp edges remain.
Common Mistake
Some builders begin installing the insulation immediately after purchasing the container. Dirt, grease, or rust left inside can interfere with adhesives, stain the insulation, or damage stored equipment over time.
Workshop Tip
If your ammunition can still has its original rubber gasket and it’s in good condition, leave it in place. It helps keep dust and moisture out of the container during long-term storage.
Measure the Interior
Accurate measurements are the key to a clean, professional-looking Faraday box. Well-fitted insulation stays in place, protects your electronics, and makes the finished project easier to assemble.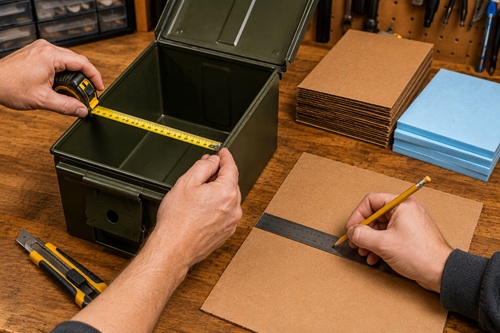
Place the open container on your workbench and measure the inside dimensions of the bottom first. Next, measure each long side, each short side, and finally the underside of the lid. Write every measurement down as you work rather than trying to remember them.
Even if the container appears perfectly square, measure every surface individually. Small differences caused by manufacturing tolerances or years of use are common and can affect how well the insulation fits.
As you record your measurements, label each one clearly. Use simple names such as Bottom, Left Side, Right Side, Front, Back, and Lid. These labels will make installation much easier later.
Before putting away the tape measure, go back and verify each measurement. It’s much faster to remeasure now than to cut replacement insulation later.
Check Your Progress
Before continuing, confirm that:
✓ Every interior surface has been measured.
✓ Every measurement has been written down.
✓ Each measurement is clearly labeled.
✓ All measurements have been verified.
Common Mistake
Don’t measure the outside of the container. Always measure the inside dimensions where the insulation will actually be installed.
Workshop Tip
Keep your measurement sheet inside the completed Faraday box. If you ever replace the insulation or build another box using the same container, you’ll already have every measurement ready.
Cut the Insulation
With the measurements complete, it’s time to cut the insulation that will separate your electronics from the metal enclosure.
Lay the cardboard, rigid foam board, or heavy felt on a flat surface. Using your ruler and permanent marker, transfer each measurement to the insulation material. Label every piece before cutting so you’ll know exactly where it belongs during assembly.
Using a sharp utility knife and a straightedge, cut each panel carefully. Make several light passes instead of trying to cut through thick material in one stroke. This produces cleaner edges, improves accuracy, and requires much less effort.
As soon as one panel is cut, place it inside the container to check the fit. The panel should sit flat without bending or buckling. If it’s slightly too large, trim only a small amount before testing it again.
Repeat the process until you’ve cut insulation for the bottom, both sides, both ends, and the underside of the lid.
Keep all of the leftover material. Small pieces are often useful later for covering tiny gaps or reinforcing corners.
Check Your Progress
Before continuing, confirm that:
✓ Every insulation panel has been cut.
✓ Each panel has been test-fitted.
✓ Every panel sits flat.
✓ The leftover material has been saved.
Common Mistake
Don’t cut every panel before checking the fit of the first one. Testing each piece as it’s completed makes it much easier to correct small measuring errors before they affect the rest of the project.
Workshop Tip
A sharp blade makes cleaner cuts and is actually safer because it requires less force. If the knife begins tearing the insulation instead of cutting it cleanly, replace the blade before continuing.
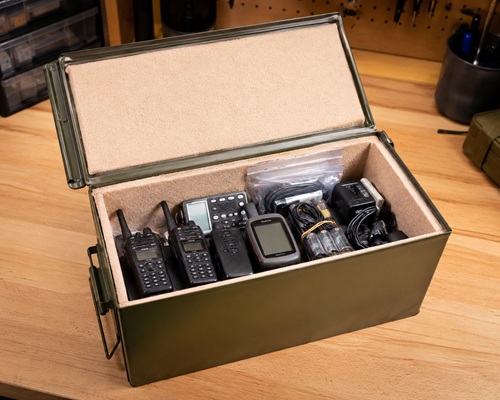
Install the Insulation
With every insulation panel cut and test-fitted, you’re ready to build the protective liner inside the container. This liner prevents your electronics from touching the metal enclosure and is one of the most important parts of the entire project.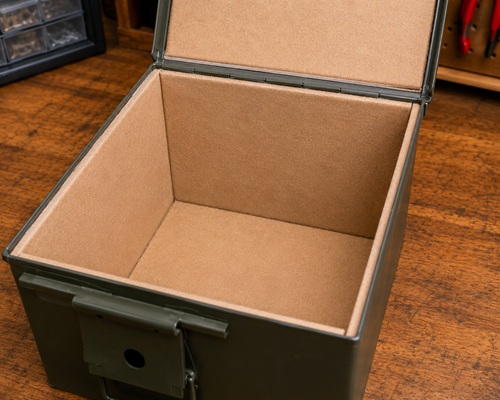
Begin by placing the bottom panel into the container. Press it firmly into position so it lies flat without curling or lifting at the edges. Next, install the two side panels, followed by the front and back panels. Finish by fitting the insulation to the underside of the lid.
As you install each panel, check that it fits snugly against the metal without forcing it into place. If a piece is too large, remove it and trim only a small amount before trying again. It’s much easier to remove a little material than it is to replace material that has already been cut away.
When every panel has been installed, inspect the entire interior. Pay close attention to the corners and seams where two panels meet. If you discover even a small area of exposed metal, cut a patch from your leftover insulation and cover it before continuing.
Most builders find that properly fitted insulation stays in place without adhesive. If you decide to use glue or double-sided tape, apply only enough to prevent the panels from shifting. Excess adhesive makes future repairs and replacement much more difficult.
Close the lid slowly and reopen it several times. None of the insulation should move, catch on the edges, or prevent the lid from closing completely. If it does, identify the problem and correct it before moving on.
Check Your Progress
Before continuing, confirm that:
✓ Every interior surface is insulated.
✓ No bare metal is exposed.
✓ The insulation fits securely.
✓ The lid closes without interference.
✓ No panels shift when the lid is opened or closed.
Common Mistake
Many first-time builders overlook the underside of the lid. Remember that electronics can shift if the container is moved, so every interior surface should be insulated.
Workshop Tip
Run your hand around the entire inside of the container. If your fingers can touch bare metal, your electronics can too. Correct those areas before continuing.
Prepare the Electronics
Now prepare the equipment that will be stored inside your completed Faraday box. Taking a few extra minutes to inspect and organize everything now helps ensure your equipment is ready to use when it’s needed.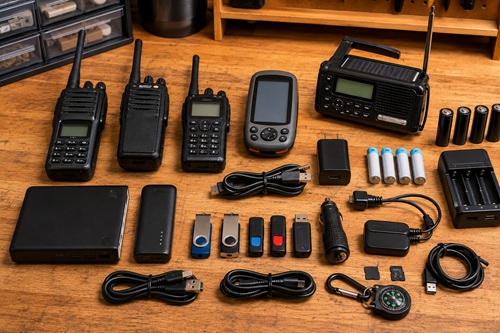
Lay all of your electronics on the workbench and group similar items together. Keep handheld radios with their antennas, chargers, spare batteries, and programming cables. Store GPS receivers with charging cables and memory cards. Keep USB drives and external hard drives together in a clearly labeled bag.
Turn each electronic device on and confirm that it still works properly. Verify that radios receive local stations, weather radios operate correctly, GPS receivers power on, and flashlights function as expected. Replace or repair anything that doesn’t work before placing it into storage.
Inspect every battery. Recharge rechargeable batteries and replace disposable batteries that are weak or approaching their expiration date. If a device won’t be used for an extended period and its batteries can be removed, remove them before storage to reduce the risk of battery leakage.
If you store digital information on USB drives or external hard drives, connect them to a computer and verify that the files can still be opened. Update emergency contact lists, medical information, insurance records, offline maps, preparedness documents, and any other files that may have changed.
Once everything has been tested, power each device off before placing it into the Faraday box.
Check Your Progress
Before continuing, confirm that:
✓ Every device has been tested.
✓ Batteries have been inspected.
✓ Digital files have been updated.
✓ Accessories are grouped with the correct equipment.
✓ Every device has been powered off.
Common Mistake
It’s easy to remember the radio and forget its charger, spare battery, or programming cable. A radio without its accessories may be far less useful during an emergency.
Workshop Tip
Place each device and its accessories into a labeled resealable bag. The next time you open the Faraday box, you’ll immediately know which accessories belong together.
Load the Faraday Box
With both the container and electronics prepared, it’s time to organize everything inside the Faraday box.
Begin by placing the heaviest items on the bottom of the container. Arrange them so they sit securely without pressing against one another. Continue adding smaller and lighter electronics, keeping similar equipment together whenever possible.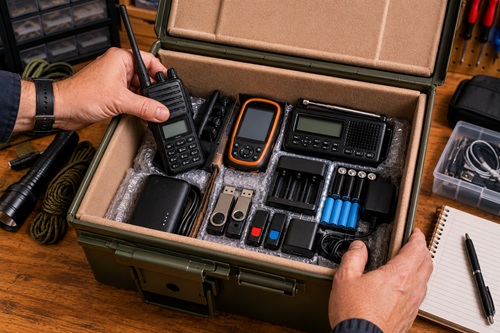
Use bubble wrap or a soft cloth to cushion delicate items such as GPS receivers, handheld radios with displays, tablets, or external hard drives. The goal is to prevent equipment from rubbing together while the container is being moved.
Leave a small amount of space between larger items whenever practical. This makes equipment easier to remove during inspections and reduces unnecessary pressure on connectors, screens, and buttons.
As you fill the container, compare the contents with your inventory list. Make sure every device, charger, cable, battery, antenna, and accessory has been packed before closing the lid.
Finally, gently lift and tilt the container. If equipment shifts noticeably, rearrange the contents or add additional padding until everything remains secure.
Check Your Progress
Before continuing, confirm that:
✓ Heavy items are on the bottom.
✓ Delicate electronics are protected.
✓ Accessories are packed with each device.
✓ Equipment remains stable when the container is moved.
✓ The inventory matches the contents.
Common Mistake
Don’t pack the container as tightly as possible. Leaving a little extra room makes inspections easier and reduces the chance of damaging your electronics.
Workshop Tip
Before closing the lid, take a photograph of the finished layout. During future inspections, you’ll have a visual reference showing exactly where everything belongs.
Close the Faraday Box
Before closing the lid, take one final look inside the container. This is your last opportunity to make adjustments before the Faraday box is placed into storage.
Compare the contents of the container with your inventory sheet. Confirm that every device, charger, cable, battery, antenna, adapter, and accessory has been packed. Make sure each electronic device is resting on the insulated liner and that nothing can shift enough to contact the metal walls if the box is moved.
Slowly lower the lid and engage the latch. The lid should close easily without forcing it. If you need to press down hard or struggle to engage the latch, reopen the container and determine what’s causing the problem. Rearranging the contents or removing a small amount of padding is almost always a better solution than forcing the lid closed.
Some builders choose to leave the container exactly as it is, while others apply aluminum HVAC foil tape around the seam where the lid meets the body of the container. If you decide to use foil tape, clean the metal surfaces first to remove dust or oil. Apply the tape slowly, pressing it firmly into place as you work around the perimeter of the lid.
Keep in mind that any foil tape will need to be removed before opening the container again. If you expect to inspect the contents regularly or make changes in the near future, you may prefer to wait until you’re satisfied with the final arrangement before sealing the lid.
Check Your Progress
Before continuing, confirm that:
✓ Every electronic device is packed.
✓ Nothing can touch bare metal.
✓ The lid closes without force.
✓ The latch locks securely.
✓ The inventory sheet is complete.
Common Mistake
Some builders assume that if the latch closes, everything is fine. A container that’s packed too tightly places unnecessary pressure on both the insulation and the electronics inside.
Workshop Tip
Place your inventory sheet in a clear plastic sleeve before storing it inside the container. It will stay clean, remain easy to read, and can be updated during future inspections.
Test the Faraday Box
Your Faraday box is now complete, but don’t place valuable electronics into long-term storage until you’ve tested it. Although it’s not possible to duplicate an actual electromagnetic pulse at home, simple signal tests can help verify that your Faraday box is functioning as expected.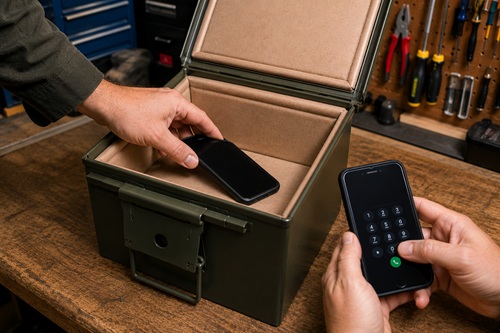
Begin with the mobile phone test. Turn on a mobile phone and confirm that it has a strong cellular signal. Place the phone inside the Faraday box, close the lid completely, and latch it securely.
Using another phone, call the phone inside the Faraday box. If the call goes directly to voicemail or cannot be completed, the container is blocking the signal. If the phone rings or receives notifications, inspect the lid, seams, and any foil tape you’ve applied before repeating the test.
Next, perform a radio test. Tune a portable AM/FM or weather radio to a strong local station and adjust the volume so it’s easy to hear. Place the radio inside the Faraday box and close the lid.
The signal should become significantly weaker or disappear altogether. If the station continues to come through clearly, inspect the container again for gaps, poor lid contact, or damaged areas before repeating the test.
Remember that these are practical field tests. They don’t guarantee protection from every electromagnetic event, but they do provide confidence that the enclosure is blocking common radio-frequency signals.
Check Your Progress
Before continuing, confirm that:
✓ The mobile phone test has been completed.
✓ The radio test has been completed.
✓ Both tests produced the expected results.
✓ Any problems have been corrected.
Common Mistake
Testing only one device provides limited information. Using both a mobile phone and a portable radio gives you a better indication that your Faraday box is functioning properly.
Workshop Tip
Write the testing date on your inventory sheet. During your annual inspection, you’ll immediately know when the Faraday box was last tested.
Store the Faraday Box
Once you’ve completed the testing, choose a location where the Faraday box will remain clean, dry, and protected from unnecessary damage.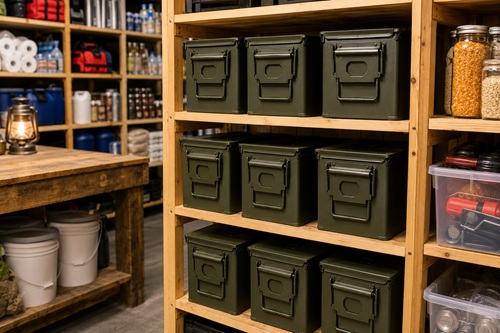
A basement, utility room, closet, or dedicated preparedness storage area is usually an excellent location. If the container will be stored in a garage or workshop, avoid placing it directly on a concrete floor. Instead, place it on a shelf, wooden pallet, or cabinet to reduce exposure to moisture.
Avoid stacking heavy objects on top of the Faraday box. Although military ammunition cans and quality metal toolboxes are durable, excessive weight can eventually affect how well the lid fits or make the container more difficult to open.
Clearly label the outside of the container with its contents. Labels such as Communications, Navigation, Emergency Power, or Digital Records allow you to locate the correct equipment quickly without opening multiple containers.
Finally, make sure everyone in your household knows where the Faraday box is stored. During an emergency, equipment is only useful if people can find it when it’s needed.
Check Your Progress
Before continuing, confirm that:
✓ The box is stored in a dry location.
✓ It is protected from damage.
✓ The contents are clearly labeled.
✓ Family members know where it is stored.
Common Mistake
Hiding emergency equipment so well that nobody can find it defeats its purpose. Choose a secure location that’s easy for your household to access when necessary.
Workshop Tip
If you eventually build several Faraday boxes, store them together and organize them by purpose. Keeping communication equipment, navigation devices, digital records, and emergency power accessories in separate labeled containers makes inspections faster and emergency access much easier.
Inspect and Maintain Your Faraday Box
Building the Faraday box is only the first step. Like every other piece of emergency equipment, it should be inspected regularly to ensure it’s ready when you need it. A simple inspection once each year takes only a few minutes and helps identify small problems before they become larger ones.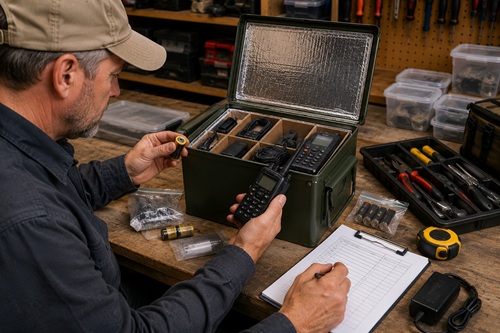
Begin by inspecting the outside of the container. Look for rust, dents, loose hinges, damaged latches, or anything that might prevent the lid from closing properly. If you find surface rust, remove it before it spreads. Wipe away dust, dirt, or moisture before opening the container.
Next, inspect the insulated liner. Check that every panel still fits securely and that no bare metal has become exposed. If the insulation has shifted, torn, or become damaged, replace the affected sections before returning the electronics to storage.
Remove each electronic device one at a time and test it. Confirm that radios transmit and receive properly, GPS receivers power on, weather radios function correctly, and rechargeable batteries still hold a charge. Replace weak batteries, recharge rechargeable ones, and repair or replace any equipment that no longer works reliably.
If you store important digital information inside the Faraday box, connect each USB drive or external hard drive to a computer and verify that the files can still be opened. Update emergency contacts, insurance documents, medical records, offline maps, and any other information that may have changed since the last inspection.
Finally, compare the contents of the container with your inventory sheet. Confirm that every listed item is still present and update the inventory if you’ve added, removed, or replaced any equipment.
After everything has been repacked, repeat the mobile phone and radio tests described earlier. This confirms that your Faraday box is still performing as expected.
Check Your Progress
Before putting the Faraday box back into storage, confirm that:
✓ The container is clean and undamaged.
✓ The insulation is intact.
✓ Every electronic device has been tested.
✓ Batteries have been checked.
✓ Digital files have been updated.
✓ The inventory sheet is current.
✓ The Faraday box has passed the signal tests.
Common Mistake
Many people inspect the electronics but forget to update the files stored on their USB drives. Outdated emergency contacts, maps, or medical information can be just as problematic as equipment that no longer works.
Workshop Tip
Schedule your inspection on the same day each year. Many people choose the day they replace smoke detector batteries or review the rest of their emergency supplies. Combining preparedness tasks into one annual routine makes them much easier to remember.
Troubleshooting Common Problems
If your Faraday box doesn’t perform as expected, don’t assume you’ve failed. Most problems are caused by small issues that are easy to correct.
The Mobile Phone Still Rings
If a phone inside the Faraday box continues to receive calls or notifications, inspect the lid carefully. Make sure it closes completely and that nothing inside the container is preventing it from sealing properly. Look for bent edges, damaged hinges, or debris caught between the lid and the container.
Solution: Correct any problems you find and repeat the phone test.
The Radio Still Receives Stations
If a portable radio continues receiving strong stations while inside the closed container, inspect the seams and lid for poor contact. Also confirm that the lid is fully latched during the test.
Solution: Repair any obvious problems and repeat the test using several different stations.
The Lid Won’t Close
If the lid requires excessive force to close, the container is probably overfilled or one of the insulation panels is preventing it from seating properly.
Solution: Rearrange the contents or trim the insulation slightly. Never force the latch closed.
Equipment Moves Around
If electronics slide around whenever the container is moved, they can become scratched or damaged over time.
Solution: Add additional bubble wrap or soft padding and reorganize the contents until everything remains secure.
Moisture Inside the Container
Moisture can eventually lead to rust and damage sensitive electronics.
Solution: Remove everything from the container, allow it to dry completely, wipe the interior clean, and inspect for rust. If you live in a humid area, place one or two silica gel desiccant packs inside the box before repacking it.
Workshop Tip
Whenever you correct a problem, repeat the mobile phone and radio tests before returning the Faraday box to storage. Confirming the repair immediately gives you confidence that the problem has been resolved.
Key Takeaways
Building a Faraday box is a practical project that almost anyone can complete using basic hand tools and inexpensive materials. By carefully selecting a suitable container, installing a complete insulated liner, organizing your equipment, and testing the finished box, you’ve created a dedicated storage container for many of your most important emergency electronics.
The quality of the finished project depends more on careful workmanship than expensive materials. Taking accurate measurements, fitting the insulation properly, organizing the contents, and performing routine inspections all contribute to a Faraday box that will remain useful for years.
Remember that a Faraday box protects electronics—it doesn’t maintain them. Batteries should be checked regularly, digital files should be updated, and every device should be tested during your annual inspection. A few minutes of maintenance each year can prevent unpleasant surprises during an emergency.
The skills you’ve learned in this chapter can be applied to almost any metal container. Once you’ve successfully built one Faraday box, building additional boxes for communication equipment, navigation devices, emergency power accessories, or digital records becomes much easier.
Practical Exercise
Now that you’ve completed your first Faraday box, put your new skills into practice.
Over the next few weeks, build a second Faraday box dedicated to a different category of emergency equipment. For example, keep communication equipment in one container, navigation devices in another, and digital records in a third. Separating equipment into categories makes inspections easier, keeps the contents organized, and allows you to retrieve exactly what you need without unpacking everything else.
As you build additional Faraday boxes, look for ways to improve your organization. Refine your inventory sheets, standardize your labeling, and keep similar equipment together. Small improvements made over time will result in a preparedness system that’s easier to maintain and far more useful during an emergency.
Congratulations – you’ve completed your first Faraday box. More importantly, you’ve learned a practical preparedness skill that you can use again and again as your emergency equipment grows.
© Prepping Communities. This content is for informational purposes only and not professional advice. Use at your own risk.
Terms | Privacy | Guidelines