
Few pieces of outdoor gear offer as much versatility as a simple tarp. Lightweight, compact, inexpensive, and adaptable, a tarp can provide protection from rain, wind, snow, sun, and ground moisture while taking up very little space in a pack.
Long before lightweight backpacking tents became common, campers, hunters, military personnel, and wilderness travelers relied on tarps to create shelter in virtually any environment. Even today, many experienced outdoorsmen prefer a tarp because it allows them to adapt their shelter to changing weather and terrain conditions.
Knowing several tarp configurations can significantly increase your comfort and safety in the outdoors. Different shelter designs excel in different situations, and no single setup is ideal for every environment.
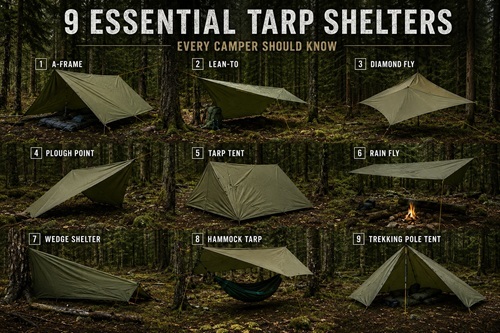
A-Frame Shelter
The A-Frame is often the first tarp shelter people learn because it is simple, reliable, and highly effective in wet weather.
A ridgeline is stretched between two anchor points and the tarp is draped evenly over the line. The sides are then secured to the ground, creating a triangular profile that sheds rain efficiently.
Because both sides extend toward the ground, the A-Frame provides excellent protection from wind and precipitation. It is particularly useful for overnight camping trips where weather conditions may be uncertain.
Many campers consider the A-Frame their default shelter because it balances protection, simplicity, and usable interior space.
Lean-To Shelter
The Lean-To is one of the quickest tarp shelters to construct.
One side of the tarp is elevated while the opposite side remains close to the ground, creating an open-front shelter. This design offers excellent visibility and airflow while still providing protection from wind and rain coming from one direction.
The Lean-To is commonly used around campfires because the open front allows heat from the fire to reflect into the shelter. In mild weather, it creates a comfortable living area without feeling enclosed.
Proper orientation is important. The open side should face away from prevailing winds whenever possible.
Diamond Fly
The Diamond Fly is a favorite among minimalist backpackers and emergency shelter builders.
This setup uses a square tarp suspended from a single elevated point. The remaining corners are staked outward, creating a shelter that provides overhead protection while using very little cordage.
Its lightweight nature makes it attractive for hikers who want to minimize pack weight while maintaining emergency weather protection.
Although it offers less coverage than some other configurations, it can be deployed quickly when unexpected rain moves in.
Plough Point Shelter
When strong winds and heavy rain become concerns, many experienced tarp users turn to the Plough Point.
This design creates a low-profile structure capable of handling challenging weather conditions. One corner is elevated while the rest of the tarp remains close to the ground, forming a wedge that deflects wind and sheds rain effectively.
Because of its storm-resistant characteristics, the Plough Point is often recommended as an emergency shelter when conditions deteriorate rapidly.
Tarp Tent
The Tarp Tent configuration transforms a simple tarp into a fully enclosed shelter.
By using additional stake points and support lines, the tarp forms walls and a roof that provide significantly more protection from weather, insects, and cold temperatures.
While it generally requires more setup time than open shelters, the additional protection can be well worth the effort during extended trips or adverse weather conditions.
For those seeking maximum weather resistance without carrying a traditional tent, this configuration offers an attractive compromise.
Rain Fly Shelter
Sometimes the objective is not sleeping protection but creating a covered workspace.
The Rain Fly configuration suspends the tarp overhead to create a dry area for cooking, equipment maintenance, gathering firewood, or relaxing during poor weather.
This setup is particularly useful in group camps where several people may need a protected area outside of their sleeping shelters.
Because the sides remain open, ventilation remains excellent even during warm summer weather.
Wedge Shelter
The Wedge Shelter is designed with wind protection in mind.
One side remains very low to the ground while the opposite side is elevated slightly higher. This creates a streamlined profile that minimizes exposure to strong winds.
The design sacrifices some interior space in exchange for increased stability and weather resistance.
For winter camping, exposed terrain, or mountain environments, the Wedge Shelter can provide impressive protection while using minimal materials.
Hammock Tarp Shelter
Hammock camping has become increasingly popular, and tarp shelters play a critical role in making hammocks practical during poor weather.
A tarp is suspended above the hammock using a ridgeline, creating a roof that protects both the sleeper and their gear.
Proper positioning and tension are essential to prevent rain from entering through the ends or collecting in low spots.
When set up correctly, a hammock tarp shelter provides excellent protection while maintaining the comfort advantages of hammock camping.
Trekking Pole Tent
In areas where trees are unavailable, trekking poles can be used as shelter supports.
This configuration creates a lightweight pyramid-style shelter that is especially popular among long-distance hikers and ultralight backpackers.
Because it does not rely on trees, the trekking pole tent works well in alpine environments, open meadows, and other areas above treeline.
The result is a highly portable shelter system that provides excellent protection while keeping pack weight to a minimum.
Practical Tarp Shelter Tips
Regardless of which configuration you choose, a few basic principles can greatly improve shelter performance.
- Position shelter openings away from prevailing winds.
- Pitch tarps lower during storms to reduce exposure.
- Use quality cordage and sturdy stakes whenever possible.
- Carry spare guylines for unexpected repairs or modifications.
- Practice each setup before relying on it in the field.
- Learn multiple shelter designs rather than depending on a single configuration.
The more comfortable you become with tarp shelters, the easier it becomes to adapt to changing weather and terrain.
Final Thoughts
A tarp may appear simple, but in capable hands it becomes one of the most valuable tools in an outdoor kit. Whether you’re backpacking through the mountains, establishing a hunting camp, preparing for emergencies, or simply spending a weekend in the woods, the ability to quickly construct an effective shelter can make a significant difference in both comfort and safety.
Mastering these nine tarp shelters provides a strong foundation for outdoor self-reliance and gives you the flexibility to adapt to a wide range of conditions using one of the most versatile pieces of gear ever created.
© Prepping Communities. This content is for informational purposes only and not professional advice. Use at your own risk.
Terms | Privacy | Guidelines