

A Practical Guide to Building, Growing, and Harvesting Potatoes in Small Spaces
Introduction
Potatoes have been feeding families for centuries, and for good reason. They are nutritious, productive, inexpensive to grow, and capable of producing a remarkable amount of food from a relatively small area. Whether your goal is lowering grocery bills, becoming more self-sufficient, or strengthening your family’s preparedness plan, potatoes deserve a permanent place in almost every garden.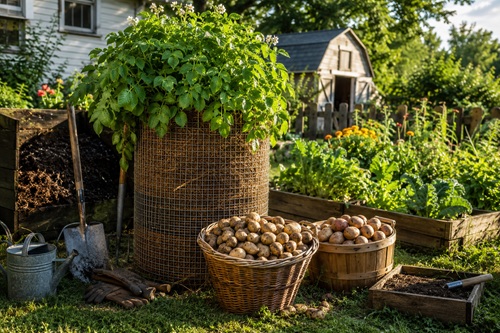
For many people, however, space is limited. Traditional potato gardens often require long rows of cultivated soil and repeated hilling throughout the growing season. While this method has proven successful for generations, it isn’t practical for everyone. Homeowners with small yards, raised beds, patios, balconies, or urban gardens often need a more compact solution.
One popular alternative is the potato tower.
A potato tower is a vertical growing system that allows potatoes to be grown inside a wire enclosure filled with alternating layers of soil and organic material. By growing upward rather than outward, the tower reduces the amount of ground space required while keeping the planting area neat, accessible, and easy to manage.
Like many popular gardening techniques, potato towers have generated both enthusiasm and misunderstanding. Some articles claim a single tower can produce enormous harvests with almost no effort, while others dismiss the idea entirely. The truth is far more practical.
A properly built potato tower can produce an excellent crop when the right potato varieties are selected and the plants receive proper soil, moisture, sunlight, and care. It isn’t a miracle growing system, nor does it guarantee dramatically larger harvests than traditional planting methods. Instead, it offers an efficient way to grow potatoes where space is limited while simplifying maintenance and harvesting.
Throughout this handbook, you’ll learn far more than simply how to build a tower. You’ll discover how potatoes actually grow, how to choose the best varieties, prepare the growing medium, plant correctly, care for your crop throughout the season, recognize common pests and diseases, harvest without damaging your potatoes, and store them properly for long-term use.
Like every preparedness skill, success comes from understanding the process rather than simply following instructions.
Why Every Prepper Should Grow Potatoes
When discussing preparedness gardening, attention often focuses on tomatoes, beans, lettuce, peppers, and cucumbers. These vegetables certainly deserve a place in the garden, but few crops provide the same combination of nutrition, productivity, versatility, and storage potential as potatoes.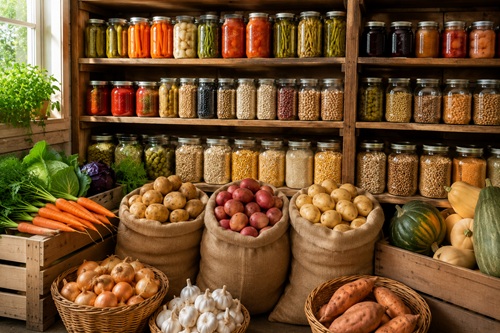
One of the greatest strengths of potatoes is their ability to produce a large amount of food from a relatively small planting area. A healthy crop can provide hundreds of pounds of edible food over the course of a growing season, making potatoes one of the most efficient calorie-producing crops available to home gardeners.
Unlike many vegetables that must be eaten shortly after harvest, properly cured potatoes can often be stored for several months under the right conditions. This makes them particularly valuable for households seeking greater food security. Instead of harvesting a crop that must immediately be consumed or preserved, potatoes provide a dependable staple that can remain available well into the winter.
Potatoes are also remarkably versatile in the kitchen. They can be baked, boiled, mashed, roasted, fried, dehydrated, pressure canned in approved recipes, incorporated into soups and stews, or used in breads, casseroles, and countless other meals. Their versatility makes them easy to rotate through everyday meal planning, which is one of the foundations of an effective preparedness pantry.
Growing potatoes also teaches practical gardening skills that extend far beyond a single crop. As you learn to prepare healthy soil, build compost, manage moisture, recognize nutrient deficiencies, rotate crops, identify pests, and harvest properly, you’ll develop experience that improves every other area of your garden. These are practical, repeatable skills that become more valuable with each growing season.
For preppers, potatoes represent much more than another vegetable. They are a dependable food crop that combines high productivity, excellent storage potential, and practical gardening experience into a single project.
What You’ll Learn
This handbook has been designed to teach far more than the construction of a potato tower.
By the time you finish reading, you’ll understand how potatoes grow beneath the soil, why certain varieties perform better than others in vertical growing systems, and how to build a durable tower using inexpensive, readily available materials. You’ll learn how to prepare the ideal growing medium, plant seed potatoes correctly, water efficiently, recognize common pests and diseases before they become serious problems, and harvest your crop without damaging the tubers you’ve spent months growing.
You’ll also learn how to cure and store potatoes properly, compare potato towers with other growing methods, avoid common beginner mistakes, and determine whether a potato tower is the right solution for your own garden.
Most importantly, you’ll gain the confidence to grow potatoes successfully year after year rather than relying on trial and error.
Understanding How Potatoes Grow
Before gathering materials or building a tower, it’s important to understand how potatoes actually develop. Many beginners assume potatoes grow directly from the roots of the plant. While this seems logical, it isn’t how potatoes form.
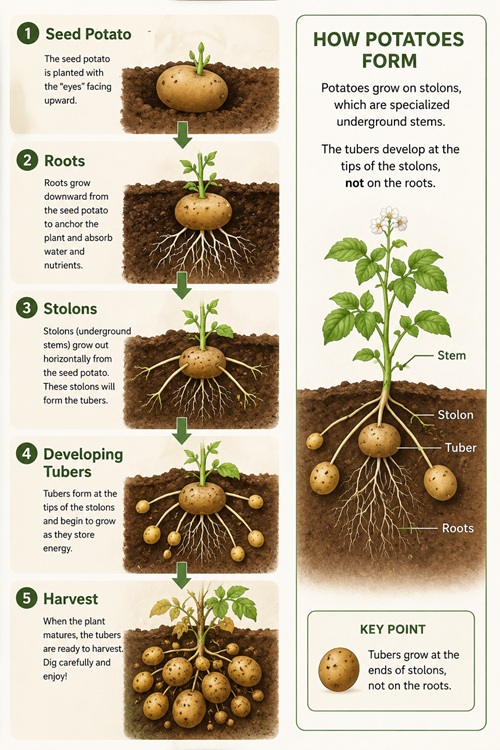
Potatoes develop on underground stems known as stolons. As the plant grows, these horizontal stems extend outward beneath the soil. Over time, the ends of the stolons begin storing energy produced by the leaves, gradually swelling into the tubers that will eventually become your harvest.
This growth pattern explains why gardeners traditionally hill potatoes by gradually adding soil around the lower stems as the plants grow. Burying portions of the stem encourages some potato varieties to produce additional stolons beneath the newly added soil, increasing the potential number of tubers.
The potato tower is built around this same principle.
As the tower is gradually filled with additional layers of soil and organic material, the lower stems remain covered while the upper portions continue producing leaves that capture sunlight. Under the right conditions, this encourages continued tuber production while allowing the plant to occupy very little ground space.
However, one of the biggest misconceptions surrounding potato towers is the belief that every potato variety continues producing tubers all the way to the top of the tower. In reality, potato varieties differ considerably in their growth habits. Some respond well to repeated hilling, while others produce most of their potatoes close to the original planting depth regardless of how much additional soil is added.
Understanding this simple fact helps set realistic expectations. A potato tower is not a magical method for multiplying yields indefinitely. Its greatest advantages are efficient use of space, improved organization, simplified maintenance, and easier harvesting.
When combined with good gardening practices, these advantages make the potato tower an excellent choice for many preparedness gardens.
Before You Continue
Now that you understand how potatoes grow and why potato towers work, the next step is choosing the right variety. Not all potatoes behave the same way, and selecting the proper variety before you plant can have a significant impact on your harvest. In the next section, you’ll learn how to choose potatoes that match your climate, growing season, storage goals, and the unique demands of a vertical growing system.
Choosing the Right Potato Variety
One of the most important decisions you’ll make before building a potato tower has nothing to do with wire mesh, compost, or soil. It begins with selecting the right potatoes to plant.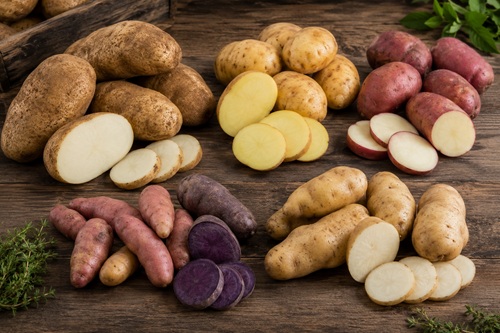
Many first-time gardeners assume that all potatoes grow the same way. In reality, different varieties mature at different speeds, produce different yields, store for different lengths of time, and respond differently to hilling and vertical growing methods.
Choosing the right variety before planting often has a greater impact on your harvest than the tower itself.
Fortunately, selecting seed potatoes doesn’t have to be complicated. Once you understand a few basic differences, you’ll be able to choose varieties that match your climate, available space, and long-term food storage goals.
Seed Potatoes vs. Grocery Store Potatoes
Whenever possible, begin with certified seed potatoes rather than potatoes purchased from the grocery store.
Seed potatoes are grown specifically for planting. They are inspected for many common diseases, handled to encourage vigorous growth, and are far less likely to introduce problems into your garden.
Grocery store potatoes, on the other hand, are produced for eating. Many have been treated to slow sprouting during storage, while others may carry diseases that aren’t immediately visible. Even if they eventually grow, they may produce weaker plants or lower yields than certified seed potatoes.
If seed potatoes aren’t available in your area, some gardeners successfully plant untreated, organically grown potatoes that have naturally developed healthy sprouts. While this can work, it carries a greater degree of uncertainty than using certified seed potatoes.
For the best results, begin with healthy planting stock.
Understanding Maturity Dates
Potatoes are generally grouped into three categories based on how long they take to mature.
Early-Season Potatoes
Early varieties are usually ready to harvest in about two to three months. They grow quickly and are excellent for gardeners with shorter growing seasons.
Because they’re harvested earlier, they often have thinner skins and generally don’t store as long as later varieties. Many gardeners grow early potatoes primarily for enjoying fresh potatoes during the summer.
Mid-Season Potatoes
Mid-season potatoes provide a good balance between harvest time, productivity, and storage.
They mature slightly later than early varieties while often producing larger harvests.
For many home gardeners, they offer an excellent combination of reliability and versatility.
Late-Season Potatoes
Late varieties remain in the ground the longest but often reward the extra patience with larger harvests and excellent storage qualities.
Their thicker skins help protect the tubers during long-term storage, making them particularly attractive for preparedness gardening.
If your growing season is long enough, late-season potatoes are often an excellent choice for building a winter food supply.
Popular Potato Varieties
Although hundreds of potato varieties are available, only a few are commonly found in garden centers.
Understanding their characteristics makes choosing much easier.
Russet Potatoes
Russets are among the most popular potatoes in North America.
Their high starch content makes them excellent for baking, mashed potatoes, and French fries. They also store exceptionally well under proper conditions.
For preparedness purposes, Russets remain one of the best all-around choices.
Yukon Gold
Yukon Gold potatoes are known for their rich flavor and creamy texture.
They perform well in many recipes, including roasting, boiling, and mashing.
While they generally don’t store quite as long as Russets, they remain an excellent addition to most gardens.
Red Potatoes
Red potatoes have smooth skins and waxy flesh that holds together well during cooking.
They’re ideal for potato salads, soups, and roasting.
Although many gardeners enjoy growing them, they generally aren’t chosen primarily for long-term storage.
Fingerling Potatoes
Fingerlings produce small, elongated tubers with outstanding flavor.
They’re popular among home gardeners looking for variety but generally aren’t grown for maximum calorie production.
For preparedness gardens where food production is the priority, larger varieties often provide better overall yields.
Which Potatoes Work Best in Towers?
One of the biggest misconceptions surrounding potato towers is that every variety produces potatoes throughout the full height of the tower.
Research and practical gardening experience suggest this isn’t always the case.
Some varieties respond well to repeated hilling, while others produce most of their tubers close to the original planting depth regardless of how much additional soil is added.
Because growing conditions, climate, and potato varieties all influence results, many experienced gardeners recommend experimenting with two or three varieties during your first season rather than relying on a single type.
Keeping simple notes about yield, size, and storage quality will quickly show which varieties perform best in your own garden.
Your own experience is often the most valuable guide.
Choosing for Preparedness
If your primary goal is food security rather than simply growing potatoes for fun, look for varieties that offer three important characteristics.
First, choose potatoes that produce dependable harvests in your climate.
Second, select varieties that store well for several months after harvest.
Finally, grow potatoes that your family already enjoys eating.
Preparedness works best when your stored food matches your everyday meals. Potatoes that sit untouched because nobody enjoys them don’t contribute to long-term food security.
Prepper Tip
Instead of planting one large tower with a single potato variety, consider building two or three smaller towers and experimenting with different types. At harvest time, compare their yields, flavor, storage life, and resistance to pests and diseases. Within a single growing season, you’ll learn which varieties perform best in your local conditions.
Common Beginner Mistakes
One of the most common mistakes is planting grocery store potatoes without understanding their limitations. While they sometimes produce acceptable crops, certified seed potatoes usually provide more reliable results and reduce the risk of introducing diseases into your garden.
Another mistake is choosing varieties based solely on appearance. A beautiful potato that doesn’t store well or perform in your climate may not be the best choice for a preparedness garden. Focus on productivity, storage life, and adaptability rather than appearance alone.
Finally, avoid planting only one variety year after year without experimenting. Small trials help identify which potatoes consistently perform best in your unique growing conditions.
Planning Your Potato Tower
A successful potato harvest begins long before the first seed potato goes into the soil. Choosing the right location, selecting appropriate materials, and planning the size of your tower will have a significant impact on the health of your plants and the quality of your harvest.
Many beginners focus almost entirely on the construction of the tower itself, believing that the structure is the secret to success. In reality, the tower simply supports the growing environment. Healthy soil, adequate sunlight, consistent moisture, and good airflow remain the factors that determine whether your potato crop thrives or struggles.
Spending a little extra time planning now will prevent many common problems later in the growing season.
Choosing the Right Location
Potatoes are sun-loving plants.
For the best results, select a location that receives at least six to eight hours of direct sunlight each day. More sunlight generally produces stronger plants, healthier foliage, and better tuber development.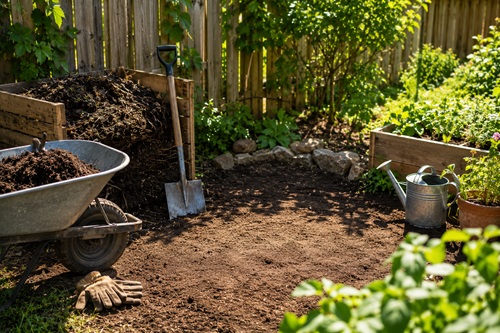
Avoid placing your tower beside large trees, fences, or buildings that cast shade for much of the day. Even partial shade can reduce plant growth and lower your final harvest.
Good air circulation is equally important. Moving air helps dry moisture from the leaves after rain or watering, reducing the risk of fungal diseases such as late blight.
If possible, choose an open area where gentle breezes can move freely around the tower.
Start with Good Drainage
One of the quickest ways to damage a potato crop is allowing the growing medium to remain waterlogged.
Potatoes require consistent moisture, but they dislike constantly wet soil.
When selecting a location, avoid low areas where rainwater naturally collects after storms. If the ground remains soggy for several days following heavy rain, choose another location or improve drainage before building the tower.
A well-drained site encourages healthy root development while reducing the likelihood of rot and disease.
How Large Should the Tower Be?
Many online articles encourage gardeners to build very tall potato towers in the hope of producing enormous harvests.
In practice, taller isn’t always better.
Most successful potato towers are between 2 and 3 feet (60 to 90 cm) in diameter and 3 to 4 feet (90 to 120 cm) tall.
This size provides enough growing space while remaining easy to water, maintain, and harvest.
Extremely tall towers often become difficult to keep evenly moist. Water may run quickly through the upper layers while the center remains dry, leading to uneven growth.
For most home gardens, a moderately sized tower produces better results than an oversized one.
Choosing the Right Materials
The materials used to build the tower don’t need to be expensive.
Many gardeners successfully build towers using welded wire fencing, hardware cloth, livestock fencing, or heavy galvanized wire mesh. The material should be sturdy enough to support the weight of moist soil throughout the growing season while allowing good airflow around the plants.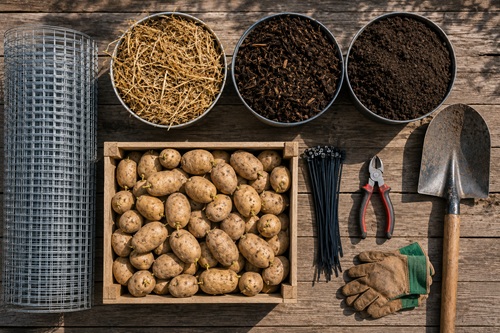
Avoid lightweight plastic netting or thin chicken wire that bends easily under heavy loads. As the tower fills with damp compost and soil, considerable pressure is placed against the sides. Stronger materials remain stable and can often be reused for many growing seasons.
Whenever possible, choose galvanized materials that resist rust and weathering.
Planning for Future Harvests
A potato tower should be viewed as more than a one-season project.
A well-built tower can often serve your garden for many years with only minor repairs. Investing a little extra time in quality construction today may save considerable work in future growing seasons.
As you plan your tower, think beyond this year’s harvest.
Consider how easily it can be emptied, cleaned, moved, repaired, or rebuilt if necessary. Simple improvements now can make every future harvest easier.
Preparedness often means building systems that continue providing value year after year.
Leave Room to Work
One detail that’s often overlooked is access.
Once the potato plants begin growing, you’ll need enough room to walk around the tower for watering, inspection, weeding, and harvesting.
Avoid placing towers too close together.
Leaving at least 2 to 3 feet (60 to 90 cm) of space around each tower allows comfortable access from every side while improving air circulation.
If you plan to build multiple towers, arrange them in rows that remain easy to reach throughout the growing season.
Good organization saves time every time you visit the garden.
Think About Water Before You Build
Watering becomes much easier if it’s considered during the planning stage.
Because potato towers drain more quickly than traditional garden rows, they often require more frequent watering during hot weather.
If you already use drip irrigation, soaker hoses, or rain barrels, position your tower where these systems can easily reach it.
If you’ll be watering by hand, make sure a garden hose or watering can can comfortably reach the location without dragging through other garden beds.
Planning for irrigation now prevents frustration later.
Prepper Tip
If space allows, build two smaller potato towers instead of one very large tower. Growing different potato varieties side by side provides valuable experience while reducing the risk of losing your entire harvest if one variety performs poorly or becomes affected by pests or disease.
Common Beginner Mistakes
One of the most common mistakes is choosing a location simply because it’s convenient rather than because it receives adequate sunlight. Potatoes need full sun to produce their best harvest.
Another frequent mistake is building the tower much taller than necessary. While impressive-looking towers attract attention online, moderate-sized towers are usually easier to maintain and often produce more consistent results.
Finally, don’t underestimate the weight of wet soil. Choosing strong materials from the beginning prevents towers from collapsing during the growing season.
Before You Continue
With your location selected and your design planned, you’re ready to gather the materials needed for construction. In the next section, you’ll learn exactly what you’ll need, how to choose quality materials, and which inexpensive alternatives can work just as well as commercial gardening products.
Gathering Your Materials
One of the reasons potato towers have become so popular is their simplicity. Unlike many garden structures that require specialized tools or expensive materials, a potato tower can usually be built in an afternoon using inexpensive supplies available from most hardware stores, farm supply centers, or even materials you already have around your property.
The goal isn’t to build a perfect-looking tower.
The goal is to build a sturdy structure that provides excellent drainage, good airflow, and enough growing space for healthy potato plants.
Many gardeners successfully use recycled materials, making potato towers both economical and environmentally friendly.
Wire Mesh
The outside wall of the tower is normally constructed from galvanized wire mesh or welded wire fencing.
The mesh provides strength while allowing plenty of air circulation throughout the growing season. It also holds the growing medium in place without restricting plant growth.
Openings of approximately 2 to 4 inches (5 to 10 cm) usually work well. Smaller openings tend to hold soil more effectively, while larger openings improve airflow and make harvesting easier.
Choose material that is rigid enough to support the weight of damp soil without collapsing.
Although lightweight chicken wire can sometimes be used, heavier welded wire fencing generally lasts much longer and remains stable year after year.
Organic Material
The growing medium inside the tower should never consist entirely of ordinary garden soil.
Heavy soil compacts easily, restricting drainage and reducing the amount of oxygen available to developing roots.
Instead, combine several organic materials to produce a loose, fertile mixture that remains light throughout the growing season.
Many gardeners use combinations of:
- Finished compost
- Quality garden soil
- Well-aged manure
- Straw
- Shredded leaves
These materials work together to improve drainage while supplying nutrients and encouraging healthy root development.
The exact proportions aren’t critical.
The finished mixture should feel loose, rich, and easy to crumble in your hand.
Straw or Hay
Straw serves several valuable purposes inside a potato tower.
Placed around the inside edge of the wire mesh, it helps prevent soil from falling through the openings while improving drainage and insulation.
As the season progresses, the straw gradually breaks down and contributes additional organic matter to the growing medium.
Whenever possible, use clean straw that contains few weed seeds.
Hay can also be used, but it often introduces unwanted grasses and weeds into the tower.
For most gardeners, straw is the better choice.
Compost
Compost is one of the most valuable ingredients you’ll add to your potato tower.
It supplies nutrients, improves soil structure, encourages beneficial microorganisms, and increases the soil’s ability to retain moisture without becoming waterlogged.
Well-finished compost should have a rich, earthy smell and a dark, crumbly texture.
Avoid using fresh manure or unfinished compost directly around seed potatoes, as these materials may generate excessive heat while decomposing or introduce disease problems.
The healthier your compost, the healthier your potato crop.
Seed Potatoes
Choose firm, healthy seed potatoes that show no signs of rot, mold, soft spots, or disease.
Small seed potatoes may be planted whole.
Larger potatoes can usually be cut into pieces, provided each section contains at least one or two healthy eyes.
After cutting larger seed potatoes, allow the cut surfaces to dry for a day or two before planting.
This curing period helps reduce the risk of rot after planting.
Healthy seed potatoes provide the strongest start to the growing season.
Simple Tools
Building a potato tower requires very few tools.
Most gardeners already own everything they need.
A pair of heavy-duty wire cutters will trim the fencing to size, while pliers make bending and fastening the wire much easier.
You’ll also need a shovel or garden fork for mixing soil, a wheelbarrow or large container for transporting compost, work gloves to protect your hands, and a measuring tape to help keep the tower dimensions consistent.
If you’re building several towers, a few wooden stakes and a rubber mallet can provide additional support in windy locations.
Good preparation makes construction much easier.
Estimate Your Materials Before You Start
One mistake many first-time builders make is underestimating how much growing medium a potato tower requires.
A single tower can easily require several wheelbarrow loads of compost, soil, straw, and organic material.
Before cutting any wire mesh, gather all your materials in one location.
Having everything ready allows you to complete the project without repeatedly stopping to search for additional supplies.
Like most gardening projects, preparation often determines success.
Prepper Tip
Whenever possible, purchase enough wire mesh to build two towers instead of one.
The additional cost is often relatively small, and having two towers allows you to experiment with different potato varieties, compare growing techniques, or stagger your planting dates.
Building extra capacity while materials are available is a preparedness principle that applies to many projects.
Common Beginner Mistakes
One of the most common mistakes is filling the tower entirely with heavy garden soil. Compacted soil limits root development, reduces drainage, and makes harvesting much more difficult.
Another mistake is using fresh manure directly around the seed potatoes. Fresh manure can damage young plants and may introduce unnecessary disease problems. Always use well-aged manure or finished compost.
Finally, avoid building the tower before gathering all your materials. Stopping halfway through construction because you’ve run out of compost or straw often results in uneven layering and unnecessary frustration.
Before You Continue
With your materials gathered and your growing medium prepared, you’re ready to begin construction.
In the next chapter, you’ll build the tower step by step, learn how to assemble a sturdy structure that will support the weight of an entire growing season, and prepare it for planting. By the end of the chapter, you’ll have a finished tower that’s ready to receive its first layer of soil and seed potatoes.
Building Your Potato Tower
With your materials gathered and your location selected, you’re ready to begin building your potato tower. The construction itself is surprisingly straightforward, and most gardeners can complete the entire project in less than an hour.
Remember that the tower isn’t the most important part of the system. Its purpose is simply to hold a healthy growing medium while providing good drainage, airflow, and easy access throughout the growing season.
Take your time.
A sturdy tower built correctly can serve your garden for many years.
Forming the Cylinder
Begin by cutting a section of galvanized wire mesh or welded wire fencing long enough to form a cylinder approximately 2 to 3 feet (60 to 90 cm) in diameter. The finished height should generally fall between 3 and 4 feet (90 to 120 cm).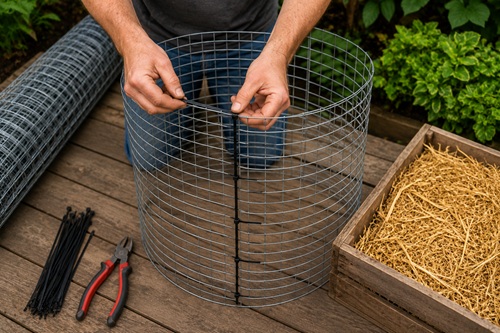
As you bend the mesh into a circle, check that the sides remain as round as possible. A circular shape distributes the weight of the growing medium evenly and creates a stronger structure than one with sharp corners or flat sides.
Once you’re satisfied with the shape, fasten the overlapping ends securely using heavy-duty zip ties, galvanized wire, or fencing clips. Space the fasteners several inches apart from top to bottom to prevent the seam from spreading apart once the tower is filled.
At this stage, gently press on different areas of the cylinder. It should feel rigid and stable rather than loose or flexible.
Positioning the Tower
Move the completed cylinder to its permanent location before adding any soil.
Once filled, the tower becomes extremely heavy and is nearly impossible to relocate without emptying it.
Place the tower directly on bare ground whenever possible. This allows excess water to drain naturally into the soil below while giving earthworms and beneficial microorganisms access to the growing medium.
If your tower will be placed on a patio or other hard surface, ensure that water can drain freely and won’t collect beneath the structure.
Before continuing, verify that the tower sits level.
A tower leaning even slightly at the beginning often becomes more unstable as additional layers are added.
Creating the First Layer
The bottom of the tower forms the foundation for the entire growing season.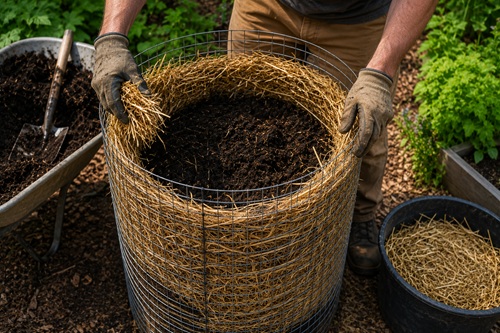
Begin by placing several inches of loose straw around the inside edge of the wire mesh. This creates a natural liner that helps keep soil from washing through the openings while still allowing excellent airflow and drainage.
Next, fill the center with a rich mixture of compost and quality garden soil until the growing medium is approximately 6 to 8 inches (15 to 20 cm) deep.
Avoid compacting the soil.
Simply level it gently with your hands or a rake.
Loose soil encourages stronger root development and better drainage.
Planting the First Seed Potatoes
Arrange your seed potatoes evenly around the outer edge of the soil layer, leaving several inches of space between each one.
Position the eyes—the small buds from which new shoots emerge—facing upward whenever possible.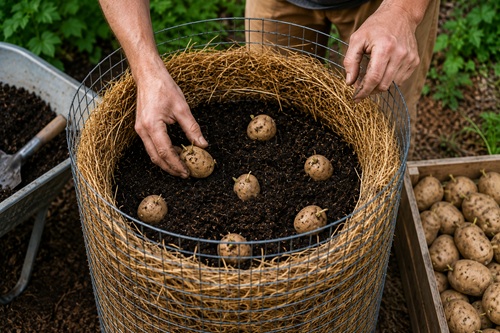
Cover the seed potatoes with approximately 4 inches (10 cm) of your prepared growing medium.
Water the layer thoroughly until the soil is evenly moist.
The goal isn’t to soak the tower but to settle the soil around the seed potatoes while providing the moisture needed to begin growth.
Building Additional Layers
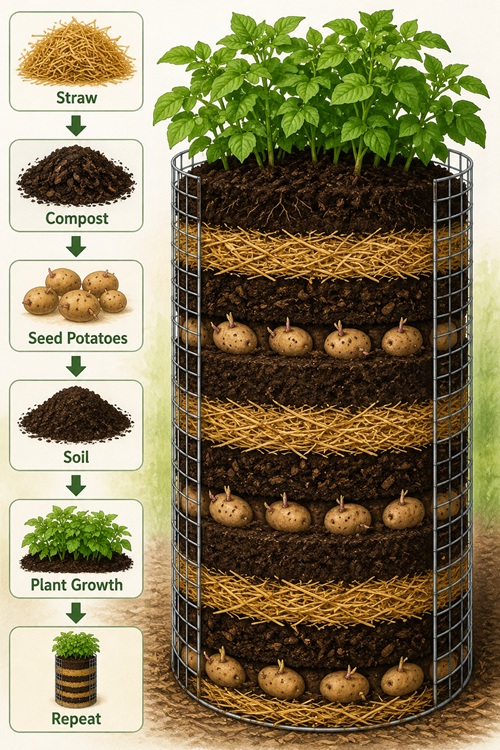
As the potato plants begin growing and reach approximately 6 to 8 inches (15 to 20 cm) above the soil surface, it’s time to add another layer.
Carefully place additional straw around the inside wall of the tower and add more compost and soil around the stems, leaving only the upper leaves exposed.
This process resembles the traditional practice of hilling potatoes in a garden row.
Continue repeating this process throughout the growing season until the tower reaches its planned height.
Avoid burying the entire plant.
Always leave several inches of healthy green foliage above the soil so the leaves can continue capturing sunlight and producing the energy needed to develop potatoes underground.
Water After Every Layer
Each time a new layer of soil is added, water the tower thoroughly.
Freshly added soil often contains dry pockets that prevent moisture from reaching developing roots.
A slow, deep watering helps settle the growing medium while encouraging roots to grow downward rather than remaining near the surface.
During periods of hot weather, check moisture frequently.
Potato towers often dry more quickly than traditional garden beds because of their excellent drainage and increased airflow.
Consistent moisture is one of the most important factors influencing both potato size and overall yield.
Watch the Plants as They Grow
One of the advantages of a potato tower is that it allows you to observe plant development closely.
Healthy plants should produce sturdy stems, dark green leaves, and steady upward growth throughout much of the season.
If growth slows unexpectedly, leaves begin yellowing prematurely, or plants appear wilted despite adequate moisture, investigate the cause rather than assuming the problem will correct itself.
Early attention to nutrient deficiencies, watering issues, or insect damage often prevents much larger problems later.
A few minutes of observation each week can save an entire harvest.
Prepper Tip
Take a photograph of your tower every week from the same location.
These pictures create a visual growing record that makes it much easier to identify successful techniques, compare varieties, and improve future harvests. Over several growing seasons, your photo journal becomes one of your most valuable gardening references.
Common Beginner Mistakes
One of the most common mistakes is adding new layers too quickly. Covering young plants before they’ve produced enough healthy foliage can slow growth and reduce the plant’s ability to produce energy.
Another mistake is packing the soil tightly around the stems. Potatoes prefer loose, well-aerated growing media that allow roots and developing tubers to expand easily.
Finally, avoid allowing the tower to dry completely between waterings. While potatoes dislike soggy soil, long periods of dryness followed by heavy watering can lead to uneven tuber development and reduced yields.
Before You Continue
With your potato tower fully constructed and planted, the focus shifts from building to caring for your crop. In the next chapter, you’ll learn how to water, fertilize, monitor plant health, and maintain steady growth throughout the season. Small adjustments during these weeks often make the difference between an average harvest and an exceptional one.
Caring for Your Potato Tower
Once your potato tower has been planted, the construction phase is complete and the growing phase begins. Although potatoes are generally considered one of the easier crops to grow, they still require regular attention throughout the season.
Fortunately, potato plants are excellent communicators.
Healthy plants usually tell you they’re doing well through steady growth, dark green leaves, and sturdy stems. Likewise, problems such as insufficient water, nutrient deficiencies, or insect damage often become visible long before the harvest is affected.
Learning to recognize these early signs is one of the most valuable gardening skills you can develop.
A few minutes of observation every few days often prevents problems that could otherwise reduce your harvest.
Watering Properly
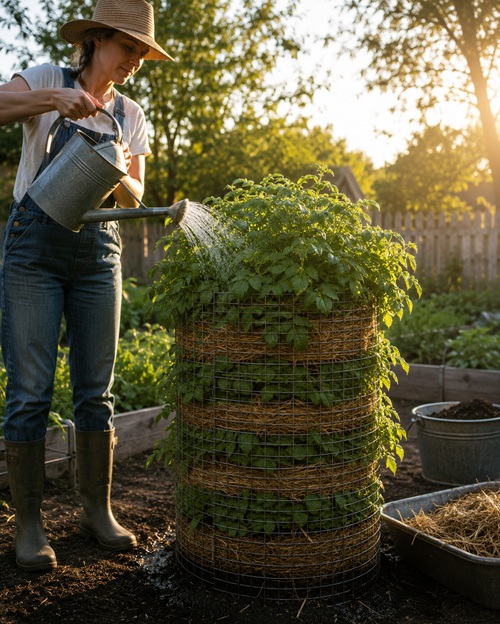
Consistent moisture is one of the most important factors in growing healthy potatoes.
The soil should remain evenly moist but never saturated. Potatoes dislike constantly wet soil, yet they also struggle when allowed to dry out for extended periods.
Instead of watering on a fixed schedule, learn to check the soil itself.
Insert your finger several inches into the growing medium. If the soil feels slightly damp, there’s usually no need to water. If it feels dry several inches below the surface, it’s time to water thoroughly.
Deep watering encourages stronger root systems than frequent light watering.
During hot summer weather, potato towers often dry faster than traditional garden beds because the sides of the tower allow increased airflow.
This simply means you’ll need to monitor moisture more frequently.
Avoid Overwatering
Beginning gardeners often believe more water automatically means more potatoes.
The opposite is often true.
Excessively wet soil reduces oxygen around developing roots and encourages rot, fungal diseases, and poor tuber development.
Water should move freely through the tower without leaving the growing medium soggy.
If water stands inside the tower after irrigation or rain, improve drainage before continuing.
Healthy potatoes require moisture—but they also require air.
Feeding Your Plants
Potatoes benefit from fertile soil, but they don’t require excessive fertilization.
If you’ve built your tower using quality compost and well-prepared soil, much of the nutrition your plants need is already present.
As the plants continue growing, a light application of balanced organic fertilizer or additional finished compost can help maintain steady growth.
Avoid fertilizers containing excessive nitrogen.
While nitrogen encourages lush green leaves, too much can reduce tuber production by directing more energy into foliage than potatoes.
Healthy plants should produce both vigorous tops and productive underground growth.
Mulching Benefits
The straw placed around the inside of the tower continues working long after construction.
It helps retain soil moisture, moderates temperature, reduces soil erosion during heavy watering, and gradually breaks down into valuable organic matter.
If portions of the straw begin decomposing or settling significantly during the season, simply add another thin layer as needed.
This also helps prevent soil from washing through the wire mesh.
Supporting Healthy Growth
As potato plants become taller, inspect them regularly.
Healthy foliage should remain a rich green color with upright stems and steady new growth.
Remove weeds that compete for water and nutrients as soon as they appear.
Although weeds may seem insignificant at first, they can quickly reduce airflow and compete with potato plants during the most productive part of the growing season.
A clean tower is easier to inspect and much easier to maintain.
Watch the Weather
Weather often influences your potato crop more than any other single factor.
Extended heat may require more frequent watering.
Heavy rainfall can increase the risk of fungal diseases.
Unexpected frost may damage young plants.
Rather than following the calendar alone, pay attention to current weather conditions and adjust your care accordingly.
Successful gardeners respond to the plants rather than rigid schedules.
Observe Before You Act
One of the best habits you can develop is simply spending a few minutes observing your garden.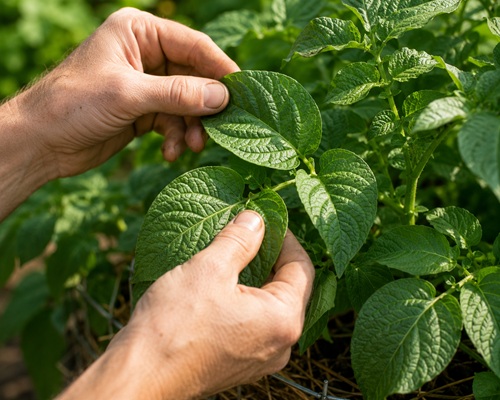
Look for:
- New growth
- Leaf color
- Stem strength
- Moisture levels
- Insect activity
- Signs of disease
Many gardening problems are much easier to solve when they’re discovered early.
A five-minute inspection every few days is often more valuable than hours of work after problems become severe.
Prepper Tip
Keep a simple garden journal.
Record planting dates, watering during unusually hot weather, fertilizer applications, rainfall, and observations about plant growth.
After a few growing seasons, these notes become one of the most valuable gardening resources you own because they’re based on your own climate, soil, and growing conditions.
Common Beginner Mistakes
One of the most common mistakes is watering too frequently without checking the soil. Constantly wet conditions often create more problems than slightly dry soil.
Another mistake is applying large amounts of nitrogen fertilizer after the plants are established. While the foliage may become impressive, excessive leaf growth often comes at the expense of potato production.
Finally, don’t ignore small changes in your plants. Yellowing leaves, insect damage, or unusual spots rarely improve without attention. Early intervention is almost always easier than correcting advanced problems.
Before You Continue
Healthy potato plants still face challenges from insects, diseases, and wildlife throughout the growing season.
In the next chapter, you’ll learn how to recognize the most common threats before they spread, use practical prevention strategies, and protect your crop without relying solely on chemical treatments.
Protecting Your Potato Crop
A healthy potato tower is capable of producing an impressive harvest, but like every garden crop, potatoes face challenges throughout the growing season. Insects, diseases, wildlife, and environmental stress can all reduce production if problems go unnoticed.
The good news is that most serious issues don’t appear overnight.
Plants usually provide warning signs well before significant damage occurs. By learning what healthy potato plants should look like and making regular inspections part of your gardening routine, you’ll often discover problems while they’re still small and easy to manage.
The goal isn’t to eliminate every insect or create a perfectly spotless garden.
The goal is to recognize developing problems early and respond before they affect your harvest.
Inspect Your Plants Regularly
One of the best habits any gardener can develop is performing regular visual inspections.
Every few days, spend a few minutes looking closely at your potato plants. Examine both the upper and lower surfaces of the leaves, inspect the stems, and observe the overall appearance of the plant.
Healthy potato plants typically produce strong upright stems, dark green leaves, and steady new growth.
Changes in color, unusual spots, insect damage, or wilting often indicate that something deserves closer attention.
Frequent observation allows you to identify problems while they’re still localized rather than after they’ve spread throughout the entire crop.
Colorado Potato Beetles
The Colorado potato beetle is one of the best-known potato pests in North America.
Both the adult beetles and their larvae feed on potato leaves, sometimes removing large amounts of foliage in a surprisingly short period of time.
The adults are easy to recognize by their yellow bodies marked with distinctive black stripes. Their reddish-orange larvae are equally noticeable once you know what to look for.
Small infestations can often be managed by hand-picking the insects and removing egg clusters found on the undersides of leaves.
Regular inspections are far more effective than waiting until the population becomes established.
Aphids
Aphids are tiny insects that feed by extracting sap from plant tissues.
Large populations can weaken plants, distort new growth, and contribute to the spread of certain plant diseases.
Fortunately, aphids rarely become serious if discovered early.
Natural predators such as ladybugs and lacewings often help keep aphid populations under control.
If numbers begin increasing rapidly, a strong spray of water is sometimes enough to dislodge many of the insects without harming the plants.
Wireworms
Wireworms live beneath the soil and feed on developing potatoes.
Because they remain underground, they’re often difficult to detect until harvest when small holes are discovered inside the tubers.
The best defense is prevention.
Avoid planting potatoes repeatedly in the same location year after year, and rotate crops whenever possible. Healthy soil and proper crop rotation significantly reduce the likelihood of persistent wireworm problems.
Fungal Diseases
Moist conditions combined with poor air circulation create an environment where fungal diseases can develop.
Two of the most common concerns are early blight and late blight.
Although these diseases differ in appearance and severity, both usually begin with spots or discoloration on the leaves that gradually spread if conditions remain favorable.
Good spacing, proper watering, and adequate airflow are among the most effective preventive measures.
Whenever possible, water the soil rather than wetting the foliage, particularly during the evening when leaves remain damp overnight.
Healthy growing conditions are often the best defense against disease.
Black Scurf and Common Scab
Not all potato diseases affect the leaves.
Some primarily affect the tubers themselves.
Black scurf appears as dark, rough patches on the potato surface, while common scab produces corky, roughened areas on the skin.
Although these conditions often affect appearance more than edibility, they can reduce the quality of the harvest.
Maintaining healthy soil, using certified seed potatoes, and practicing crop rotation remain the most effective long-term strategies.
Wildlife Visitors
Potatoes occasionally attract more than insects.
Depending on where you live, rabbits, deer, ground squirrels, mice, voles, and other wildlife may browse foliage or disturb the growing medium.
Simple fencing, protective barriers, or encouraging natural predators may help discourage repeated damage.
If wildlife becomes a recurring problem, identifying the animal responsible is usually more effective than trying multiple solutions at random.
Understanding the cause makes choosing an appropriate response much easier.
Companion Planting
Many gardeners include companion plants around their potato towers to encourage beneficial insects and increase garden diversity.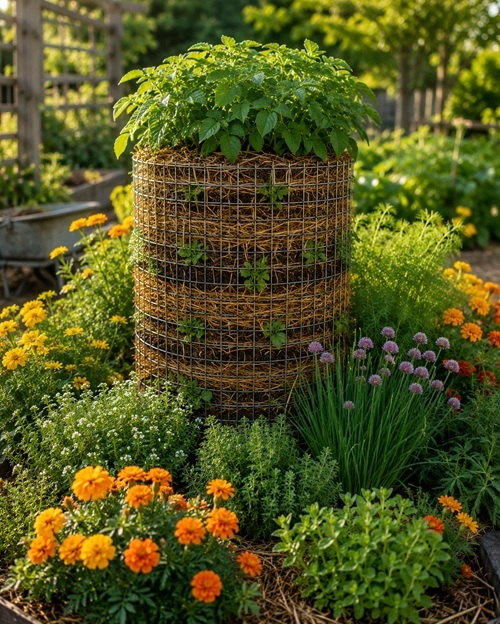
Flowers such as marigolds and herbs like dill, thyme, oregano, and chives may attract pollinators and beneficial insects while creating a more balanced garden ecosystem.
Companion planting should be viewed as one part of an overall gardening strategy rather than a guaranteed method of pest control.
Healthy soil, proper spacing, crop rotation, and regular observation remain the foundation of successful gardening.
Prevention Is Easier Than Treatment
Experienced gardeners know that preventing problems is almost always easier than correcting them.
Healthy soil, disease-free seed potatoes, proper watering, adequate sunlight, and good airflow reduce the likelihood of many common issues before they ever appear.
Rather than waiting for plants to decline, develop the habit of making small corrections throughout the growing season.
Minor adjustments made early often prevent major problems later.
Prepper Tip
Walk through your garden at least twice each week with the sole purpose of observing your plants. Don’t bring tools or plan to do any work. Simply look carefully. You’ll often notice subtle changes in leaf color, insect activity, or moisture levels before they become serious enough to affect your harvest.
Common Beginner Mistakes
One of the most common mistakes is assuming that a few damaged leaves indicate a failed crop. Minor insect feeding is a normal part of gardening, and healthy plants usually tolerate small amounts of damage without affecting production.
Another mistake is immediately reaching for chemical treatments before identifying the actual problem. Many issues have multiple possible causes, and applying the wrong solution may do little to help while affecting beneficial insects.
Finally, don’t overlook sanitation. Removing heavily diseased plant material, cleaning up fallen debris, and rotating crops from year to year are among the simplest and most effective ways to reduce future pest and disease problems.
Before You Continue
As the growing season draws to a close, your attention shifts from protecting the plants to harvesting the potatoes you’ve worked hard to produce. Knowing when to harvest—and how to handle the crop afterward—has a direct impact on both quality and storage life. In the next chapter, you’ll learn how to recognize the signs of maturity, harvest without damaging the tubers, and prepare your potatoes for long-term storage.
Harvesting Your Potato Tower
After weeks of watering, observing, and caring for your potato plants, the growing season finally reaches its most rewarding stage. Harvest time is when all of your planning and effort comes together.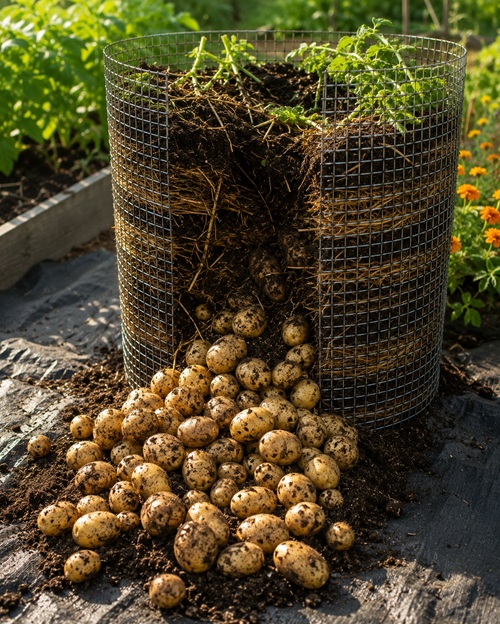
Many beginning gardeners are eager to harvest as soon as they see potatoes developing, but patience is important. Harvesting too early often results in smaller potatoes with thin skins that don’t store well. Waiting until the crop has fully matured produces a larger harvest and significantly improves long-term storage.
Fortunately, potato plants provide several clear signs that they’re ready.
Learning to recognize these natural signals allows you to harvest at the ideal time rather than relying solely on the calendar.
Knowing When to Harvest
As potato plants approach maturity, you’ll notice gradual changes in the foliage.
Healthy green leaves begin turning yellow, stems lose their firmness, and the plants slowly die back. This is a completely natural part of the potato’s life cycle.
As the foliage declines, the plant redirects its remaining energy into the tubers beneath the soil. During this period, the skins of the potatoes continue to mature and become tougher, making them less likely to bruise during harvest and better suited for long-term storage.
Many gardeners wait one to two weeks after the foliage has completely died before harvesting storage potatoes. This additional time allows the skins to toughen even further.
If your goal is fresh “new potatoes,” you can harvest earlier while the plants are still green. These young potatoes have thin, delicate skins and excellent flavor but should be eaten relatively soon because they won’t store as long.
Choose the Right Day
Harvesting is easiest when the growing medium is slightly moist but not saturated.
Very wet soil sticks to the potatoes, increases the chance of bruising, and makes cleaning more difficult.
Extremely dry soil, on the other hand, can become hard and compacted, making the potatoes more difficult to remove without damage.
Whenever possible, harvest after several days of dry weather.
A cool, overcast day is often ideal because freshly harvested potatoes won’t be exposed to intense sunlight or excessive heat.
Dismantling the Tower
One of the greatest advantages of a potato tower becomes obvious at harvest time.
Instead of digging through heavy garden soil, you simply dismantle the structure.
Begin by removing the fasteners that hold the wire mesh together. Carefully open one side of the cylinder and allow the growing medium to spread naturally onto a tarp, wheelbarrow, or directly onto the garden.
As the layers fall away, gently search through the soil with your hands.
This method greatly reduces the chance of accidentally cutting or puncturing potatoes with a shovel or garden fork.
Many gardeners find harvesting from a tower to be one of the easiest and most enjoyable parts of the growing season.
Handle Potatoes Gently
Freshly harvested potatoes bruise more easily than many people realize.
Although small surface scratches may seem unimportant, damaged potatoes generally don’t store as well as undamaged ones.
Handle each potato carefully.
Avoid throwing them into buckets or allowing them to fall onto hard surfaces.
Instead, place them gently into baskets, crates, or shallow containers.
Treat every potato as though you intend to store it for several months.
Because you probably do.
Separate the Harvest
As you harvest, sort your potatoes into several groups.
Large, healthy potatoes with no visible damage are usually the best candidates for long-term storage.
Smaller potatoes can be used first in everyday cooking.
Any potatoes that have been accidentally cut, bruised, or damaged should also be used soon rather than placed into storage.
Separating the harvest now makes later storage much easier.
Don’t Wash Storage Potatoes
One of the most common mistakes new gardeners make is washing every potato immediately after harvest.
For potatoes intended for long-term storage, this isn’t recommended.
The thin layer of dry soil clinging to the skin actually helps protect the potatoes during curing and storage.
Instead of washing them, simply brush away loose soil with your hands or a soft brush after they have cured.
Only wash potatoes immediately before cooking.
Inspect Every Potato
Harvest time is also inspection time.
As each potato is picked up, look for:
- Cuts or punctures
- Soft spots
- Insect damage
- Unusual discoloration
- Signs of disease
Removing questionable potatoes before storage helps protect the rest of your harvest.
One damaged potato can sometimes affect several others during long-term storage.
Taking a few extra minutes now can prevent unnecessary losses later.
Save the Best for Seed
If you plan to continue growing potatoes next year, harvest time is an excellent opportunity to identify your healthiest plants.
Select potatoes from vigorous, disease-free plants that produced good yields.
If you’re saving seed potatoes, store them separately and clearly label the variety.
Over several growing seasons, this simple practice helps you identify which varieties consistently perform best in your garden.
Prepper Tip
Keep a notebook during harvest.
Record:
- Variety planted
- Planting date
- Harvest date
- Approximate yield
- Weather conditions
- Problems encountered
- Improvements for next season
After several years, these notes become one of the most valuable references in your preparedness library because they’re based entirely on your own experience.
Common Beginner Mistakes
One of the biggest mistakes is harvesting too early because of excitement. Allowing potatoes to mature fully produces stronger skins and significantly improves storage life.
Another common mistake is leaving harvested potatoes sitting in direct sunlight. Extended exposure can cause the skins to turn green as chlorophyll develops. Green potatoes may also contain increased levels of naturally occurring glycoalkaloids and should not be eaten if significant greening has occurred.
Finally, avoid piling freshly harvested potatoes into deep buckets where the weight of the upper potatoes can bruise those beneath them. Shallow containers help minimize unnecessary damage.
Before You Continue
Harvesting marks the end of the growing season, but it doesn’t mark the end of your preparedness plan.
How you cure and store your potatoes over the next several weeks will determine whether your harvest lasts only a few weeks or continues feeding your household for many months.
In the next chapter, you’ll learn how to cure potatoes properly, create ideal storage conditions, prevent spoilage, and build a dependable long-term food supply from your harvest.
Curing and Storing Your Harvest
Harvesting your potatoes is an exciting milestone, but proper storage begins immediately after the last potato is removed from the tower. Many beginning gardeners focus entirely on growing a large harvest and give little thought to what happens afterward. In reality, the way potatoes are handled during the first few weeks after harvest has a tremendous impact on how long they remain usable.
Freshly harvested potatoes are still living plant tissue. Their skins are relatively delicate, and small cuts or bruises that seem insignificant during harvest can become entry points for decay during storage.
Proper curing allows the potatoes to naturally strengthen their skins and heal many small surface injuries before they are placed into long-term storage.
Taking a little extra time now can mean the difference between potatoes that last several weeks and potatoes that remain in excellent condition for many months.
Understanding the Curing Process
Curing is simply the process of allowing freshly harvested potatoes to rest under controlled conditions before placing them into storage.
During this period, the outer skin becomes tougher, and minor scrapes or bruises begin to heal naturally. This protective layer helps reduce moisture loss while making it more difficult for bacteria and fungi to enter the potato.
Think of curing as allowing the harvest to finish maturing after it leaves the garden.
Although it requires a little patience, curing is one of the easiest ways to improve long-term storage success.
Creating Good Curing Conditions
Freshly harvested potatoes should be placed in a cool, dark location with good air circulation.
They should not be exposed to direct sunlight, freezing temperatures, or excessive heat.
Spread the potatoes in a single layer whenever possible rather than piling them deeply into buckets or boxes. Good airflow around each potato helps prevent excess moisture from accumulating while reducing the chance of decay.
Most gardeners allow potatoes to cure for approximately one to two weeks before placing them into permanent storage.
During this time, avoid washing them. Simply brush away loose soil if necessary and leave the protective skin undisturbed.
Choosing the Right Storage Location
Once curing is complete, potatoes should be moved to a cool, dark, and well-ventilated storage area.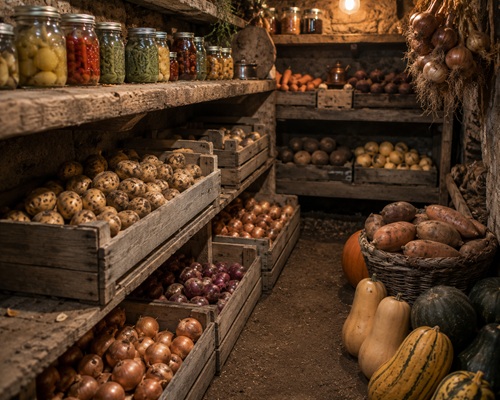
Traditional root cellars remain one of the best options because they naturally maintain stable temperatures and humidity throughout much of the year.
However, many households successfully store potatoes in basements, unheated utility rooms, insulated garages, or other locations that remain consistently cool without freezing.
The goal is to avoid large temperature fluctuations.
Rapid changes in temperature encourage condensation, which increases the likelihood of spoilage.
Consistency is often more important than achieving the perfect temperature.
Keep Potatoes in Darkness
Light is one of the greatest enemies of stored potatoes.
When exposed to light for extended periods, potatoes begin producing chlorophyll, causing the skin to turn green. Although chlorophyll itself is harmless, greening may occur alongside increased concentrations of naturally occurring glycoalkaloids, which can make potatoes unsafe to eat if present in significant amounts.
Always store potatoes where they remain completely protected from sunlight and artificial lighting whenever possible.
Darkness helps preserve both quality and food safety.
Allow Air to Circulate
Good ventilation is another essential part of successful storage.
Avoid sealing potatoes inside airtight plastic containers or plastic bags.
Instead, use breathable containers such as wooden crates, cardboard boxes with ventilation holes, burlap sacks, woven baskets, or mesh produce bags.
These materials allow moisture to escape while reducing condensation around the potatoes.
Healthy airflow greatly reduces the likelihood of mold and decay during long-term storage.
Check Your Potatoes Regularly
Even under ideal conditions, potatoes should never be forgotten.
Inspect your stored potatoes every few weeks.
Remove any potatoes that become soft, begin sprouting excessively, develop mold, or show signs of decay.
One spoiled potato can quickly affect several others if left unnoticed.
Regular inspections require only a few minutes but can prevent significant losses.
Successful long-term storage depends on routine observation.
Store Different Crops Separately
Although root vegetables often share similar storage conditions, not all should be stored together.
For example, apples release ethylene gas as they ripen.
Exposure to ethylene can encourage potatoes to sprout prematurely, shortening their storage life.
Whenever possible, store potatoes separately from apples and other fruits that produce significant amounts of ethylene gas.
A little extra organization helps preserve your harvest longer.
Rotate Your Harvest
Preparedness isn’t simply about storing food.
It’s about using what you store.
As you remove potatoes for everyday meals, use the oldest potatoes first and replace your supply with each new harvest.
This First-In, First-Out (FIFO) approach minimizes waste while ensuring your stored food remains fresh.
The same rotation principles used for canned foods, grains, and emergency supplies work equally well for fresh potatoes.
Estimating Your Food Supply
One of the advantages of growing potatoes each year is that you begin developing a better understanding of your household’s needs.
After weighing or estimating your harvest, ask yourself a few simple questions.
How many pounds did your garden produce?
How long will that amount feed your household?
Would another tower provide enough additional potatoes to meet your long-term storage goals?
Keeping these records each season allows you to gradually expand your garden based on actual experience rather than guesswork.
Preparedness improves when decisions are based on real data.
Prepper Tip
Label every storage container with the harvest date and potato variety. If one variety stores significantly longer or develops fewer problems, you’ll quickly identify which potatoes deserve more space in next year’s garden.
Common Beginner Mistakes
One of the most common mistakes is washing potatoes before storage. Moisture left on the skins encourages spoilage and shortens storage life. Brush away loose soil and wait until you’re ready to cook them before washing.
Another frequent mistake is forgetting to inspect stored potatoes. Even under excellent conditions, occasional spoilage is normal. Regular inspections prevent one damaged potato from affecting the rest of the harvest.
Finally, avoid storing potatoes where temperatures regularly rise and fall. Stable storage conditions almost always produce better results than locations that alternate between warm days and cold nights.
Before You Continue
By now you’ve learned how to build a potato tower, grow healthy plants, protect them throughout the season, harvest your crop, and store it for long-term use.
Before concluding, it’s worth comparing potato towers with several other growing methods. Every garden is different, and understanding the strengths and limitations of each approach will help you decide which method—or combination of methods—best fits your available space, climate, and preparedness goals.
Comparing Potato Growing Methods
The potato tower is an excellent option for many home gardeners, but it isn’t the only way to grow potatoes successfully. Every growing method has advantages and disadvantages, and the best choice depends on your available space, soil conditions, climate, and gardening goals.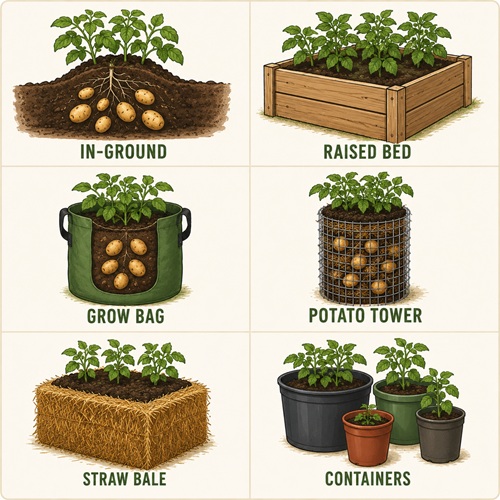
Rather than asking which method is best, it’s more useful to ask which method is best for your particular situation.
Understanding the strengths of each approach allows you to choose the one that fits your needs while avoiding unnecessary disappointment.
Many experienced gardeners even combine several methods to increase both production and flexibility.
Traditional In-Ground Planting
Growing potatoes directly in the garden remains the most common method worldwide.
Potatoes are planted in rows and gradually hilled with additional soil as the plants grow. This technique has been used successfully for generations because it is simple, productive, and easy to expand for larger gardens.
For households with plenty of garden space, traditional planting often produces the highest overall yield with the least amount of construction.
The primary disadvantages are the amount of land required and the physical effort involved in digging and harvesting.
Harvesting usually requires turning over large amounts of soil, and it’s easy to accidentally cut or damage potatoes with a shovel or garden fork.
Despite these challenges, traditional planting remains an excellent choice for larger preparedness gardens.
Raised Bed Gardening
Raised beds have become increasingly popular because they provide excellent drainage, improved soil quality, and easier access for planting and maintenance.
Because the soil is built rather than dug, gardeners have greater control over fertility and structure.
Raised beds also warm more quickly in spring, allowing many gardeners to begin planting earlier than they could in heavy ground.
Although raised beds require more initial construction than in-ground planting, they are often easier to maintain over time and fit well into organized preparedness gardens.
Grow Bags and Containers
Grow bags and large containers allow potatoes to be grown almost anywhere with adequate sunlight.
They are particularly useful for patios, decks, balconies, and rental properties where permanent garden beds aren’t possible.
The containers are portable, easy to harvest, and require very little construction.
However, because they contain a relatively small volume of growing medium, they dry out much faster than traditional gardens and usually require more frequent watering during hot weather.
For gardeners with very limited space, grow bags provide an excellent alternative.
Straw Bale Gardening
Growing potatoes in straw bales has become another popular alternative.
As the straw gradually decomposes, it creates a loose growing environment with excellent drainage and abundant organic matter.
Harvesting is relatively easy because the potatoes develop within the decomposing straw rather than compacted soil.
The main challenge is preparing the straw bales correctly before planting.
Fresh bales require conditioning over several weeks before they become suitable growing media.
Although straw bale gardening requires some advance planning, many gardeners appreciate the reduced digging and improved soil structure it offers.
Hilled Rows
Hilling is less a separate growing method than an important gardening technique.
As potato plants grow, additional soil is gradually pulled around the stems, encouraging certain varieties to produce additional underground stolons while protecting developing tubers from sunlight.
For gardeners with traditional rows, hilling remains one of the simplest and most effective ways to improve potato production.
Although it requires several trips through the garden during the growing season, the work is straightforward and well worth the effort.
Why Many Gardeners Choose Potato Towers
The potato tower combines several advantages that make it especially attractive for preparedness gardening.
Perhaps its greatest strength is efficient use of space. A tower occupies only a small footprint while providing a generous volume of growing medium, making it well suited to small yards and urban gardens.
The vertical design also simplifies maintenance. Plants are easy to inspect, watering is concentrated into a defined area, and harvesting requires dismantling the tower rather than digging through heavy soil.
For many gardeners, this dramatically reduces the physical effort involved in harvesting.
The open structure also encourages good air circulation, helping foliage dry more quickly after rain and reducing the likelihood of certain fungal diseases.
When built from durable materials, a potato tower can often be reused for many growing seasons, making it an economical long-term investment.
No Single Method Is Perfect
One lesson experienced gardeners learn quickly is that there is rarely one perfect growing method.
Climate, soil type, available space, rainfall, and even potato variety all influence success.
A technique that produces excellent results in one region may perform very differently somewhere else.
Rather than searching for the “best” method, focus on developing the knowledge and experience needed to adapt your gardening techniques over time.
Preparedness is built through observation, experimentation, and continuous improvement.
Prepper Tip
If space allows, try growing potatoes using two different methods during the same season. For example, plant one potato tower and one raised bed or grow bag. Comparing the results under the same weather conditions will quickly show which method works best in your own garden.
Common Beginner Mistakes
One of the most common mistakes is believing that a new growing method automatically produces larger harvests. Good soil, healthy seed potatoes, proper watering, and regular care remain far more important than the structure itself.
Another mistake is abandoning a method after one disappointing season. Weather, pests, and soil conditions vary from year to year. Consistent results come from learning and making gradual improvements over multiple growing seasons.
Finally, avoid copying another gardener’s setup without considering your own environment. Successful gardening always involves adapting techniques to local conditions rather than expecting identical results.
Before You Continue
You’ve now learned how to choose a potato variety, build a tower, care for your plants, protect them from pests, harvest the crop, and store your potatoes for long-term use.
The final chapters bring everything together by reviewing the most common beginner mistakes, summarizing the key lessons from the handbook, and helping you build a practical action plan for your next growing season. These final insights often make the difference between simply reading about potato towers and successfully growing potatoes year after year.
Common Beginner Mistakes
Every experienced gardener has made mistakes. In fact, most successful gardeners will tell you that some of their greatest lessons came from crops that didn’t perform as expected.
Growing potatoes is no different.
The good news is that most potato tower problems are completely preventable once you understand what causes them. By recognizing these common mistakes before you begin, you’ll greatly improve your chances of producing a healthy, productive harvest.
Gardening isn’t about perfection.
It’s about learning, observing, and improving each season.
Expecting the Tower to Do the Work
One of the biggest misconceptions surrounding potato towers is the belief that the tower itself produces larger harvests.
It doesn’t.
The tower is simply a growing container.
Healthy soil, quality seed potatoes, adequate sunlight, proper watering, and regular care remain the factors that determine success.
A poorly maintained potato tower will almost always produce fewer potatoes than a well-managed traditional garden.
Think of the tower as a tool—not a guarantee.
Choosing the Wrong Potato Variety
Not every potato variety responds the same way to repeated hilling or vertical growing.
Some produce most of their tubers near the original planting depth regardless of how much additional soil is added.
Rather than assuming every variety behaves identically, experiment with several different potatoes during your first few growing seasons.
Your own garden will quickly reveal which varieties perform best under your local conditions.
Building an Oversized Tower
Many online photographs show towers that are five or even six feet tall.
While these structures certainly attract attention, they often become difficult to water evenly.
The upper layers may dry quickly while the center remains too wet or too dry.
Extremely tall towers can also become unstable as the growing medium settles.
For most home gardeners, a moderately sized tower is easier to maintain and often produces more consistent results.
Sometimes smaller really is better.
Using Heavy Garden Soil
One of the quickest ways to reduce potato production is filling the tower with dense, compacted soil.
Heavy soil restricts drainage, limits oxygen around the roots, and makes it more difficult for developing tubers to expand.
Instead, aim for a loose mixture of compost, quality garden soil, and organic matter that remains light and well-drained throughout the season.
Healthy soil is the foundation of every successful harvest.
Watering Too Much—or Too Little
Potatoes require consistent moisture, but consistency is the key.
Allowing the tower to become completely dry stresses the plants and may reduce tuber development.
Keeping the soil constantly saturated creates a different set of problems by encouraging rot and fungal diseases.
Rather than following a fixed watering schedule, check the moisture regularly and water only when needed.
Learning to read the soil is far more valuable than memorizing a schedule.
Ignoring Small Problems
Minor issues rarely stay minor for long.
A few insect eggs today may become hundreds of hungry larvae within a week.
A small yellow spot on one leaf can spread rapidly under favorable conditions.
Regular inspections allow you to solve problems while they’re still manageable.
Waiting until plants are obviously struggling often makes recovery much more difficult.
Observation is one of the most valuable tools any gardener owns.
Harvesting Too Early
Excitement leads many gardeners to harvest before the crop has fully matured.
Although new potatoes are delicious, harvesting storage potatoes too early usually results in thinner skins and shorter storage life.
Allowing the plants to complete their natural life cycle gives the potatoes time to mature fully and prepares them for long-term storage.
Patience is rewarded.
Improper Storage
A successful harvest can still be lost if potatoes aren’t stored correctly.
Exposure to sunlight, excessive warmth, poor ventilation, or failure to inspect stored potatoes regularly can shorten storage life dramatically.
Growing potatoes and storing potatoes are two separate skills.
Learning both is essential if your goal is long-term food security.
Failing to Keep Records
Many gardeners rely entirely on memory.
Unfortunately, memory isn’t always accurate months later.
Keeping a simple notebook allows you to record:
- Planting dates
- Potato varieties
- Fertilizer applications
- Rainfall
- Harvest dates
- Estimated yields
- Storage performance
After several growing seasons, these notes become an incredibly valuable gardening reference that’s tailored specifically to your property.
Preparedness improves when knowledge is documented rather than remembered.
Prepper Tip
Don’t judge your success by comparing your harvest to photographs on the internet.
Judge it by whether this year’s harvest is better than last year’s.
Preparedness is built through continual improvement, not unrealistic expectations.
Before You Continue
By now you’ve learned how to plan, build, plant, maintain, harvest, and store potatoes successfully.
The final chapter brings everything together by reviewing the most important lessons from this handbook and providing a practical action plan that will help you confidently build your first – or your next – potato tower.
Preparedness Applications
A potato tower is much more than a creative gardening project. It represents a practical approach to producing one of the world’s most important food crops in a limited amount of space. Whether you live on a rural homestead, in a suburban neighborhood, or have only a small backyard, learning to grow potatoes gives you greater control over one of the most versatile foods in your pantry.
For many households, growing even a modest portion of their own potatoes provides benefits that extend far beyond the harvest itself. Every growing season builds confidence, improves gardening skills, and reduces dependence on grocery stores. Those experiences become part of your preparedness plan long after the last potato has been harvested.
Preparedness isn’t measured by the size of your garden.
It’s measured by the knowledge and experience you gain every season.
Build Skills Before You Need Them
One of the greatest advantages of gardening is that it allows you to practice before you ever need to rely on the harvest.
If a season produces fewer potatoes than expected, you’ve still gained valuable experience. You’ll better understand your soil, your climate, your watering habits, and the potato varieties that perform best in your area.
Every season teaches something.
Every harvest improves your confidence.
That’s exactly how preparedness skills are developed.
Expand Gradually
Many new gardeners feel pressured to grow everything at once.
Resist that temptation.
Start with one well-built potato tower.
Learn from it.
Observe how your chosen variety performs, how quickly the growing medium dries, how much compost you use, and how many pounds of potatoes you harvest.
Once you’ve gained that experience, expanding becomes much easier.
Adding another tower the following season is often far more productive than building several towers before you’ve learned what works in your garden.
Preparedness grows through steady improvement rather than rapid expansion.
Think Beyond Potatoes
The lessons learned while growing potatoes apply to many other crops.
As you become more comfortable with soil preparation, composting, watering, crop rotation, pest management, and food storage, you’ll find those same skills improving the rest of your garden.
Many gardeners who begin with potatoes eventually expand into growing onions, carrots, garlic, beans, squash, corn, cabbage, and other long-term storage crops.
Each new crop builds on the skills you’ve already developed.
Gardening becomes easier because you’re no longer learning from the beginning.
You’re building on experience.
Build a Food Production System
Preparedness gardens work best when individual crops support one another.
Rather than thinking of your potato tower as a stand-alone project, consider how it fits into your overall food production plan.
Potatoes provide calories.
Beans contribute protein.
Leafy greens supply vitamins.
Herbs improve flavor and support pollinators.
Root vegetables extend your harvest into the colder months.
When planned together, these crops create a more productive and resilient garden than any single crop can provide on its own.
Preparedness isn’t built around one harvest.
It’s built around a complete food system.
Continue Learning
No handbook can replace experience.
Every growing season presents different weather, different challenges, and different opportunities to improve.
Keep experimenting with potato varieties.
Try different compost mixtures.
Adjust your watering techniques.
Improve your storage methods.
The goal isn’t perfection.
The goal is becoming a better gardener each year.
Successful preparedness is built on continuous learning.
Key Takeaways
Throughout this handbook, you’ve learned that successful potato growing begins long before planting day. Selecting healthy seed potatoes, choosing the right variety, building a sturdy tower, preparing fertile soil, and selecting a suitable location all contribute to a productive harvest.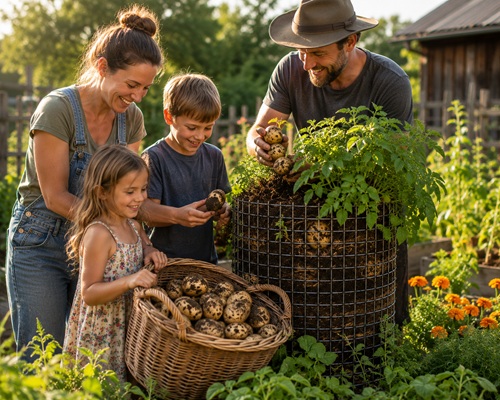
You’ve also learned how potatoes actually grow, why proper watering is more important than frequent watering, how to recognize common pests and diseases before they become serious problems, and why patience during harvest improves both yield and storage life.
Perhaps most importantly, you’ve seen that growing potatoes isn’t simply about producing food.
It’s about developing practical gardening skills that can be used year after year.
Each season strengthens your confidence, improves your decision-making, and increases your ability to provide food for your household.
Those skills become just as valuable as the harvest itself.
Your Next Steps
You don’t need to build the perfect potato tower tomorrow.
Begin with one project.
This week, choose one or two simple goals.
Locate a sunny area in your yard.
Decide which potato variety you’d like to grow.
Gather the materials needed for your tower.
Begin building compost if you don’t already have a supply.
Sketch your tower design.
Purchase certified seed potatoes before planting season arrives.
Read through this handbook a second time before you begin construction.
As you complete each step, you’ll build confidence as well as food production skills.
Preparedness isn’t achieved in a single weekend.
It’s developed one season at a time.
Final Thoughts
Growing your own potatoes is one of the most rewarding gardening projects you can undertake.
It teaches patience, observation, planning, and self-reliance while producing one of the world’s most practical food crops.
Whether your first tower produces twenty pounds or sixty pounds of potatoes isn’t the most important measure of success.
Success comes from gaining the knowledge and experience to produce food consistently, improve each season, and become less dependent on outside sources.
Every tower you build, every harvest you gather, and every lesson you learn contributes to a more resilient household.
The harvest will feed your family for months.
The knowledge will serve you for a lifetime.
Appendix A — Potato Variety Comparison
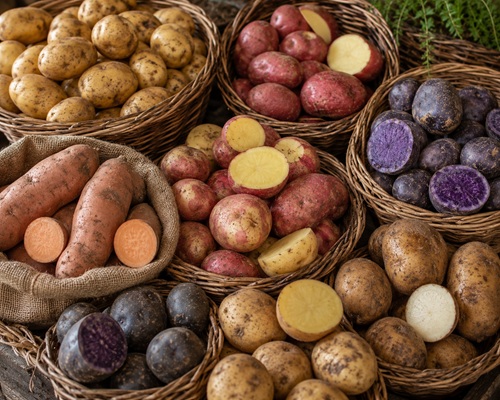
This is one table I think every reader will appreciate.
| Variety | Best Use | Storage Life | Good for Towers | Difficulty |
|---|---|---|---|---|
| Russet | Baking, fries, mashed | Excellent | Very Good | Easy |
| Yukon Gold | Roasting, boiling, mashed | Good | Good | Easy |
| Red Potatoes | Salads, roasting | Moderate | Moderate | Easy |
| Fingerlings | Gourmet cooking | Moderate | Fair | Moderate |
| Kennebec | All-purpose | Excellent | Very Good | Easy |
| Norland | Early harvest | Fair | Good | Easy |
This gives readers an at-a-glance comparison without overwhelming them.
Appendix B — Potato Growing Timeline
One of the biggest questions new gardeners ask is:
“What happens next?”
A simple timeline answers that.
| Stage | Approximate Time |
|---|---|
| Plant seed potatoes | Day 1 |
| First sprouts appear | 2–4 weeks |
| Begin adding soil | When plants reach 6–8 inches |
| Continue layering | Throughout active growth |
| Plants flower | Mid-season |
| Foliage yellows | Late season |
| Harvest | After die-back |
| Cure | 1–2 weeks |
| Store | Several months |
Appendix C — Troubleshooting Guide
Instead of making readers search through the handbook.
| Problem | Possible Cause | Solution |
|---|---|---|
| Yellow leaves | Water stress or nutrient deficiency | Check moisture and fertility |
| Small potatoes | Too little sunlight or early harvest | Improve location and allow full maturity |
| Rotting potatoes | Poor drainage | Improve growing medium |
| Green potatoes | Light exposure | Hill properly and store in darkness |
| Plants wilt | Heat or lack of water | Deep watering |
| Few potatoes | Wrong variety or excessive nitrogen | Adjust next season |
Readers absolutely love troubleshooting tables.
Appendix D — Annual Potato Tower Checklist
Every spring:
✓ Inspect tower
✓ Repair mesh
✓ Add fresh compost
✓ Order seed potatoes
✓ Review notes
✓ Prepare irrigation
✓ Build growing mix
✓ Plant
Summer:
✓ Water
✓ Watch for insects
✓ Add soil
✓ Record growth
Fall:
✓ Harvest
✓ Cure
✓ Store
✓ Clean tower
✓ Update journal
Winter:
✓ Review harvest
✓ Order seed
✓ Improve plans
Appendix E — Estimated Yield
Many readers will ask:
“How many potatoes should I expect?”
Rather than making unrealistic promises:
| Tower Size | Estimated Yield* |
|---|---|
| Small | 10–20 lbs |
| Medium | 20–35 lbs |
| Large | 30–50+ lbs |
*Actual harvests vary depending on potato variety, soil quality, weather, watering practices, growing conditions, and overall plant health.
Potato Tower Quick Facts
- Potato towers save space.
- They do not magically multiply yields.
- Good soil matters more than tower height.
- Certified seed potatoes usually outperform grocery store potatoes.
- Water consistently.
- Harvest patiently.
- Cure before storage.
- Store in darkness.
- Keep records.
- Improve every season.
Final Preparedness Challenge
Knowledge only becomes preparedness when it’s practiced.
During the next growing season:
Build one potato tower.
Take weekly photographs.
Keep a simple notebook.
Compare your harvest with next year’s.
Share your experience with another gardener.
Teach someone else what you’ve learned.
Preparedness grows when knowledge is shared.
© Prepping Communities. This content is for informational purposes only and not professional advice. Use at your own risk.
Terms | Privacy | Guidelines