

A Practical Preparedness Handbook
Why Learn This Skill?
When someone in the family develops a cough or congestion, most people head to the pharmacy and buy a jar of vapor rub without giving much thought to what’s inside it.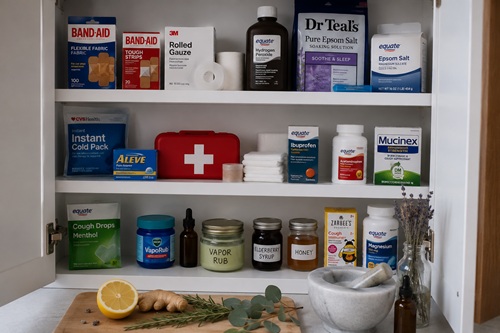
Preppers tend to think a little differently.
Rather than depending entirely on commercial products, they look for practical skills that allow them to make useful household items from ingredients they already understand and keep on hand. Homemade vapor rub is one of those skills.
Learning to make your own vapor rub isn’t about replacing modern medicine. It’s about increasing self-reliance and giving yourself another useful option during temporary shortages, severe weather, extended power outages, or other emergencies when stores may be closed or supplies unavailable.
Many of the ingredients used in homemade vapor rub have long shelf lives, serve multiple purposes, and can be used in other preparedness projects, making them valuable additions to a well-rounded home supply.
Like many preparedness skills, this one is inexpensive to learn, simple to practice, and becomes easier every time you do it.
What You’ll Learn
By the end of this handbook you’ll know how to:
- Understand how vapor rub works.
- Select ingredients that fit your needs.
- Choose appropriate carrier oils and waxes.
- Safely work with essential oils.
- Make your first batch of homemade vapor rub.
- Store it for maximum shelf life.
- Recognize common mistakes.
- Build a small reserve for your preparedness supplies.
The goal isn’t simply to follow a recipe.
The goal is to understand the process well enough that you can confidently make your own batches whenever you need them.
What Vapor Rub Does – and Doesn’t Do
Before making your first batch, it’s important to understand what vapor rub is designed to do.
Many people mistakenly believe vapor rub cures colds, influenza, sinus infections, or other respiratory illnesses.
It doesn’t.
Instead, vapor rub is a comfort product.
When applied to the chest, neck, or back, the aromatic compounds released by essential oils create cooling sensations that many people associate with easier breathing. The familiar aroma may also promote relaxation, particularly before bedtime, while the massage involved in applying the rub can provide additional comfort to tired muscles.
These effects don’t eliminate viruses or cure infections.
They simply help many people feel more comfortable while their bodies recover naturally.
Understanding this distinction helps establish realistic expectations and encourages the appropriate use of homemade remedies.
Preparedness Perspective
Preparedness isn’t about replacing doctors, hospitals, or prescription medications.
It’s about developing useful household skills before they’re needed.
Knowing how to make products like vapor rub increases your family’s self-reliance, reduces dependence on commercial supply chains, and allows you to adapt when normal shopping isn’t an option.
For many preppers, that’s every bit as valuable as storing food or water.
Before You Continue
Now that you understand what vapor rub is designed to do, the next step is learning why each ingredient is included.
Every ingredient serves a purpose. Some provide the familiar cooling sensation, others help carry the essential oils safely onto the skin, while still others determine the texture, shelf life, and stability of the finished product.
Understanding the ingredients is the foundation of making a safe and effective homemade vapor rub.
Understanding the Ingredients
Every ingredient in a homemade vapor rub serves a specific purpose. Some create the familiar cooling sensation that many people associate with easier breathing. Others give the rub its smooth texture, help protect the skin, or improve its shelf life.
Understanding why each ingredient is included allows you to make informed decisions if you ever need to substitute ingredients or adjust the recipe to suit your family’s preferences.
Rather than memorizing a recipe, learn what each ingredient contributes to the finished product.
That’s a preparedness skill you’ll use for years.
Carrier Oils: The Foundation
Carrier oils make up the majority of the vapor rub. Their job is to dilute the essential oils so they can be applied safely to the skin while also creating a smooth, spreadable consistency.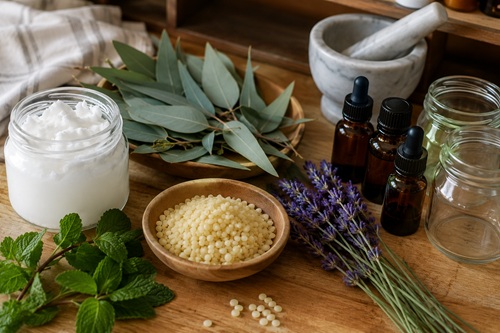
Without a carrier oil, essential oils may be too concentrated for direct application.
Several carrier oils work well.
Coconut Oil
Coconut oil is one of the most popular choices because it naturally solidifies at cooler room temperatures while becoming softer as it warms against the skin.
It spreads easily, has a long shelf life when stored properly, and is already found in many preparedness pantries because of its versatility.
Many people also appreciate that refined coconut oil has very little odor, allowing the essential oils to become the dominant scent.
For most homemade vapor rub recipes, coconut oil is an excellent starting point.
Olive Oil
Olive oil creates a softer vapor rub that remains spreadable even in cooler temperatures.
It’s widely available, inexpensive, and stores well when protected from heat and light.
If you use olive oil, you’ll generally need a little more beeswax than you would with coconut oil to achieve the same consistency.
Many people choose olive oil simply because they always have it in their kitchen.
Other Carrier Oils
Several other oils can also be used, including:
- Sweet almond oil
- Jojoba oil
- Grapeseed oil
- Apricot kernel oil
Each has slightly different properties, but all perform the same basic function of safely diluting essential oils.
For preparedness purposes, it usually makes the most sense to choose a carrier oil you already store and use regularly.
Beeswax: The Thickener
Without beeswax, your vapor rub would remain little more than scented oil.
Beeswax gives the finished product its familiar semi-solid texture, allowing it to stay in the jar while still being easy to scoop out with your fingers.
It also helps stabilize the mixture and provides a light protective barrier on the skin.
Beeswax pellets are especially convenient because they melt quickly and are easy to measure.
If you’re using solid blocks of beeswax, simply grate or shave the amount needed before melting.
Can You Substitute Beeswax?
Yes.
Some people choose plant-based waxes such as candelilla wax or soy wax.
These alternatives work well, although they often require different amounts because they produce firmer textures than beeswax.
Whenever substituting waxes, make a small test batch first.
Small adjustments are much easier than trying to correct a large batch later.
Essential Oils: The Active Aromatics
Essential oils provide the characteristic aroma that makes vapor rub recognizable.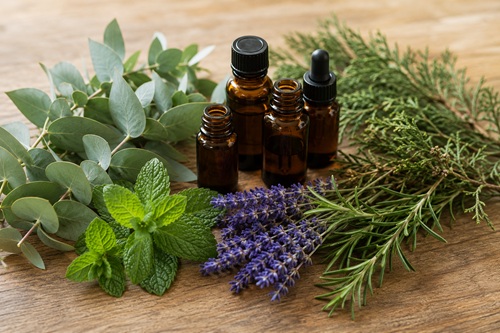
While each oil has unique properties, they all serve the same general purpose—creating aromatic vapors that many people find soothing and refreshing during periods of congestion.
Only a few drops are needed.
More is not necessarily better.
In fact, excessive amounts can increase the likelihood of skin irritation without improving effectiveness.
Eucalyptus Essential Oil
Eucalyptus is probably the scent most people immediately associate with vapor rub.
Its clean, cooling aroma has been used in respiratory preparations for generations.
Many people enjoy eucalyptus because it creates a fresh sensation that may help them feel like breathing is easier, particularly when experiencing temporary congestion.
For many homemade recipes, eucalyptus forms the primary fragrance.
Peppermint Essential Oil
Peppermint contributes the familiar cooling sensation associated with many commercial vapor rubs.
Its naturally high menthol content produces a refreshing feeling on the skin and complements eucalyptus extremely well.
Because peppermint is highly concentrated, only a small amount is required.
Lavender Essential Oil
Lavender doesn’t produce the cooling sensation of peppermint or eucalyptus.
Instead, it’s often included because many people find its aroma calming and relaxing.
Some families prefer adding a small amount of lavender to nighttime vapor rubs intended for bedtime use.
Cedarwood Essential Oil
Cedarwood provides a warm, woodsy aroma that blends well with other essential oils.
Although it receives less attention than eucalyptus or peppermint, many people enjoy its grounding scent and include it to create a more balanced fragrance.
Rosemary Essential Oil
Rosemary adds another fresh herbal note to the blend.
Because it has a stronger aroma than many other oils, it’s usually used sparingly as part of a balanced mixture rather than as the dominant scent.
Less Is Often Better
One of the biggest misconceptions about essential oils is that adding more automatically produces a better vapor rub.
It doesn’t.
A well-balanced blend with moderate amounts of essential oils often produces a more pleasant aroma while reducing the chance of skin irritation.
Preparedness is about consistency, not excess.
Prepper Tip
Purchase essential oils from reputable suppliers and store them in their original dark glass bottles.
Keep them tightly sealed in a cool, dark location away from direct sunlight.
Properly stored essential oils generally remain usable much longer than bottles left exposed to heat or bright light.
Common Beginner Mistakes
A common mistake is purchasing dozens of different essential oils before learning how to use them.
Instead, begin with two or three versatile oils such as eucalyptus, peppermint, and lavender.
Another mistake is assuming that if a little is good, more must be better.
Essential oils are highly concentrated plant extracts. Following recommended dilution guidelines produces a product that is both pleasant and safer to use.
Finally, don’t overlook the quality of your carrier oil and beeswax. A vapor rub is only as good as the ingredients used to make it.
Before You Continue
Now that you understand the purpose of each ingredient, it’s time to gather your equipment and prepare your workspace.
Making homemade vapor rub requires very little specialized equipment, but organizing everything before you begin makes the process safer, cleaner, and much more enjoyable.
Gather Your Equipment
One of the easiest ways to make homemade vapor rub successfully is to prepare your workspace before you begin. The ingredients melt quickly once heated, so having everything organized beforehand makes the process smoother, safer, and much less stressful.
Fortunately, you don’t need specialized equipment. Most of what you’ll use is probably already in your kitchen.
Basic Equipment
Gather the following items before you begin: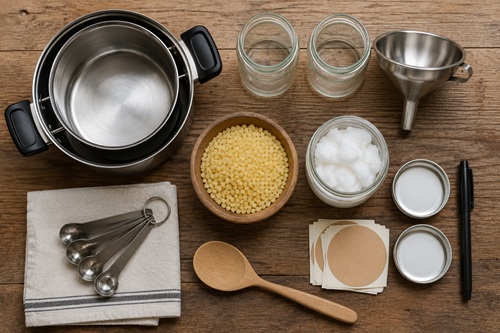
- Small saucepan or double boiler
- Heat-resistant glass measuring cup or bowl
- Wooden spoon or silicone spatula
- Measuring spoons
- Small digital kitchen scale (recommended for accuracy)
- Clean glass jars with tight-fitting lids
- Funnel (optional but helpful)
- Labels or masking tape
- Permanent marker
If you don’t own a double boiler, don’t worry. A heat-resistant glass bowl placed over a saucepan containing gently simmering water works just as well.
Avoid placing beeswax directly over high heat, as it can overheat quickly.
Choosing the Right Container
Small glass jars work best for homemade vapor rub.
Containers holding between 2 and 4 ounces (60–120 ml) are usually ideal because they’re easy to carry, simple to store, and reduce the amount of product repeatedly exposed to air after opening.
Wide-mouth jars make it much easier to scoop out the finished rub with your fingers.
Plastic containers may also work, but glass is generally preferred because it doesn’t absorb essential oil aromas and is easier to clean for future batches.
Prepare Your Workspace
Choose a clean, uncluttered work surface with good lighting.
Before opening any ingredients:
- Wash your hands thoroughly.
- Clean all utensils and containers.
- Make sure jars are completely dry.
- Keep pets and small children away from the work area.
- Lay out all ingredients in the order they’ll be used.
Taking five minutes to prepare now helps prevent mistakes later.
Measure Before Heating
One of the most common beginner mistakes is trying to measure ingredients while the beeswax is already melting.
Instead, measure everything first.
Have your carrier oil, beeswax, and essential oils ready before turning on the stove.
Once the wax has melted, you’ll be able to concentrate on mixing rather than searching for ingredients.
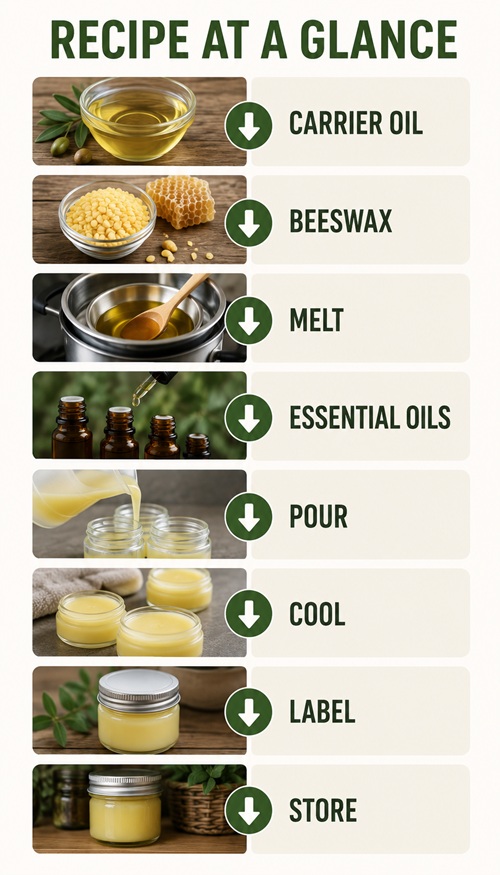
Your First Recipe
This recipe produces approximately one small jar of vapor rub.
It’s intentionally simple and makes an excellent first batch.
Ingredients
- ½ cup refined coconut oil
- 2 tablespoons beeswax pellets
- 15 drops eucalyptus essential oil
- 10 drops peppermint essential oil
- 5 drops lavender essential oil (optional)
This blend creates a balanced aroma that’s refreshing without being overpowering.
Once you’ve made several successful batches, you can begin adjusting the fragrance to suit your own preferences.
Step 1 — Melt the Base
Fill the bottom of your double boiler or saucepan with about one inch (2.5 cm) of water and bring it to a gentle simmer.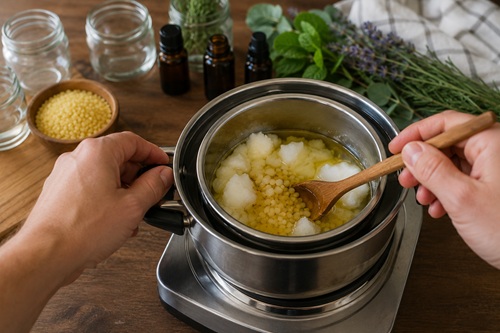
Place the coconut oil and beeswax into the upper portion of the double boiler or into your heat-resistant bowl.
Allow both ingredients to melt slowly.
Avoid boiling the water vigorously or applying direct high heat.
Gentle heat protects both the wax and the carrier oil while making the mixture easier to control.
Step 2 — Stir Until Smooth
As the beeswax melts, stir occasionally with your spoon or spatula.
Continue stirring until the mixture becomes completely clear.
There should be no visible pieces of beeswax remaining.
This usually takes only a few minutes.
Resist the temptation to increase the heat.
Patience produces a smoother finished product.
Step 3 — Remove From Heat
Once everything has melted completely, remove the bowl from the heat.
Allow the mixture to cool for approximately one to two minutes.
This short cooling period is important.
If essential oils are added while the mixture is extremely hot, some of their aromatic compounds may evaporate more quickly.
Step 4 — Add the Essential Oils
Add the eucalyptus, peppermint, and optional lavender oils.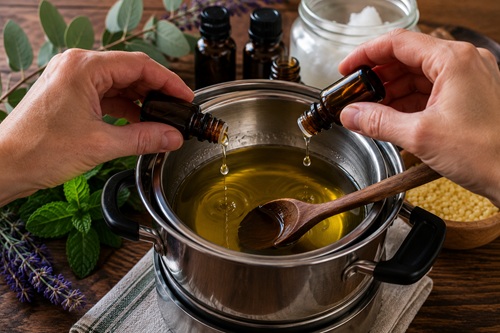
Stir gently for about thirty seconds until the oils are evenly distributed throughout the mixture.
At this point, the pleasant aroma should become immediately noticeable.
Step 5 — Pour Into Containers
Carefully pour the warm mixture into your prepared glass jars.
If necessary, use a small funnel to avoid spills.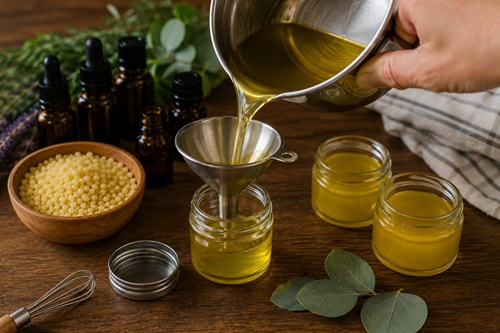
Leave a small amount of space below the rim to allow for expansion while cooling.
Avoid moving the jars until the mixture has completely solidified.
Step 6 — Allow to Cool Naturally
Allow the vapor rub to cool at room temperature.
Avoid placing it in the refrigerator to speed up the process.
Slow cooling generally produces a smoother, more even texture.
Depending on room temperature, complete cooling usually takes one to two hours.
Check Your Work
When fully cooled, your vapor rub should:
- Have a smooth, even surface.
- Feel firm but easy to scoop with a fingertip.
- Spread easily onto the skin.
- Have a pleasant, balanced aroma.
- Show no separation between the oils and wax.
If your first batch isn’t perfect, don’t be discouraged.
Small adjustments are completely normal and are part of learning the process.
Prepper Tip
Make two small jars instead of one large jar.
Keep one in your home medicine cabinet and place the second in your emergency supplies, bug-out bag, or vehicle first-aid kit.
Rotating several small containers is often more practical than repeatedly opening one large jar.
Common Beginner Mistakes
One of the biggest mistakes is overheating the beeswax. Excessive heat isn’t necessary and may reduce the quality of the finished product.
Another common mistake is adding too many essential oils. A balanced blend usually produces a more pleasant aroma while reducing the chance of skin irritation.
Finally, don’t judge the consistency until the mixture has cooled completely. Many first-time makers think the mixture is too thin while it’s still warm, only to discover it firms up perfectly once cooled.
Before You Continue
Now that you’ve successfully made your first batch, the next step is learning how to customize your vapor rub.
Different essential oil combinations create different aromas, and small adjustments to the amount of beeswax or carrier oil can change the consistency from a soft balm to a firmer salve.
Understanding how to make these adjustments will allow you to confidently create recipes that suit your family’s preferences while maintaining safe dilution levels.
Customizing Your Vapor Rub
Once you’ve successfully made your first batch, you may want to experiment with different aromas, textures, or consistencies. Fortunately, homemade vapor rub is very forgiving. Small adjustments allow you to tailor the finished product to your personal preferences without completely changing the recipe.
The key is to make only one change at a time.
If you adjust several ingredients at once, it becomes difficult to know which change affected the final product.
Small test batches are your best teacher.
Adjusting the Consistency
One of the first things you’ll notice is that homemade vapor rub can be made softer or firmer depending on how you plan to use it.
The consistency is controlled almost entirely by the ratio of carrier oil to beeswax.
Softer Vapor Rub
If you prefer a creamier rub that’s easy to spread, reduce the amount of beeswax slightly.
A softer blend is ideal for:
- Everyday use
- Massage
- Larger application areas
- Cooler climates where oils naturally become firmer
Firmer Vapor Rub
If you’d like a firmer balm that travels well in a backpack or vehicle, increase the beeswax slightly.
A firmer blend is useful for:
- Bug-out bags
- Vehicle emergency kits
- Warm climates
- Pocket-sized containers
Remember that small adjustments often make a noticeable difference.
Adding only one additional teaspoon of beeswax can significantly change the final consistency.
Choosing Your Aroma
The scent of your vapor rub comes almost entirely from the essential oils.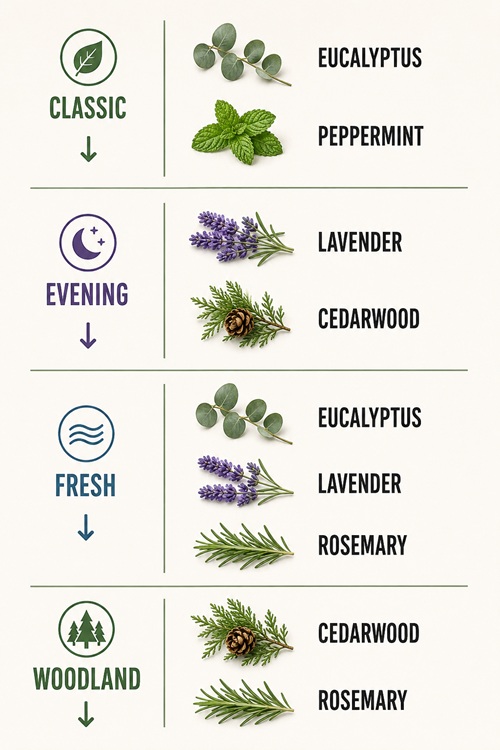
Different combinations create completely different experiences.
Some people enjoy a strong, cooling aroma while others prefer something softer and more relaxing.
Experiment gradually until you find a blend you enjoy.
Classic Blend
A familiar, refreshing combination.
- Eucalyptus
- Peppermint
This is the closest in character to many commercial vapor rubs.
Evening Blend
Designed for bedtime routines.
- Lavender
- Cedarwood
- Small amount of eucalyptus
Many people find this combination less intense while still providing a pleasant cooling aroma.
Woodland Blend
A warmer, more earthy fragrance.
- Cedarwood
- Rosemary
- Small amount of eucalyptus
This blend is popular among people who prefer less menthol-like scents.
Fresh Herbal Blend
A lighter, cleaner fragrance.
- Eucalyptus
- Lavender
- Rosemary
Ideal for those who want something fresh without being overpowering.
Less Is Usually Better
One of the most common misconceptions is that adding more essential oil creates a better vapor rub.
In reality, excessive amounts often produce an overpowering scent and increase the likelihood of skin irritation.
A balanced blend usually provides a much more pleasant experience.
Remember…
You can always add a few more drops to your next batch.
You cannot remove them once they’re mixed.
Keep Good Notes
Every time you make a batch, write down:
- Date made
- Recipe used
- Essential oils included
- Number of drops
- Consistency
- What you liked
- What you’d change
After making several batches, you’ll quickly discover the combination your family prefers.
This notebook becomes your own personal recipe collection.
Seasonal Variations
Some people enjoy making slightly different vapor rubs throughout the year.
For example:
Winter
Slightly stronger cooling aromas.
Spring
Lighter herbal blends.
Fall
Warmer woodsy fragrances.
While these changes are largely based on personal preference, they can make the process more enjoyable and encourage regular rotation of your ingredients.
Prepper Tip
Don’t make large batches until you’ve perfected your recipe.
Small batches cost very little to produce and allow you to experiment without wasting expensive essential oils.
Once you’ve found a blend you really enjoy, record the recipe and make larger quantities with confidence.
Common Beginner Mistakes
One of the biggest mistakes is changing everything at once.
Instead, adjust only one ingredient between batches so you can clearly see how it affects the final product.
Another common mistake is chasing stronger aromas by adding excessive amounts of essential oils. A pleasant, balanced fragrance is usually much more enjoyable than one that’s overwhelmingly strong.
Finally, don’t forget to label every jar. After making several batches, you’ll appreciate knowing exactly which recipe is inside each container.
Before You Continue
Now that you’ve learned how to customize your vapor rub, it’s time to learn how to store it properly.
Proper storage protects the quality of the carrier oils, preserves the fragrance of the essential oils, and helps ensure each jar remains ready whenever you need it.
Storing Homemade Vapor Rub
Making your own vapor rub is only half the process. Proper storage helps preserve its texture, aroma, and overall quality so it’s ready whenever you need it.
Fortunately, homemade vapor rub stores well when protected from heat, light, moisture, and contamination. Developing a few simple storage habits will help your batches remain fresh while reducing waste.
Like many preparedness skills, good storage begins with good organization.
Choose the Right Containers
Glass jars with tight-fitting lids are the best choice for long-term storage.
Glass doesn’t absorb essential oil aromas, is easy to clean, and protects the contents better than many plastic containers.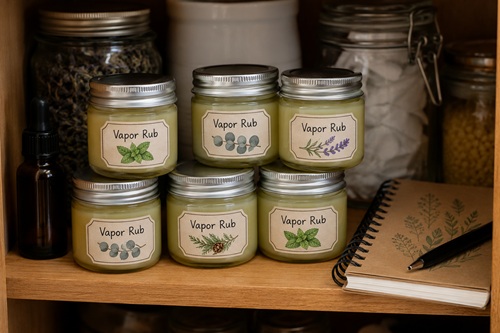
Small containers are usually more practical than one large jar.
Each time a jar is opened, fresh air, moisture, and bacteria from your fingers are introduced into the product. By dividing a batch into several smaller containers, you only expose one jar at a time while the others remain sealed.
Containers between 2 and 4 ounces (60–120 ml) are ideal for most households.
Label Every Jar
One of the easiest preparedness habits you can develop is labeling everything you make.
Each jar should include:
- Date prepared
- Batch number (optional)
- Essential oil blend
- Any special notes (nighttime blend, extra beeswax, child-safe blend, etc.)
After several months, you’ll appreciate knowing exactly what’s inside each container without opening it.
Good labeling also makes it much easier to duplicate successful recipes in the future.
Protect It from Heat and Light
Essential oils gradually lose their aroma when exposed to excessive heat or direct sunlight.
Store your vapor rub in:
- A medicine cabinet
- A bedroom drawer
- A cool pantry
- A cabinet away from the stove
- A first-aid cabinet
Avoid storing jars:
- On sunny windowsills
- Near heaters
- Inside hot vehicles for long periods
- Beside ovens or wood stoves
Cool, stable temperatures help preserve the finished product much longer.
Keep It Clean
One of the simplest ways to extend the life of homemade vapor rub is to keep contamination out of the jar.
Always use clean, dry fingers or, even better, a small cosmetic spatula or spoon when removing the product.
Avoid allowing water to enter the jar, as excess moisture may shorten its useful life.
If the product becomes contaminated or develops an unusual appearance or odor, it’s better to make a fresh batch than risk using an old one.
Build a Small Preparedness Supply
Rather than making one very large batch every few years, consider making several small batches throughout the year.
This approach provides several advantages:
- Fresher product
- Easier rotation
- Opportunities to improve recipes
- Less waste if a batch becomes damaged
- Supplies available in multiple locations
Many preppers keep jars in:
- Home medicine cabinet
- First-aid kit
- Vehicle emergency kit
- Bug-out bag
- Cabin or vacation property
Distributing your supplies means you’re less dependent on a single location.
Understanding Shelf Life
Homemade vapor rub doesn’t last forever.
The carrier oils, beeswax, and essential oils all age naturally over time.
When stored properly in clean, sealed containers away from heat and sunlight, most homemade vapor rub remains in good condition for approximately six to twelve months, although this can vary depending on the specific ingredients used.
Rather than relying only on the calendar, inspect the product periodically.
If you notice significant changes in smell, texture, color, or consistency, prepare a fresh batch.
The ingredients are inexpensive, and replacing an older batch is often the simplest solution.
Rotate Your Supply
Rotation keeps your preparedness supplies dependable.
Whenever you make a new batch:
- Place the new jars behind older ones.
- Use the oldest batch first.
- Replace empty jars during your next production session.
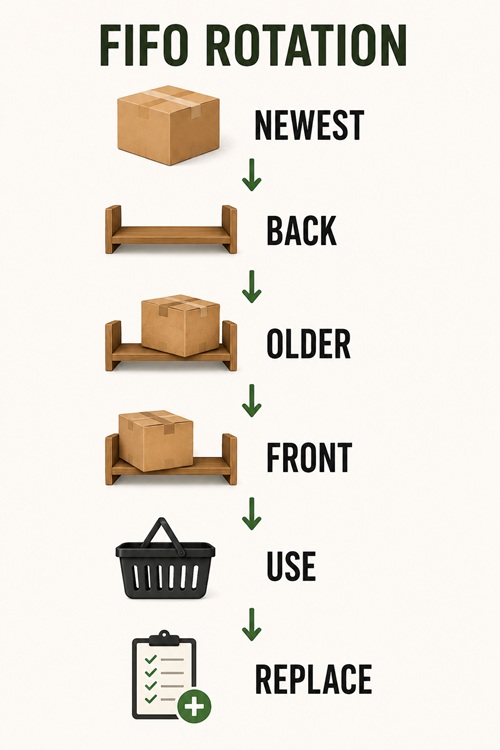
This first-in, first-out (FIFO) system works just as well for homemade products as it does for canned food or freezer supplies.
Once it becomes a habit, you’ll rarely have products sitting forgotten for years.
Prepper Tip
Keep one unopened jar sealed for emergencies.
Use another jar for everyday household use.
This simple system keeps your emergency supply protected while still allowing you to enjoy and regularly rotate your homemade vapor rub.
Common Beginner Mistakes
One of the biggest mistakes is making an excessively large batch the first time.
Small batches are easier to use, easier to rotate, and much less wasteful if you later decide to adjust the recipe.
Another common mistake is forgetting to label jars.
Six months from now, you probably won’t remember which blend contains extra peppermint or which batch was made last winter.
Finally, avoid storing homemade products where temperatures fluctuate dramatically. Consistent storage conditions help preserve both the aroma and the texture of the finished rub.
Before You Continue
Now that you’ve learned how to make, customize, and store homemade vapor rub, it’s important to understand when it should—and should not—be used.
Although vapor rub is a comforting household product, it isn’t appropriate for every situation or every individual.
The next chapter covers important safety considerations, age recommendations, potential sensitivities, and situations where professional medical advice should always take priority.
Safety Considerations
Homemade vapor rub is designed to provide comfort during periods of congestion by creating a cooling, aromatic sensation on the skin. Like any homemade personal care product, however, it should be used thoughtfully and with appropriate precautions.
Understanding when to use vapor rub—and when not to use it—is just as important as knowing how to make it.
Preparedness is about making informed decisions, not taking unnecessary risks.
Perform a Patch Test First
Even natural ingredients can cause skin irritation in some people.
Before using a newly made batch of vapor rub, apply a very small amount to the inside of your forearm or wrist.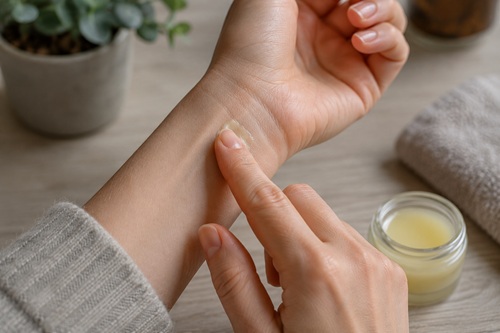
Wait approximately 24 hours.
If redness, itching, burning, swelling, or another unexpected reaction develops, discontinue use and consider adjusting your recipe or consulting a healthcare professional before trying again.
Most people experience no problems, but performing a simple patch test is an easy precaution.
Use Essential Oils Carefully
Essential oils are highly concentrated plant extracts.
Only a few drops are needed to produce a pleasant aroma.
Adding excessive amounts does not make the vapor rub more effective and may increase the chance of skin irritation or sensitivity.
Always follow recommended dilution guidelines and avoid applying undiluted essential oils directly to the skin.
Preparedness favors careful use over excessive use.
Keep Away From Eyes and Mucous Membranes
Vapor rub should only be applied to intact skin.
Avoid contact with:
- Eyes
- Eyelids
- Inside the nose
- Mouth
- Broken skin
- Cuts
- Burns
- Rashes
If accidental contact occurs, rinse the affected area thoroughly according to the first-aid guidance for the product or ingredient involved. If irritation persists or is severe, seek appropriate medical advice.
Consider Age Carefully
Young children are more sensitive to essential oils than adults.
Some essential oils commonly used in vapor rubs, including peppermint and eucalyptus, may not be appropriate for infants or very young children.
If you’re making vapor rub for children, research age-appropriate formulations carefully and consult a qualified healthcare professional if you have questions.
For many families, the safest approach is to prepare separate adult and child formulations rather than assuming one recipe fits everyone.
Pregnancy and Medical Conditions
People who are pregnant, nursing, have asthma, epilepsy, chronic respiratory conditions, or known sensitivities to essential oils should consult their healthcare provider before using products containing concentrated essential oils.
Natural does not automatically mean appropriate for every individual or every medical condition.
Store Safely
Although homemade vapor rub often smells pleasant, it should never be treated as food.
Store jars:
- Out of reach of young children.
- Away from pets.
- Clearly labeled.
- Tightly sealed.
Accidental ingestion of essential oils can be dangerous.
Preparedness includes storing homemade products responsibly.
Know When Vapor Rub Isn’t Enough
Homemade vapor rub is intended to provide temporary comfort.
It is not intended to diagnose, treat, cure, or prevent disease.
Seek appropriate medical attention if symptoms become severe, worsen unexpectedly, or include warning signs such as:
- Difficulty breathing
- Chest pain
- Persistent high fever
- Confusion
- Blue lips or fingertips
- Symptoms that continue to worsen despite appropriate care
Learning basic home remedies is valuable.
Knowing when professional medical care is needed is equally important.
Build a Well-Rounded Medicine Cabinet
Vapor rub is only one small part of a home preparedness medical kit.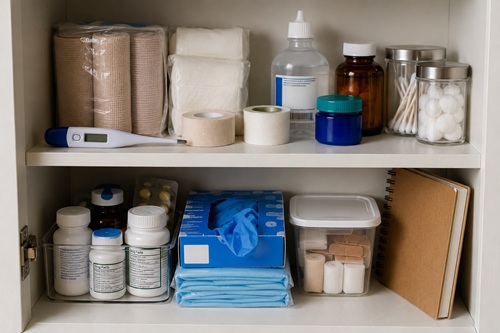
A practical home medicine cabinet may also include items such as:
- Digital thermometer
- Adhesive bandages
- Sterile gauze
- Medical tape
- Saline solution
- Acetaminophen or ibuprofen (used according to label directions)
- Antihistamines
- Hand sanitizer
- Disposable gloves
- Basic first-aid manual
Preparedness is strongest when multiple resources work together.
Prepper Tip
Write the ingredients used in every batch directly on the label.
If a family member develops a sensitivity or allergy later, you’ll know exactly which essential oils were included without guessing.
Good labeling improves both organization and safety.
Common Beginner Mistakes
One of the biggest mistakes is assuming that if a product is homemade, it’s automatically safe for everyone.
Individual sensitivities vary, and even commonly used ingredients may not be appropriate for every person.
Another common mistake is applying vapor rub too frequently or using excessive amounts. A thin layer is usually sufficient.
Finally, don’t rely on homemade remedies when symptoms suggest a more serious medical condition. Preparedness includes recognizing the limits of home care and seeking professional medical attention when necessary.
Before You Continue
You’ve now learned how to select ingredients, prepare homemade vapor rub, customize recipes, store your finished product, and use it responsibly.
The final chapter brings everything together by exploring practical preparedness applications, reviewing the most important lessons from the handbook, and providing a simple action plan you can use to begin building your own homemade vapor rub supplies.
Preparedness Applications
One of the greatest advantages of making your own vapor rub is that it becomes more than a simple home remedy—it becomes another practical skill in your preparedness toolbox.
Unlike many commercial products that are purchased, used, and forgotten, homemade vapor rub teaches techniques that can be repeated whenever ingredients are available. As you become more familiar with the process, you’ll gain confidence in selecting ingredients, adjusting recipes, and maintaining a small reserve for your household.
Preparedness is built one practical skill at a time.
Learning to make homemade vapor rub may seem like a small project, but it contributes to a much larger goal: becoming less dependent on commercial products while increasing your family’s ability to care for everyday needs.
Where Homemade Vapor Rub Fits Into Your Preparedness Plan
A well-prepared household doesn’t rely on a single product or solution.
Instead, it builds layers of preparedness.
Homemade vapor rub is one small part of a larger home wellness strategy that may also include:
- A well-stocked first-aid kit
- Thermometers and basic medical supplies
- Over-the-counter medications
- Prescription medications (when applicable)
- Herbal reference books
- Emergency contact information
- Hygiene supplies
- Clean drinking water
- Nutritious food
- Adequate rest
When viewed this way, vapor rub becomes another useful tool—not a replacement for sound medical care.
Practice Before You Need It
Like every preparedness skill, making vapor rub becomes easier with experience.
Don’t wait until someone in your household is sick before trying your first batch.
Practice now.
Learn how your ingredients behave.
Experiment with different consistencies.
Discover which aromas your family prefers.
Refine your process while there’s no pressure.
Confidence grows through practice, not theory.
Build a Small Rotation System
Many preparedness supplies are forgotten because they’re stored and never used.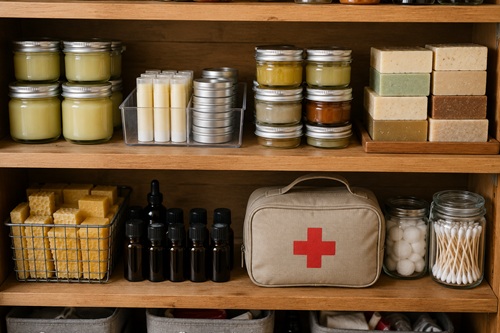
Avoid that mistake.
Instead:
- Make one or two small batches each year.
- Use them during normal cold and flu season.
- Replace older jars with freshly made batches.
- Keep notes about improvements you’d like to make.
This simple rotation keeps your supplies fresh while helping you maintain your skills.
Preparedness works best when it becomes part of everyday life.
Share the Skill
One of the most valuable preparedness resources isn’t equipment.
It’s knowledge.
Once you’re comfortable making homemade vapor rub, consider teaching a family member or close friend.
Skills shared throughout a family are far more resilient than skills held by only one person.
If someone else in your household knows how to prepare it, your preparedness becomes stronger.
Knowledge is one of the few preparedness resources that becomes more valuable the more it’s is shared.
Continue Building Your Skills
Homemade vapor rub is only one example of the many practical household products you can learn to make yourself.
As your preparedness journey continues, consider expanding your skills by learning to make:
- Herbal salves
- Lip balm
- Simple soaps
- Natural cleaning products
- Beeswax fire starters
- Herbal teas
- Infused oils
- Homemade candles
Each new skill increases your confidence while reducing dependence on commercial products.
Preparedness is a lifelong process of learning.
Key Takeaways
Throughout this handbook you’ve learned that homemade vapor rub is much more than a simple recipe.
You’ve explored how vapor rub works, learned the purpose of each ingredient, gathered the equipment needed to prepare it safely, and created your first batch step by step.
You’ve also learned how to customize recipes, adjust consistency, store finished jars properly, recognize common mistakes, and use homemade vapor rub responsibly as part of a well-rounded home preparedness plan.
Perhaps most importantly, you’ve seen that preparedness isn’t about replacing modern medicine.
It’s about learning practical household skills that increase self-reliance while complementing—not replacing—appropriate medical care.
Every new skill you learn strengthens your preparedness.
Every batch you make builds confidence.
Every lesson practiced today makes tomorrow’s challenges a little easier to face.
Your Next Steps
You don’t need to master everything at once.
Start small.
This week, choose one or two of the following:
- Purchase the basic ingredients.
- Assemble your equipment.
- Make your first small batch.
- Label and store your finished jars.
- Record your recipe in a notebook.
- Practice making a second batch using one small adjustment.
- Build a simple rotation system.
- Teach another family member what you’ve learned.
Small steps repeated consistently build lasting preparedness.
Final Thoughts
Preparedness is often associated with storing supplies, but supplies alone don’t create resilience.
Skills do.
Knowing how to make useful household products from simple ingredients gives you options when stores are closed, supply chains are disrupted, or everyday conveniences become temporarily unavailable.
Homemade vapor rub won’t solve every problem, but it represents something much larger.
It demonstrates a mindset of learning, practicing, improving, and becoming more capable over time.
That’s the heart of preparedness.
Understanding Essential Oil Safety
Essential oils are the heart of homemade vapor rub, but they deserve respect.
Unlike dried herbs or herbal teas, essential oils are highly concentrated plant extracts. Producing a single small bottle often requires large quantities of leaves, flowers, bark, or other plant material. That concentration is what gives essential oils their distinctive aromas, but it’s also why they should always be used carefully.
For homemade vapor rub, only a small number of drops are needed.
Adding more essential oil doesn’t necessarily make the rub more effective. Instead, excessive amounts may create an overpowering scent or increase the likelihood of skin irritation.
Preparedness is about using resources wisely, and that includes essential oils.
Buying Quality Ingredients
One advantage of making your own vapor rub is knowing exactly what’s inside it.
Whenever possible, purchase ingredients from reputable suppliers.
Look for:
- Pure carrier oils
- Pure beeswax
- Essential oils sold in dark glass bottles
- Clearly labeled products
- Fresh ingredients
Avoid products with vague ingredient lists or artificial fragrance oils unless they are specifically intended for cosmetic use.
Quality ingredients produce better results and often store longer when handled correctly.
Creating a Small Ingredient Inventory
Many of the ingredients used to make vapor rub are useful in other preparedness projects as well.
A modest supply might include:
| Ingredient | Other Uses |
|---|---|
| Coconut Oil | Salves, lip balm, soaps, skin care |
| Beeswax | Candles, fire starters, leather care, salves |
| Olive Oil | Cooking, infused oils, soaps |
| Eucalyptus Oil | Aromatherapy, cleaning blends |
| Peppermint Oil | Aromatherapy, insect deterrent blends |
| Lavender Oil | Linen sprays, soaps, relaxation blends |
This is one reason homemade products appeal to many preppers.
The same ingredients often support multiple projects.
Build Skills Before Supplies
Many people focus on collecting ingredients.
Experienced preppers focus on learning skills.
A person who understands the process can usually adapt if one ingredient becomes unavailable.
Someone who only memorizes recipes often struggles when substitutions become necessary.
Knowledge has one significant advantage over supplies.
It can’t expire.
Seasonal Checklist
Every autumn, before cold and flu season begins:
✓ Inspect stored ingredients.
✓ Replace old carrier oils if needed.
✓ Check essential oil bottles for damage.
✓ Make a fresh batch.
✓ Rotate older jars into everyday use.
✓ Update your recipe notes.
A yearly routine keeps your supplies fresh while reinforcing your skills.
Homemade Vapor Rub Quick Reference
| Task | Recommendation |
|---|---|
| Carrier Oil | Coconut oil works well for most batches |
| Thickener | Beeswax pellets are easiest to use |
| Primary Aroma | Eucalyptus |
| Cooling Aroma | Peppermint |
| Relaxing Aroma | Lavender |
| Container | 2–4 oz glass jars |
| Storage | Cool, dark location |
| Typical Shelf Life | Approximately 6–12 months |
| Rotation | First In, First Out (FIFO) |
| Batch Size | Small batches are easiest to manage |
Readers love quick-reference tables because they make it easy to refresh their memory without rereading the entire handbook.
Frequently Asked Questions
Can I double the recipe?
Yes.
Once you’ve successfully made a small batch, scaling the recipe is straightforward. Continue using the same ingredient ratios and mix thoroughly to ensure the essential oils are evenly distributed.
Why did my vapor rub become grainy?
Natural oils sometimes crystallize as they cool.
This is normal.
Gently remelting the mixture and allowing it to cool slowly often improves the texture.
Why is my vapor rub too hard?
The recipe probably contains slightly too much beeswax.
Reduce the beeswax a little in your next batch.
Why is it too soft?
The opposite.
Add a small amount of additional beeswax during your next batch.
Can I keep it in my vehicle?
Only if temperatures remain moderate.
Excessive summer heat may soften or melt the vapor rub, while extreme cold may make it unusually firm.
Can I freeze it?
Generally, freezing isn’t necessary.
A cool cupboard or medicine cabinet provides suitable storage for most households.
Final Preparedness Challenge
Knowledge only becomes a preparedness skill when you put it into practice.
Within the next month:
- Make one small batch.
- Label it.
- Use it when appropriate.
- Record what you’d improve.
- Make a second batch.
After two batches, you’ll understand the process far better than someone who has only read about it.
That’s the difference between collecting information and developing real preparedness skills.
© Prepping Communities. This content is for informational purposes only and not professional advice. Use at your own risk.
Terms | Privacy | Guidelines